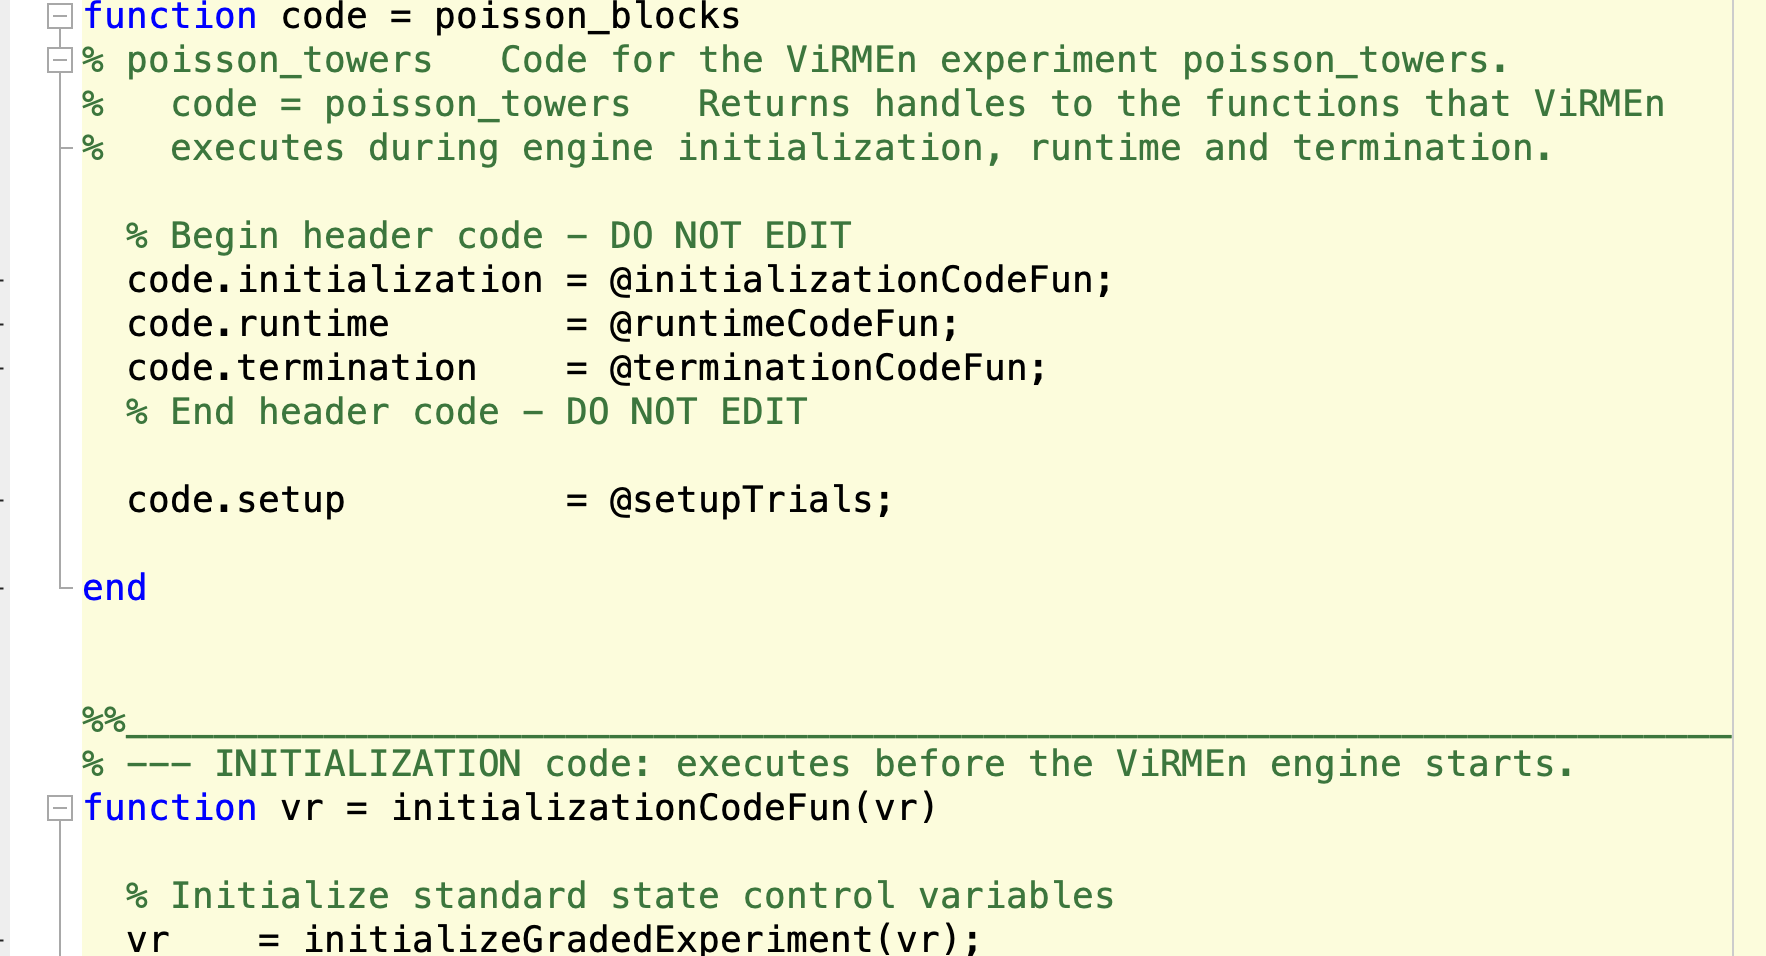
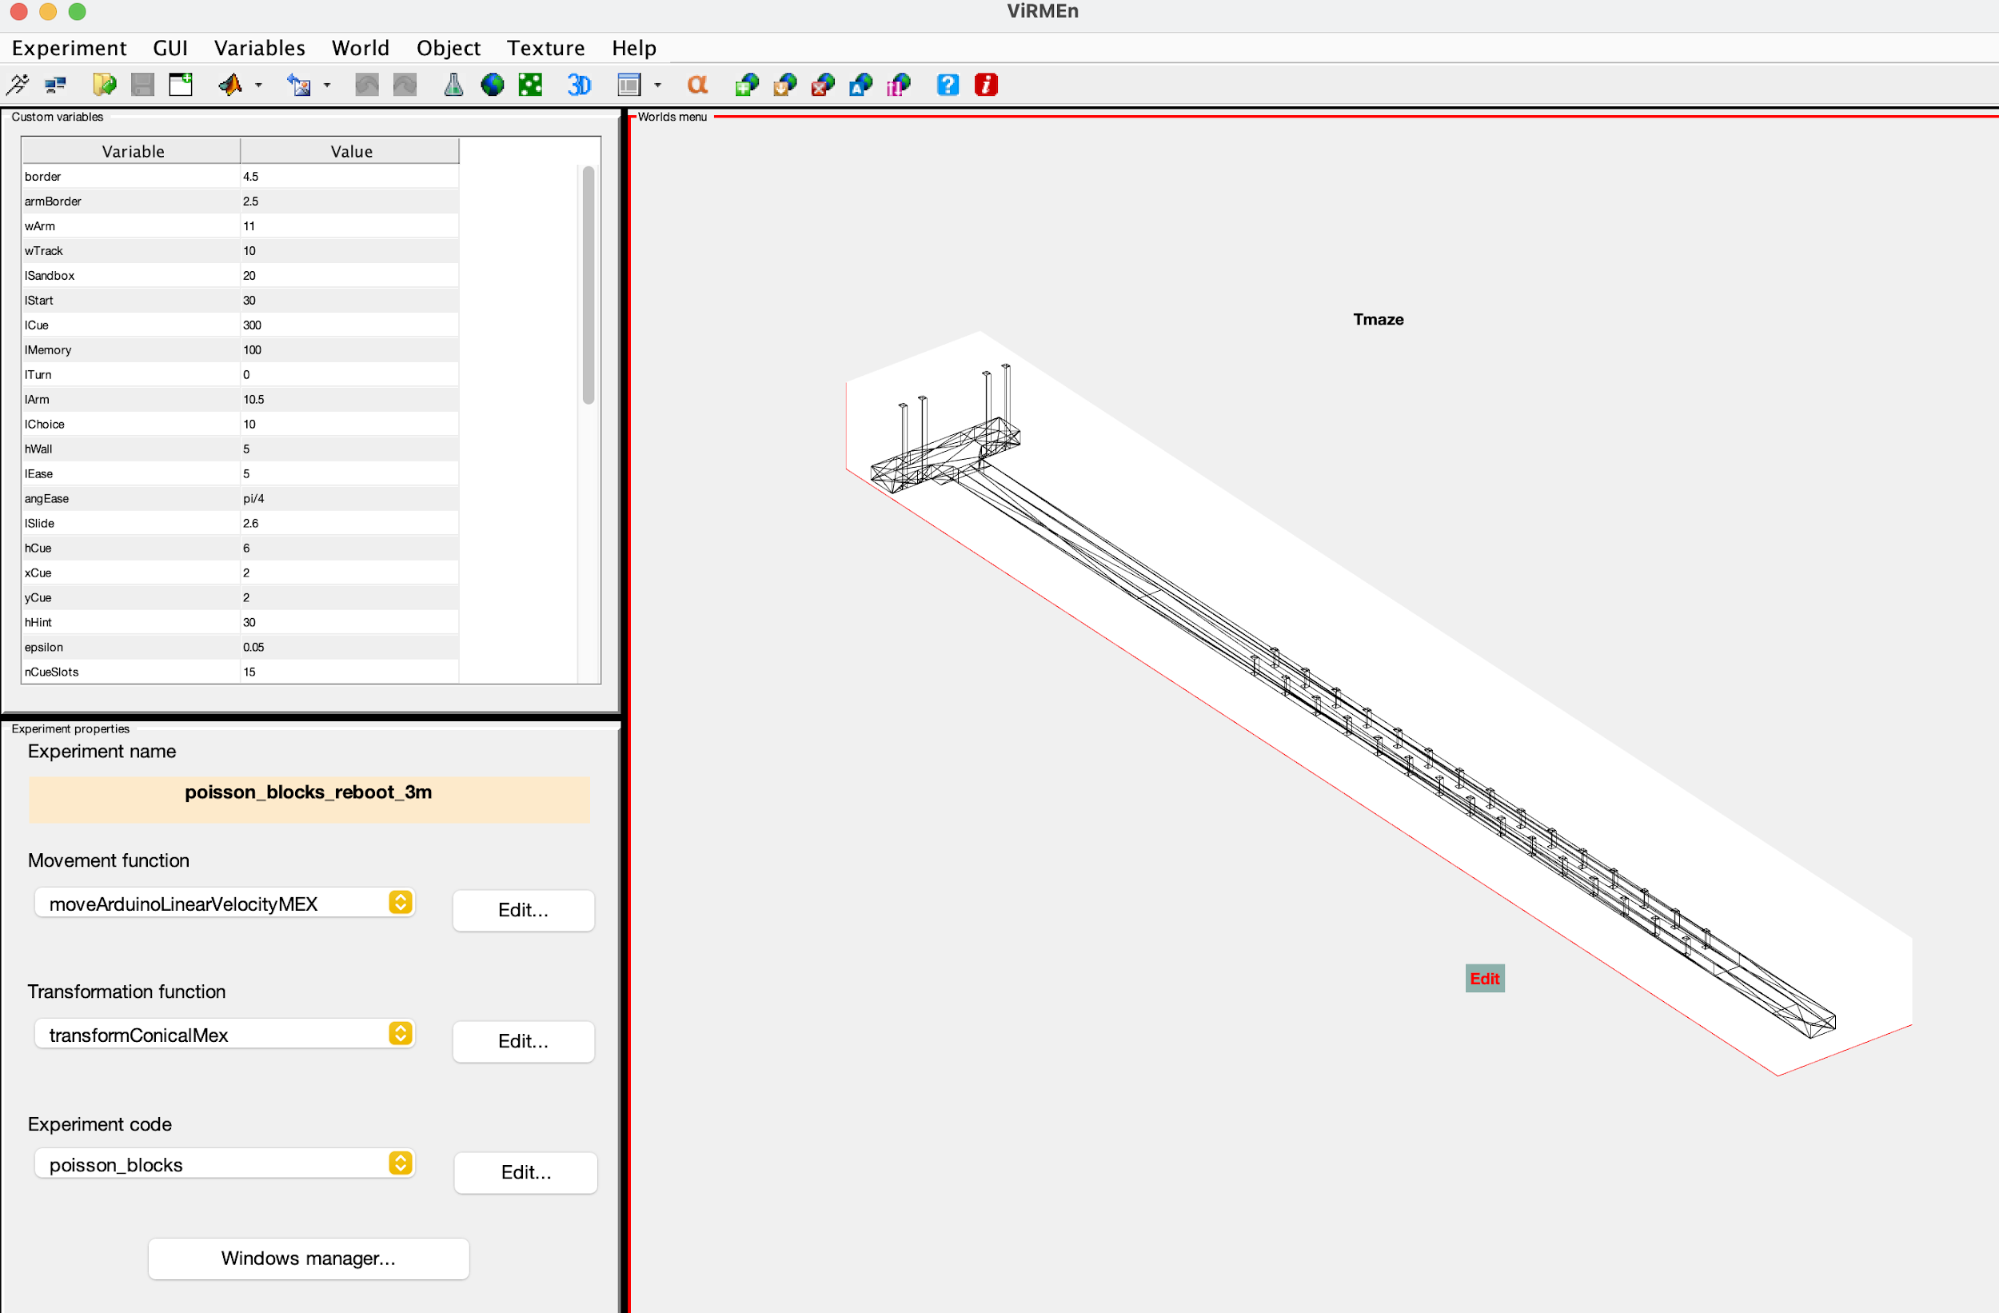
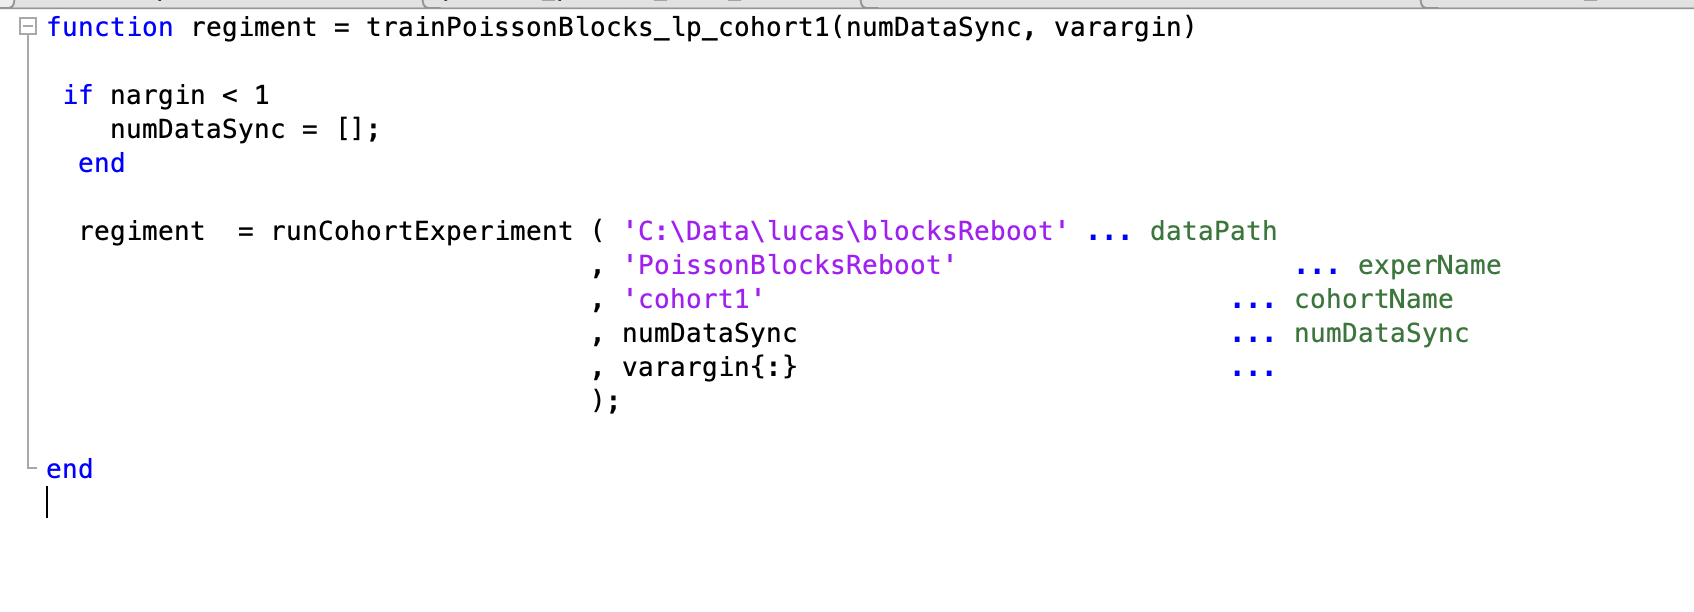
Controls stimulus presentation and trial/block progression. This code runs every frame; its general structure is a state machine that follows the trial schema.
For a detailed guide on how to modify it, see the ViRMEn Manual.
Original file: C:\Experiments\ViRMEn\experiments\poisson_blocks.m
Most common use:
Copy the existing experiment code file from the most similar task.
Rename the file to a descriptive name (e.g. "TaskName"_ExperimentCode.mat).
Parameters for a stimulus inherited when running the experiment (so stimulus parameters that change between mazes but are not defined by the stimuli themselves)
Cell array (see below for more details)
vr.inheritedVariables
Parameters for a maze inherited when running the experiment (so maze parameters that change between mazes but are not defined by the stimuli themselves)
Cell array (see below for more details)
Global settings variables:
Parameter name
Definition
Values accepted
cueMinSeparation
Min distance between two towers on the same side
Real number (>0)
fracDuplicated
Proportion of trials that are duplicated
Real number ([0-1])
trialDuplication
Number of times each set of stimulus parameters are duplicated, for a given fracDuplicated (i.e., number of exact replications of each trial type for the duplicated fraction of trials)
Located in the ViRMEn\experiments\protocols directory.
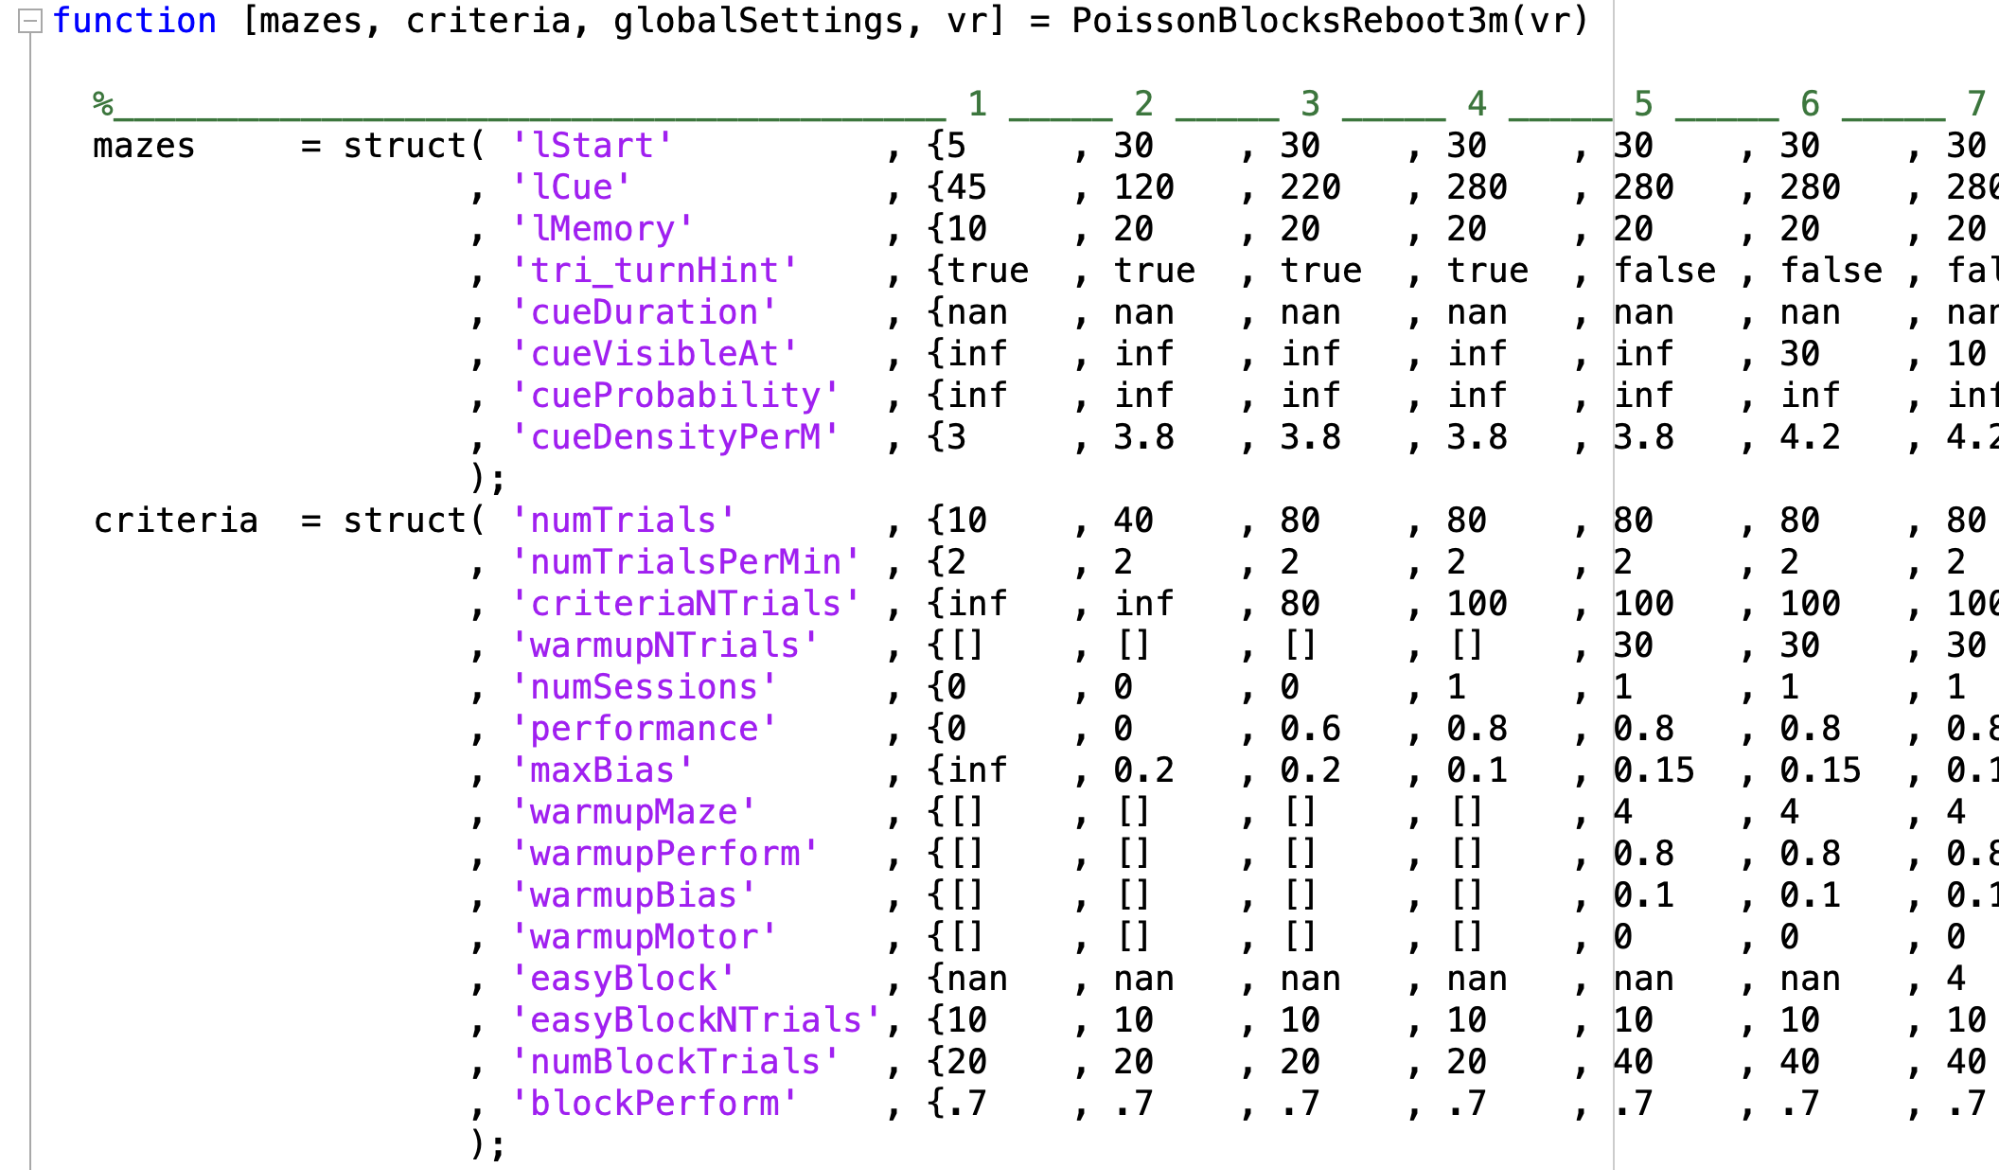
Contains the stimulus sets that are drawn from during a session. It holds trial data: tower positions and the number of towers for each maze level, depending on the protocol variables.
Original file: C:\Experiments\ViRMEn\experiments\protocols\stimulus_trains_PoissonBlocksCondensed3m.mat
Most common use:
Create the protocol and world files.
Run generatePoissonStimuli(('world_file'), @('protocol_file')), substituting world_file and protocol_file with the corresponding names.
The following sections describe the training workflow from start to finish: from selecting which experiment will run to reviewing session performance right after it finishes.
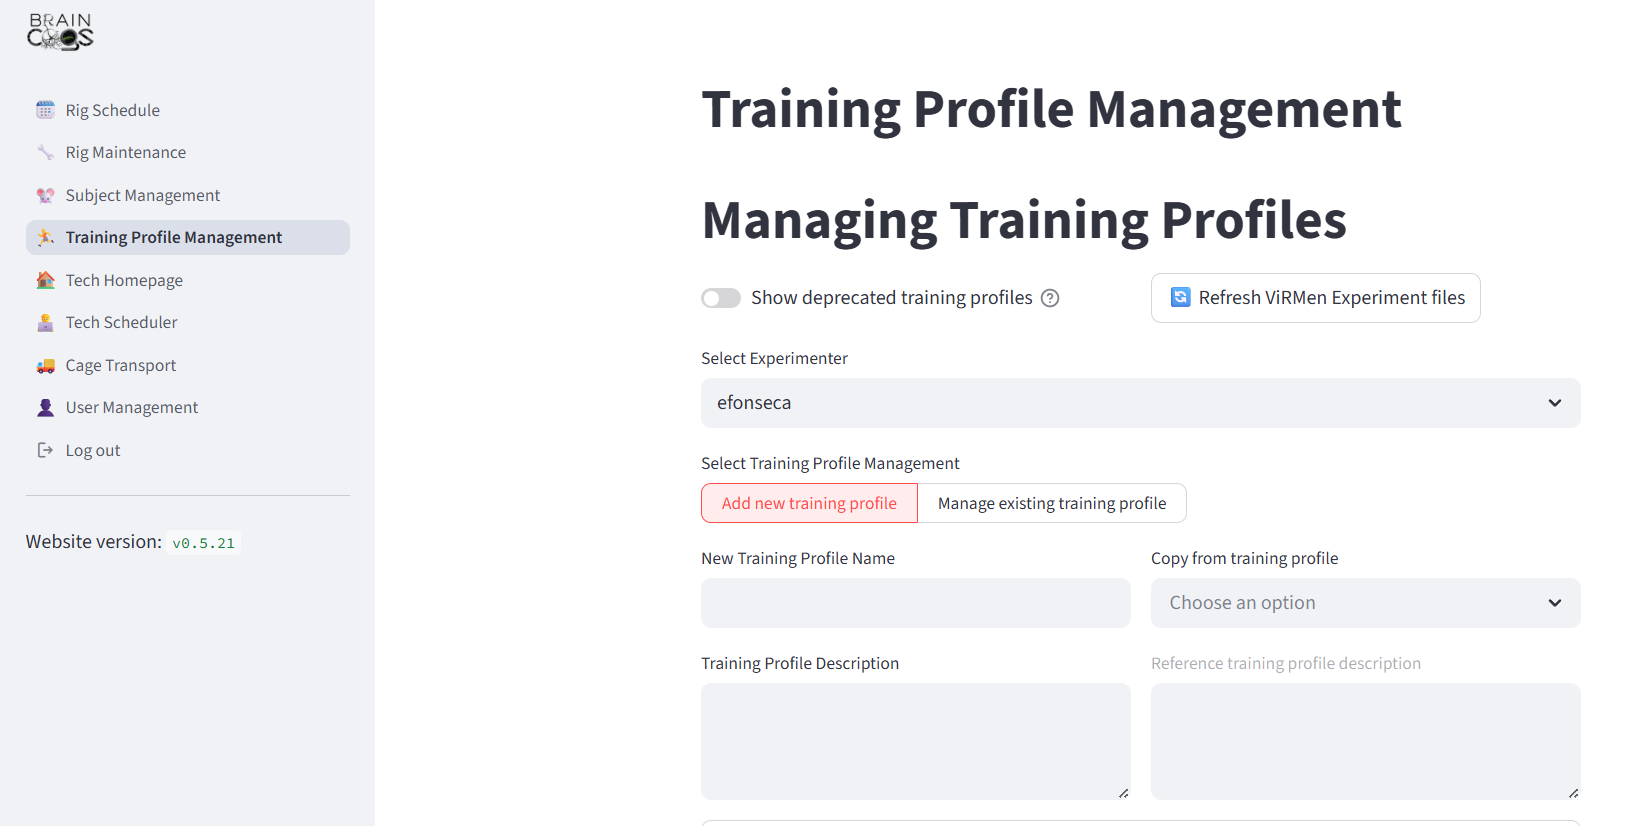
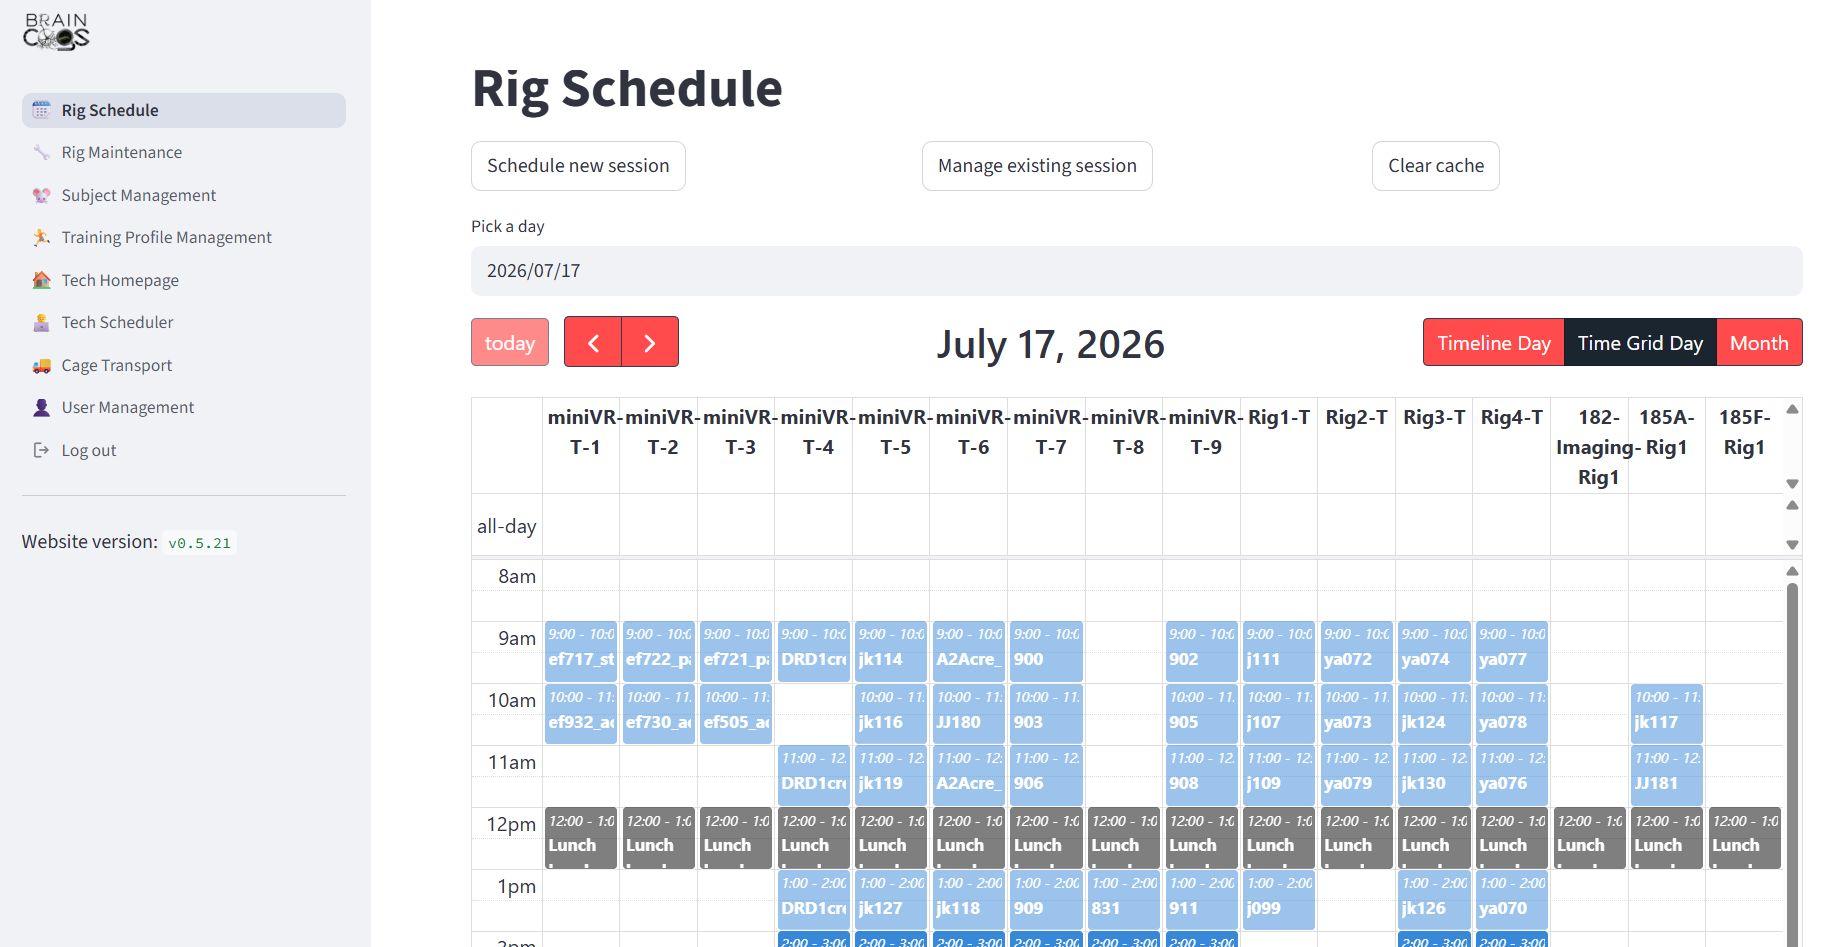
First steps is defining a training profile & scheduling a subject on a specific rig on the BRAINCoGS Web GUI: https://braincogs-webgui.pni.princeton.edu/. These steps should be done at least the day before the session occurs.
Next steps are done in the rig computers on the same day of the experiment session.
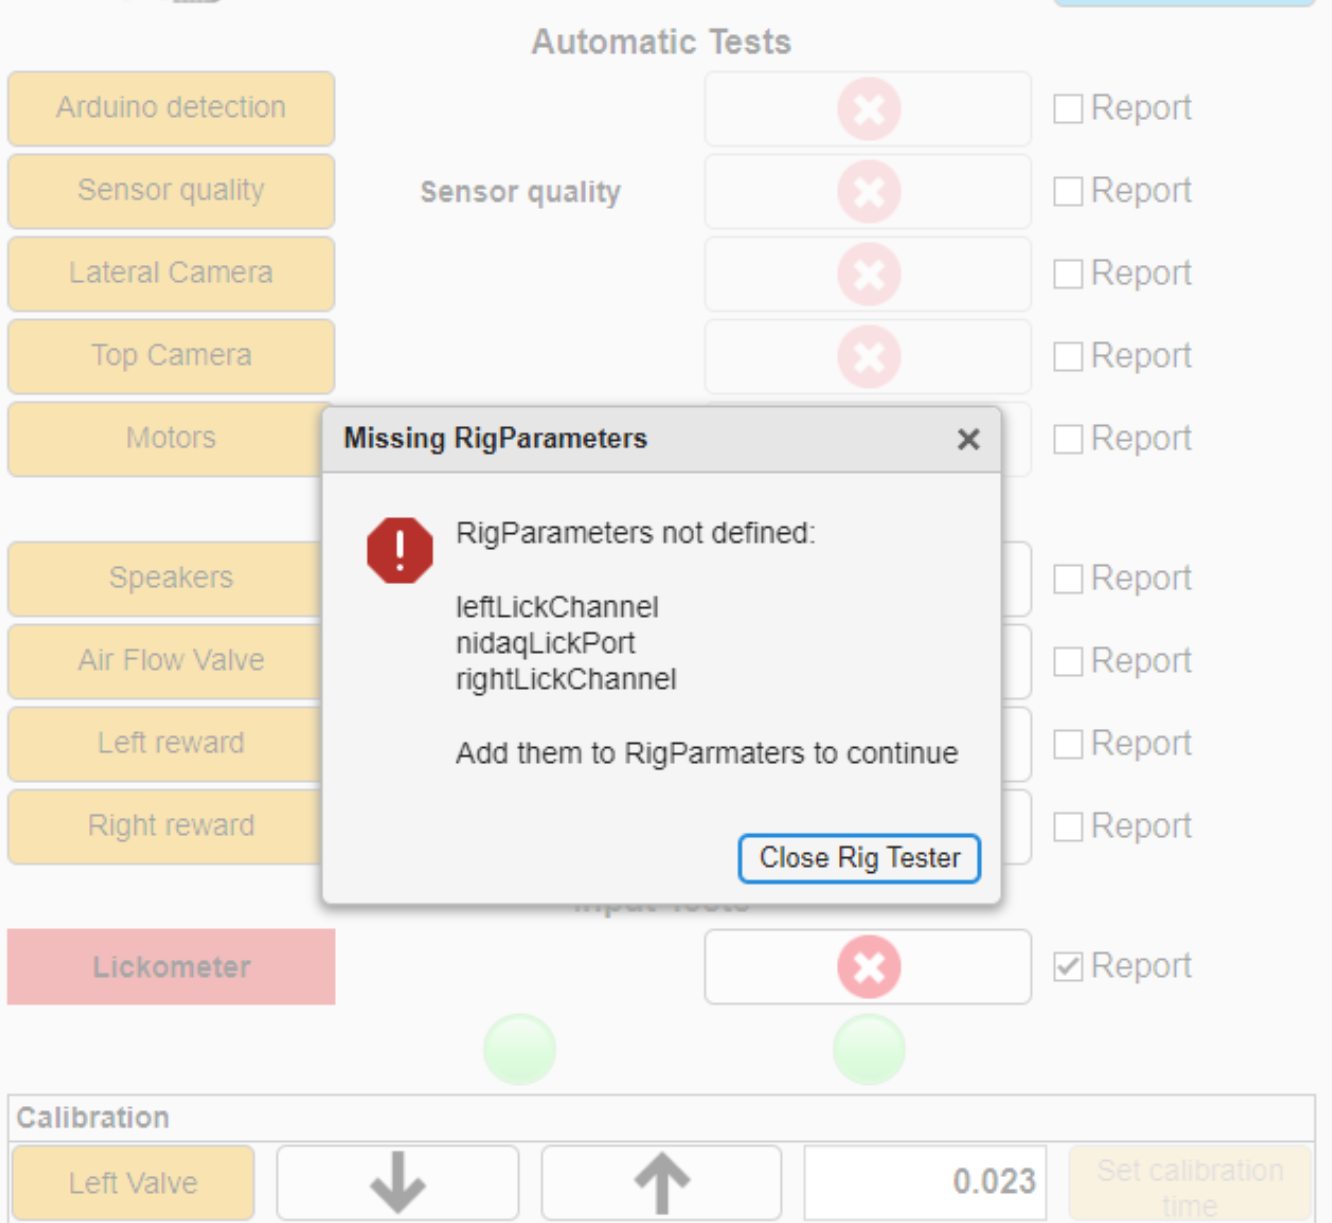
The Rig Tester GUI lets you check all of a rig's inputs and outputs (IOs) before training starts. The IOs are predefined via the Input Output Profile and Rig Status tables. See the ViRMEn developer Rig Tester section for more information.
From here on, all steps in the following sections are performed on the rig machine.
MATLAB should already be open and the Rig Tester GUI should be visible. If not, type TrainingToday to start the training process.
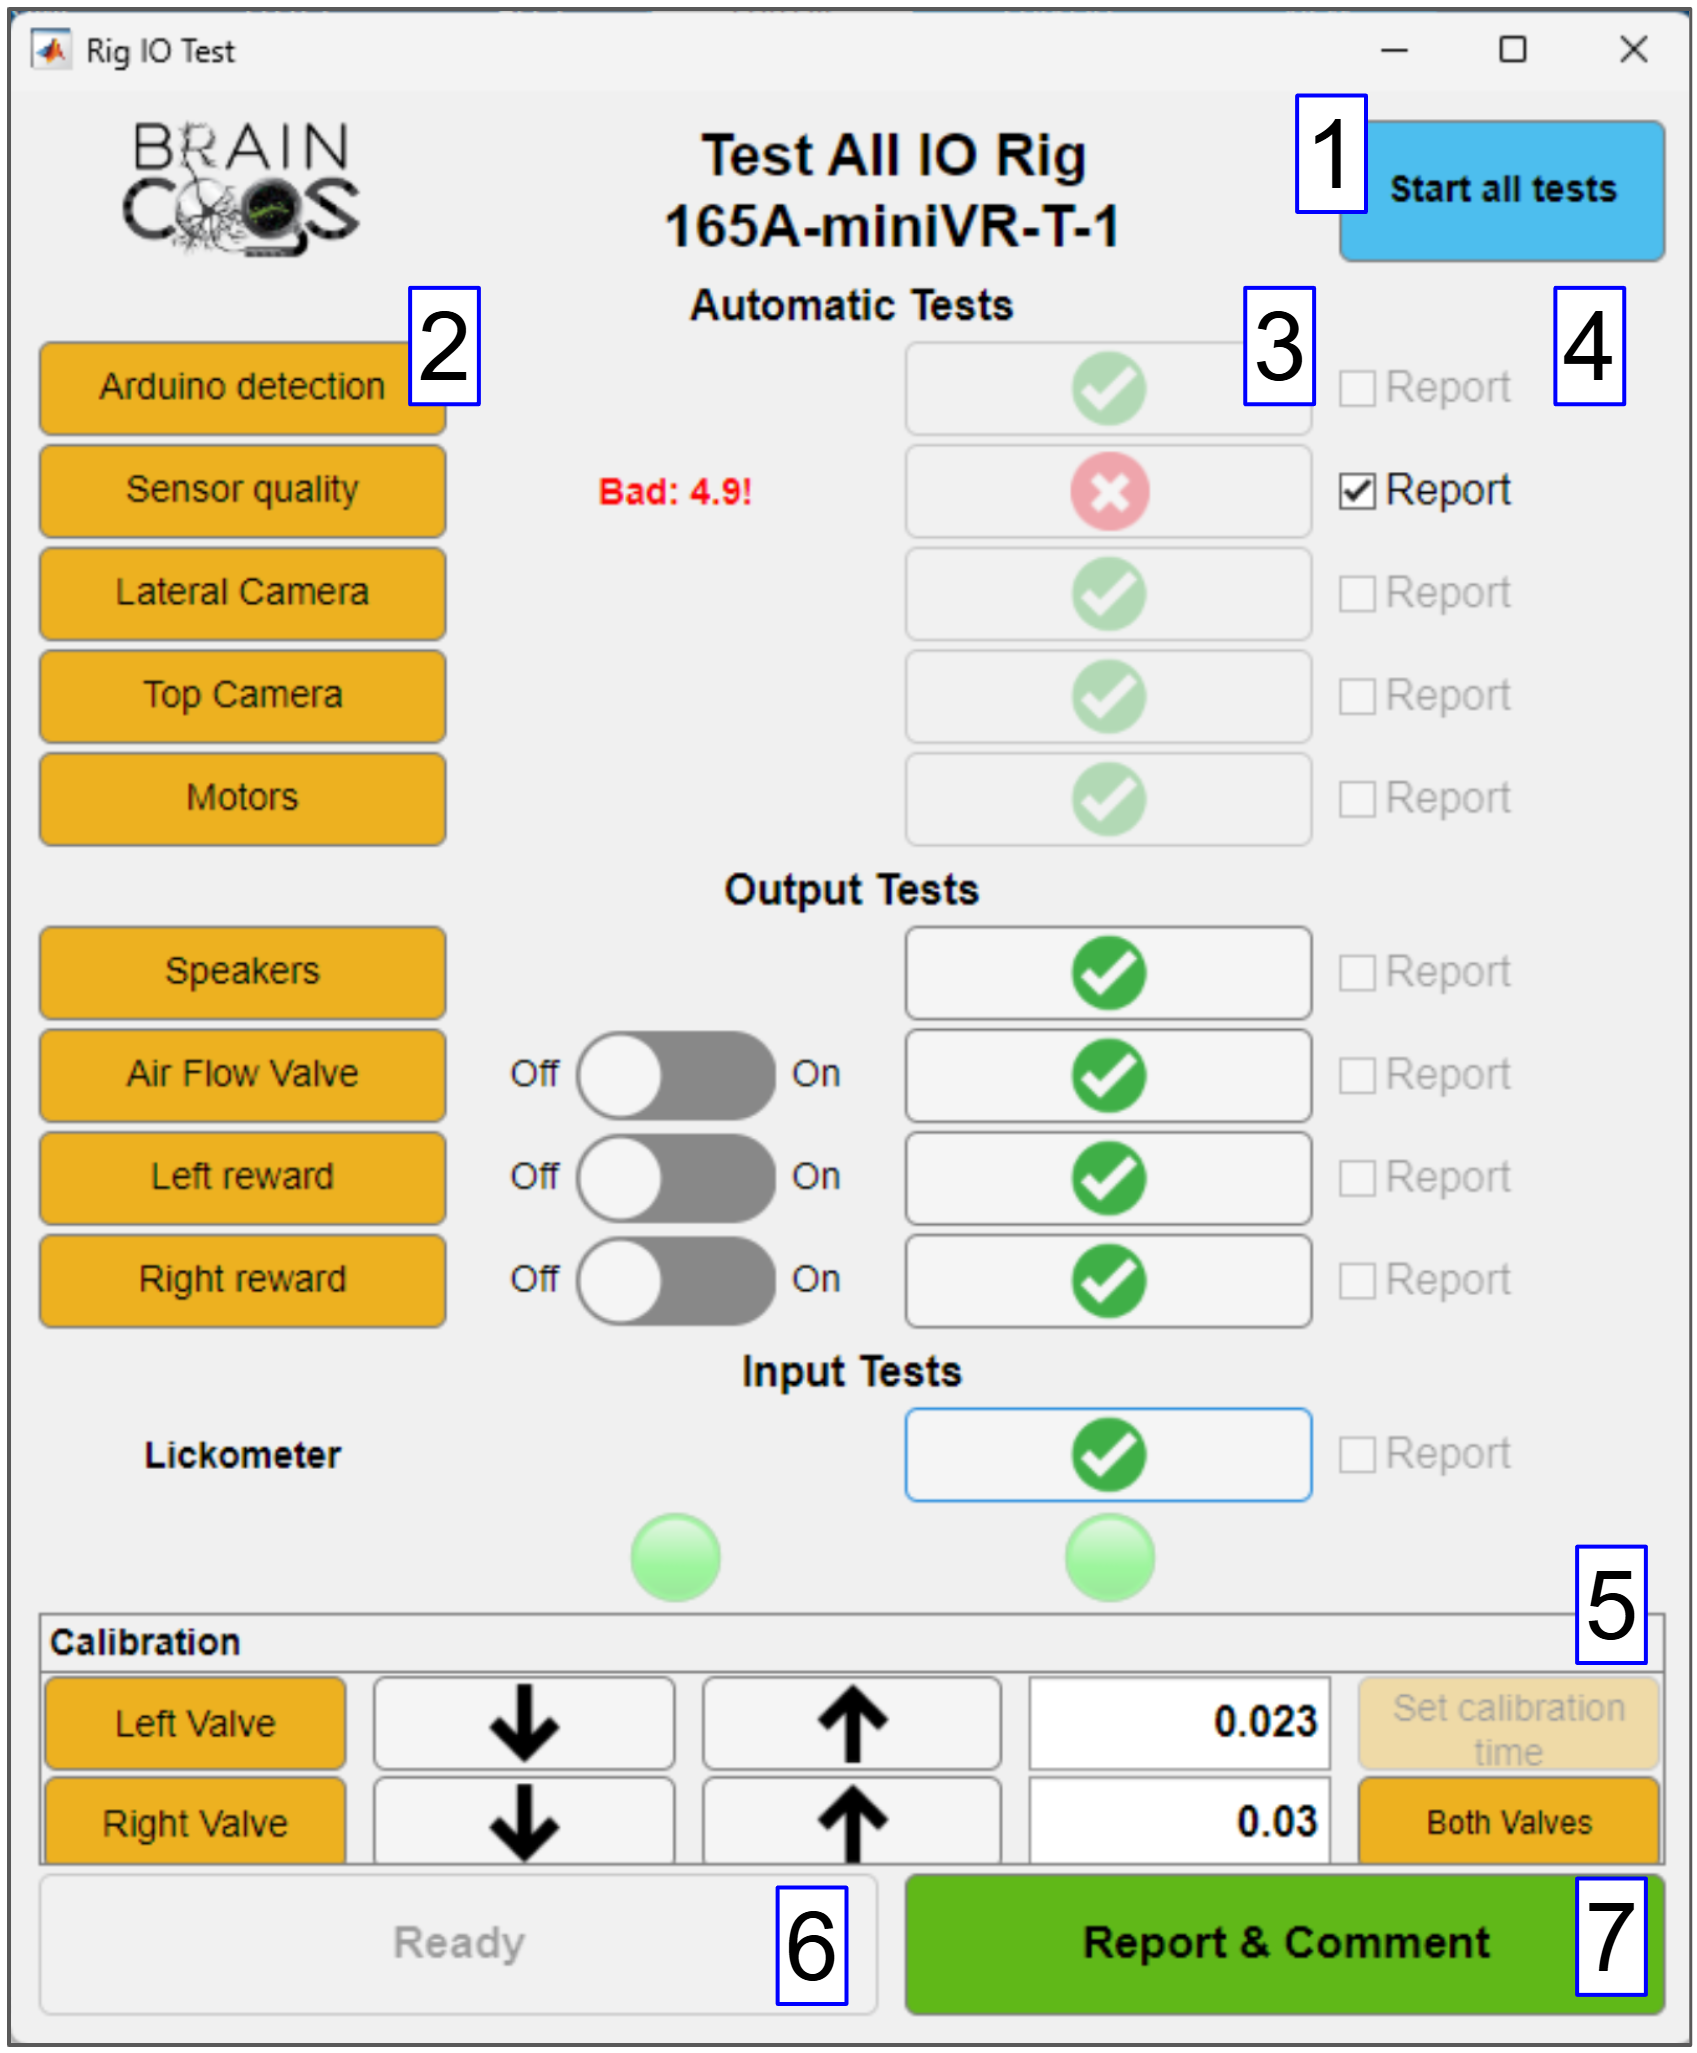
Below is a description of every part of the Rig Tester GUI. Note that some buttons may not be shown (and some extra buttons may appear) compared to the example image.
Start all tests Button: Automatically runs all "Automatic Tests", one by one, until they are done.
Start individual test Button: For "Output Tests" such as valves and air puffs. This button briefly activates the output so you can manually verify it is working properly.
Mark Passed/Failed Buttons: For "Input & Output Tests", the technician pushes this button to mark a test as passed or failed.
Report Checkboxes: If a test fails, the technician can report it by checking the report checkbox.
Calibration Panel:
Left Valve/Right Valve/Valve Button: Runs calibration: 25 drops are delivered in the corresponding lick spout. The technician can check whether the volume delivered matches the desired value (4 ul per drop).
Up and Down Arrow Buttons: Adjust valve timing to reach the desired calibration.
Set calibration time Button: Saves the adjusted valve times in the RigParameters file.
Both valves Button: Calibrates both valves simultaneously.
Ready Button: If all tests pass, proceed to the Training Flow GUI screen.
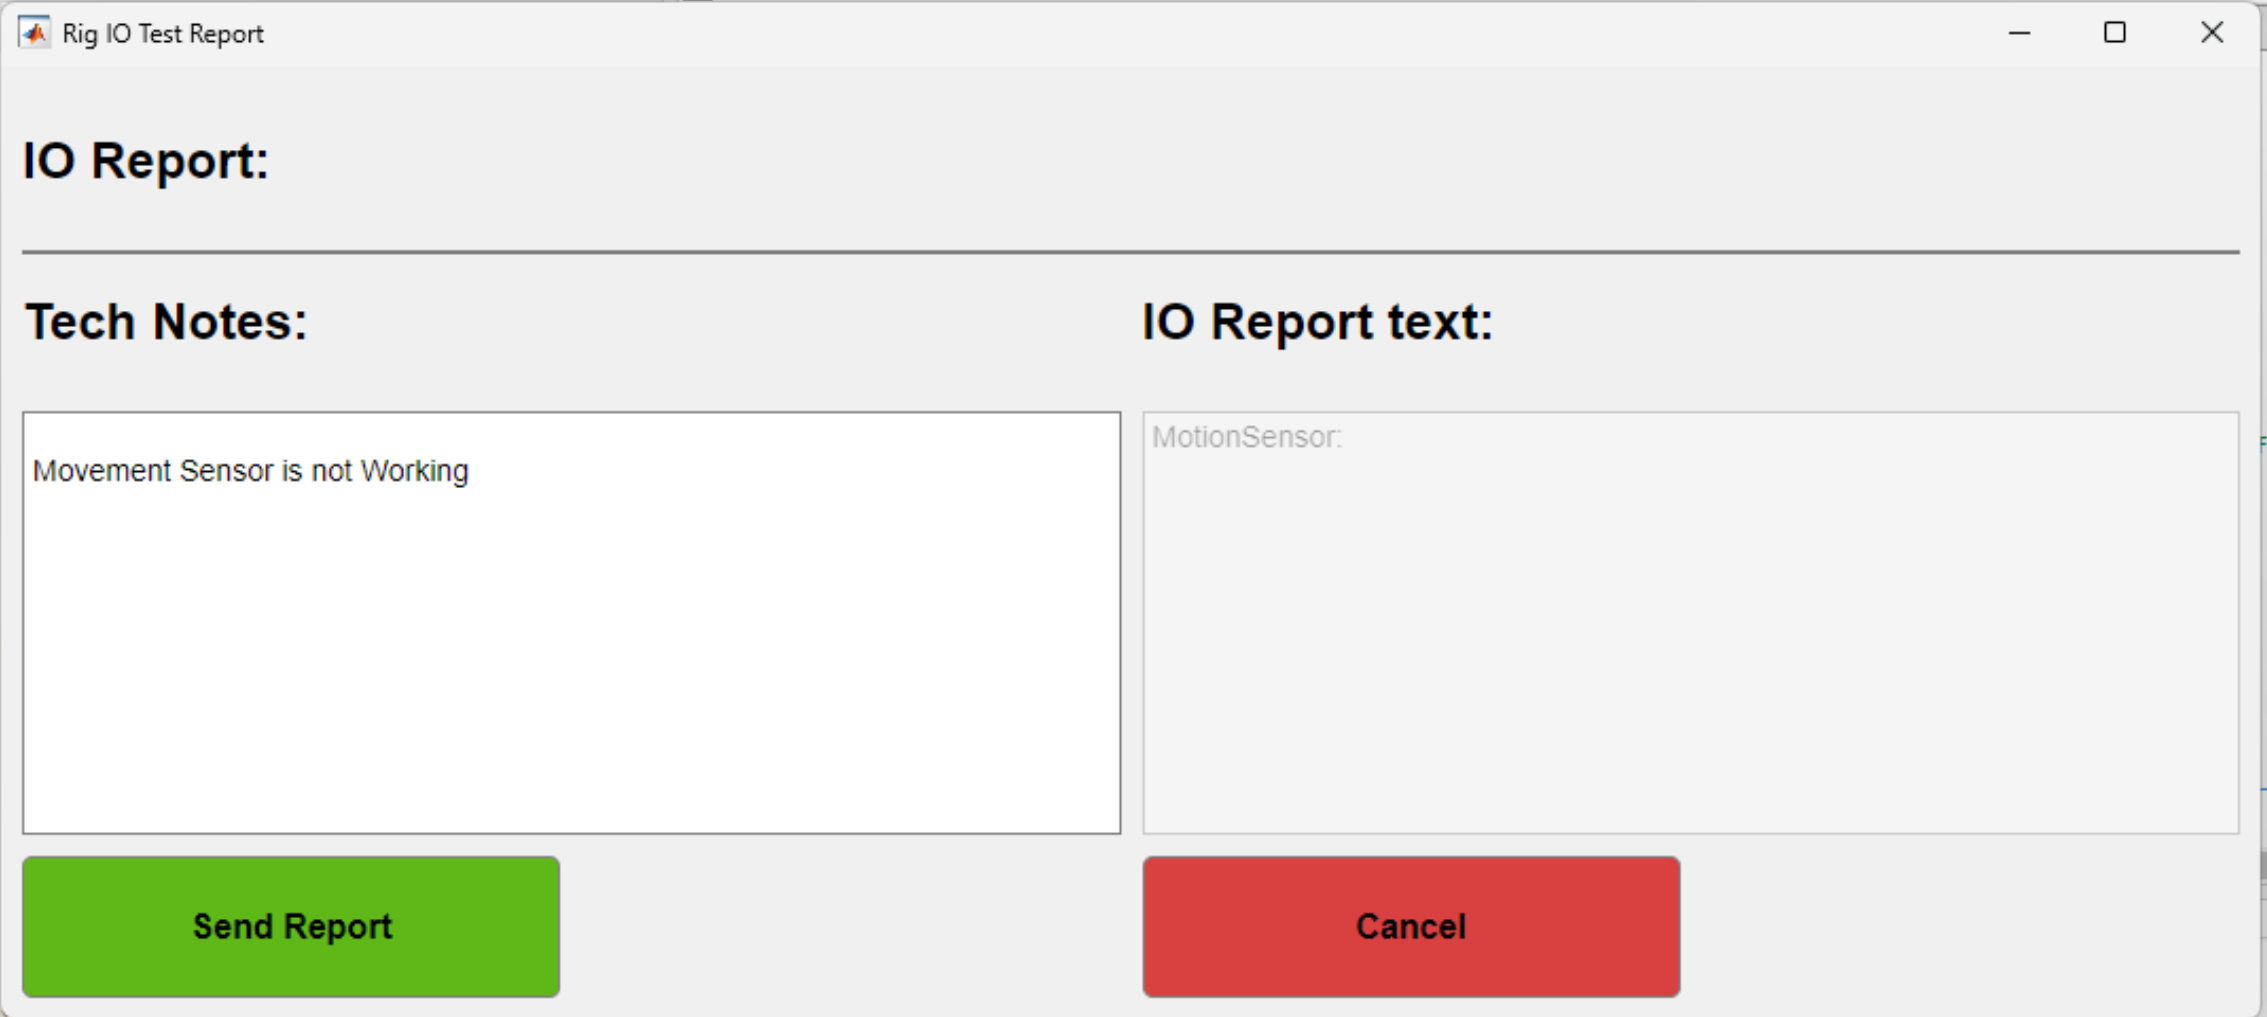
Report & Comment Button: If at least one IO test does not pass and the report checkboxes are marked, a report screen appears where you can add comments for the Lab Manager (see below). A Slack message is sent to the #rig_issues_and_troubleshooting channel when a report is sent.
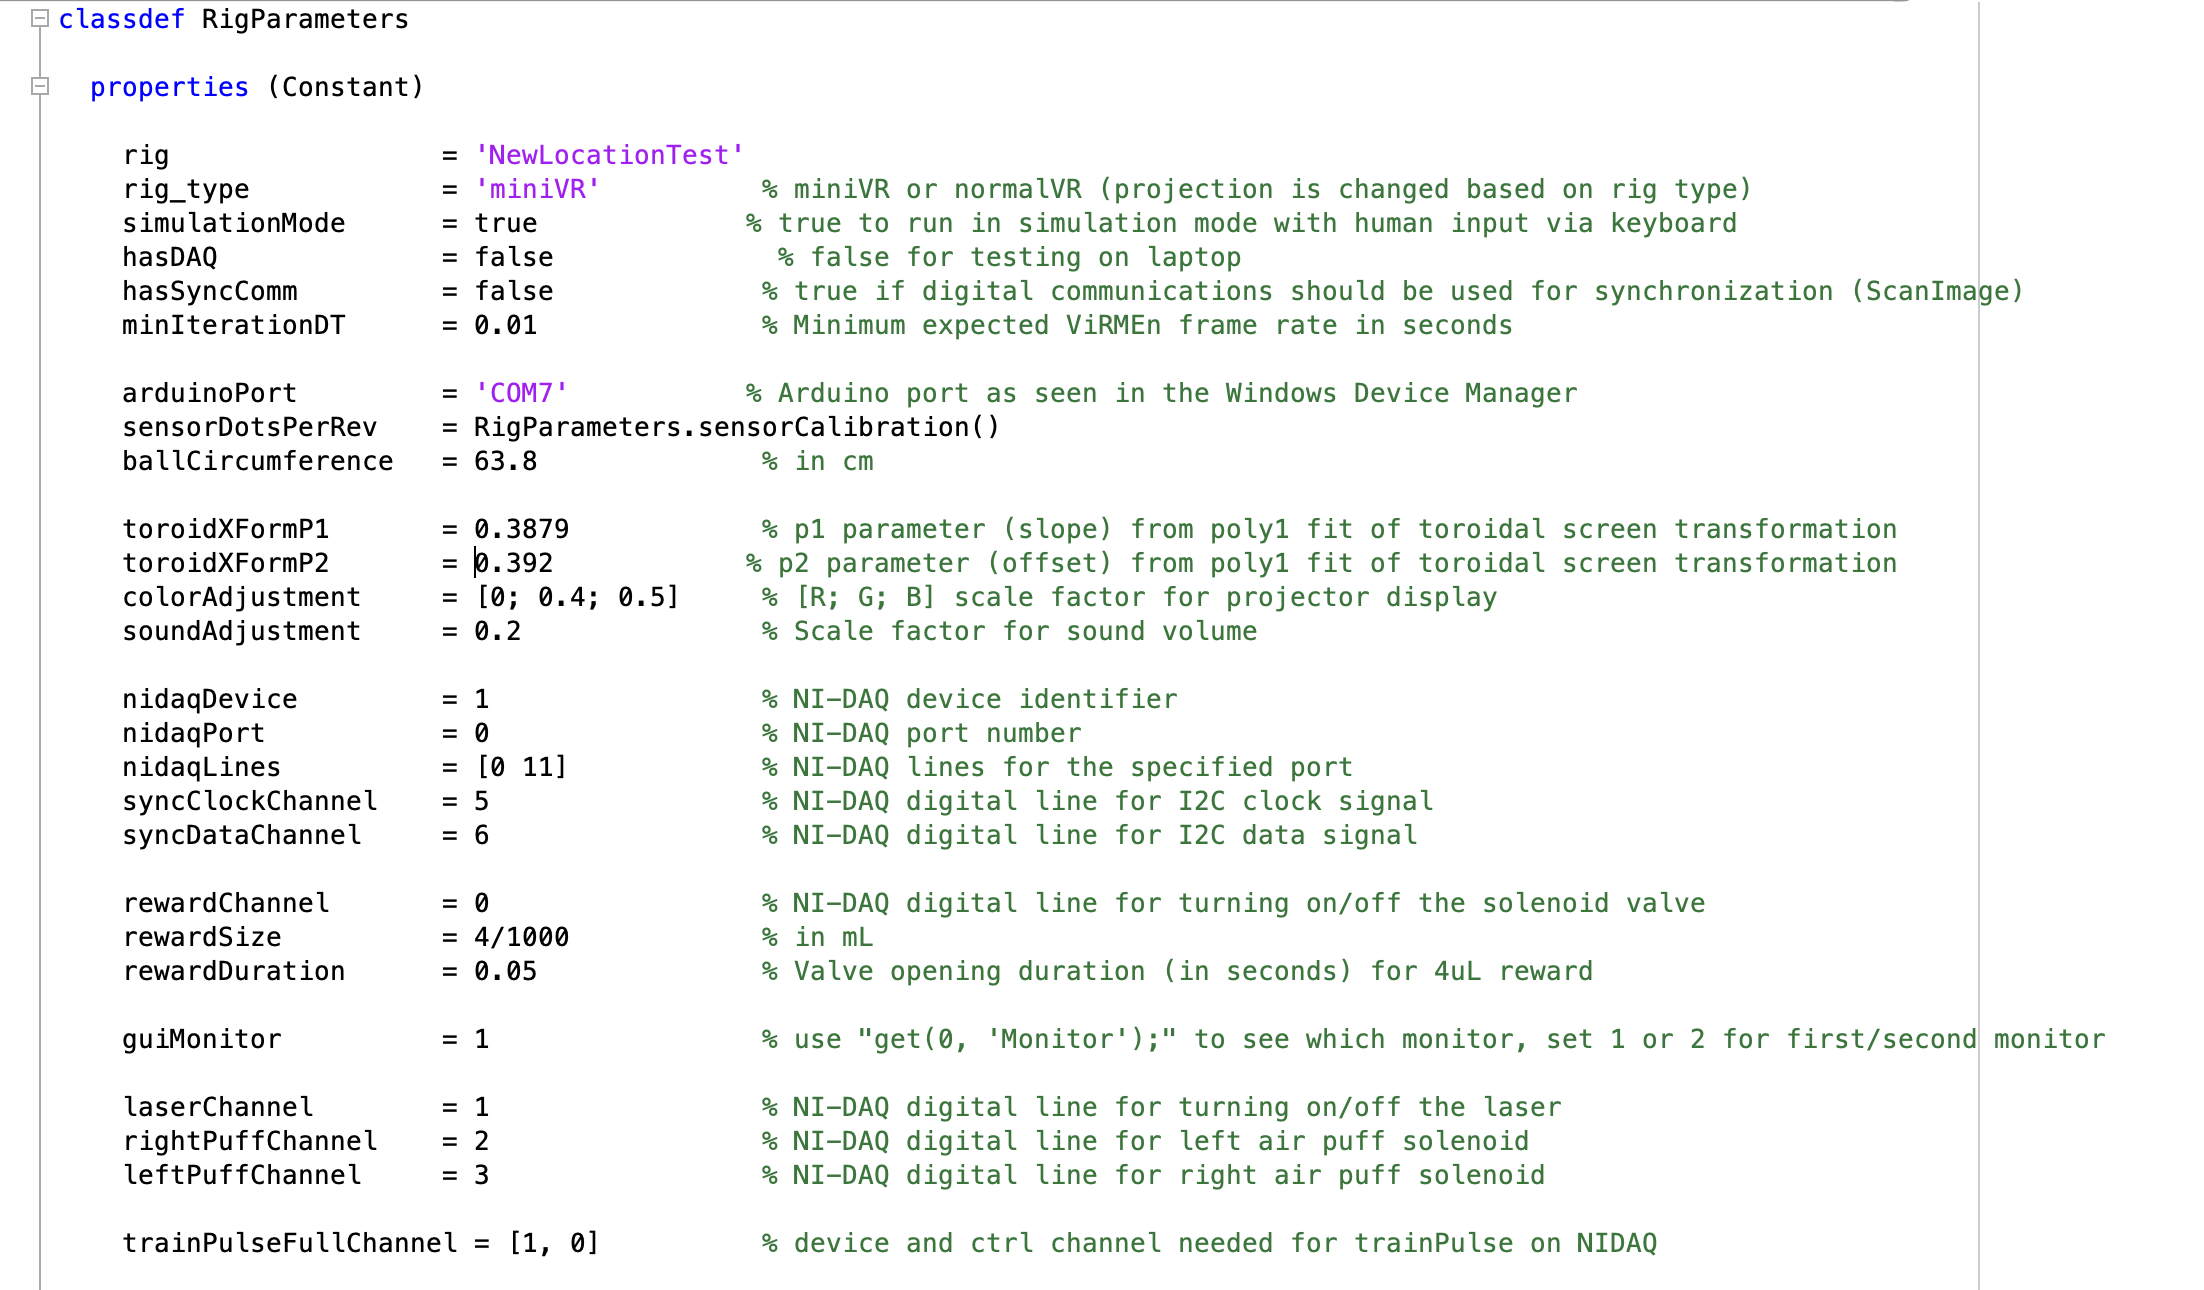
If a rig parameter is missing from the RigParameters.m file for the configured IOs, a dialog like the one below appears. Add the parameters to the RigParameters.m file and see the ViRMEn developer Rig Tester section for more information.
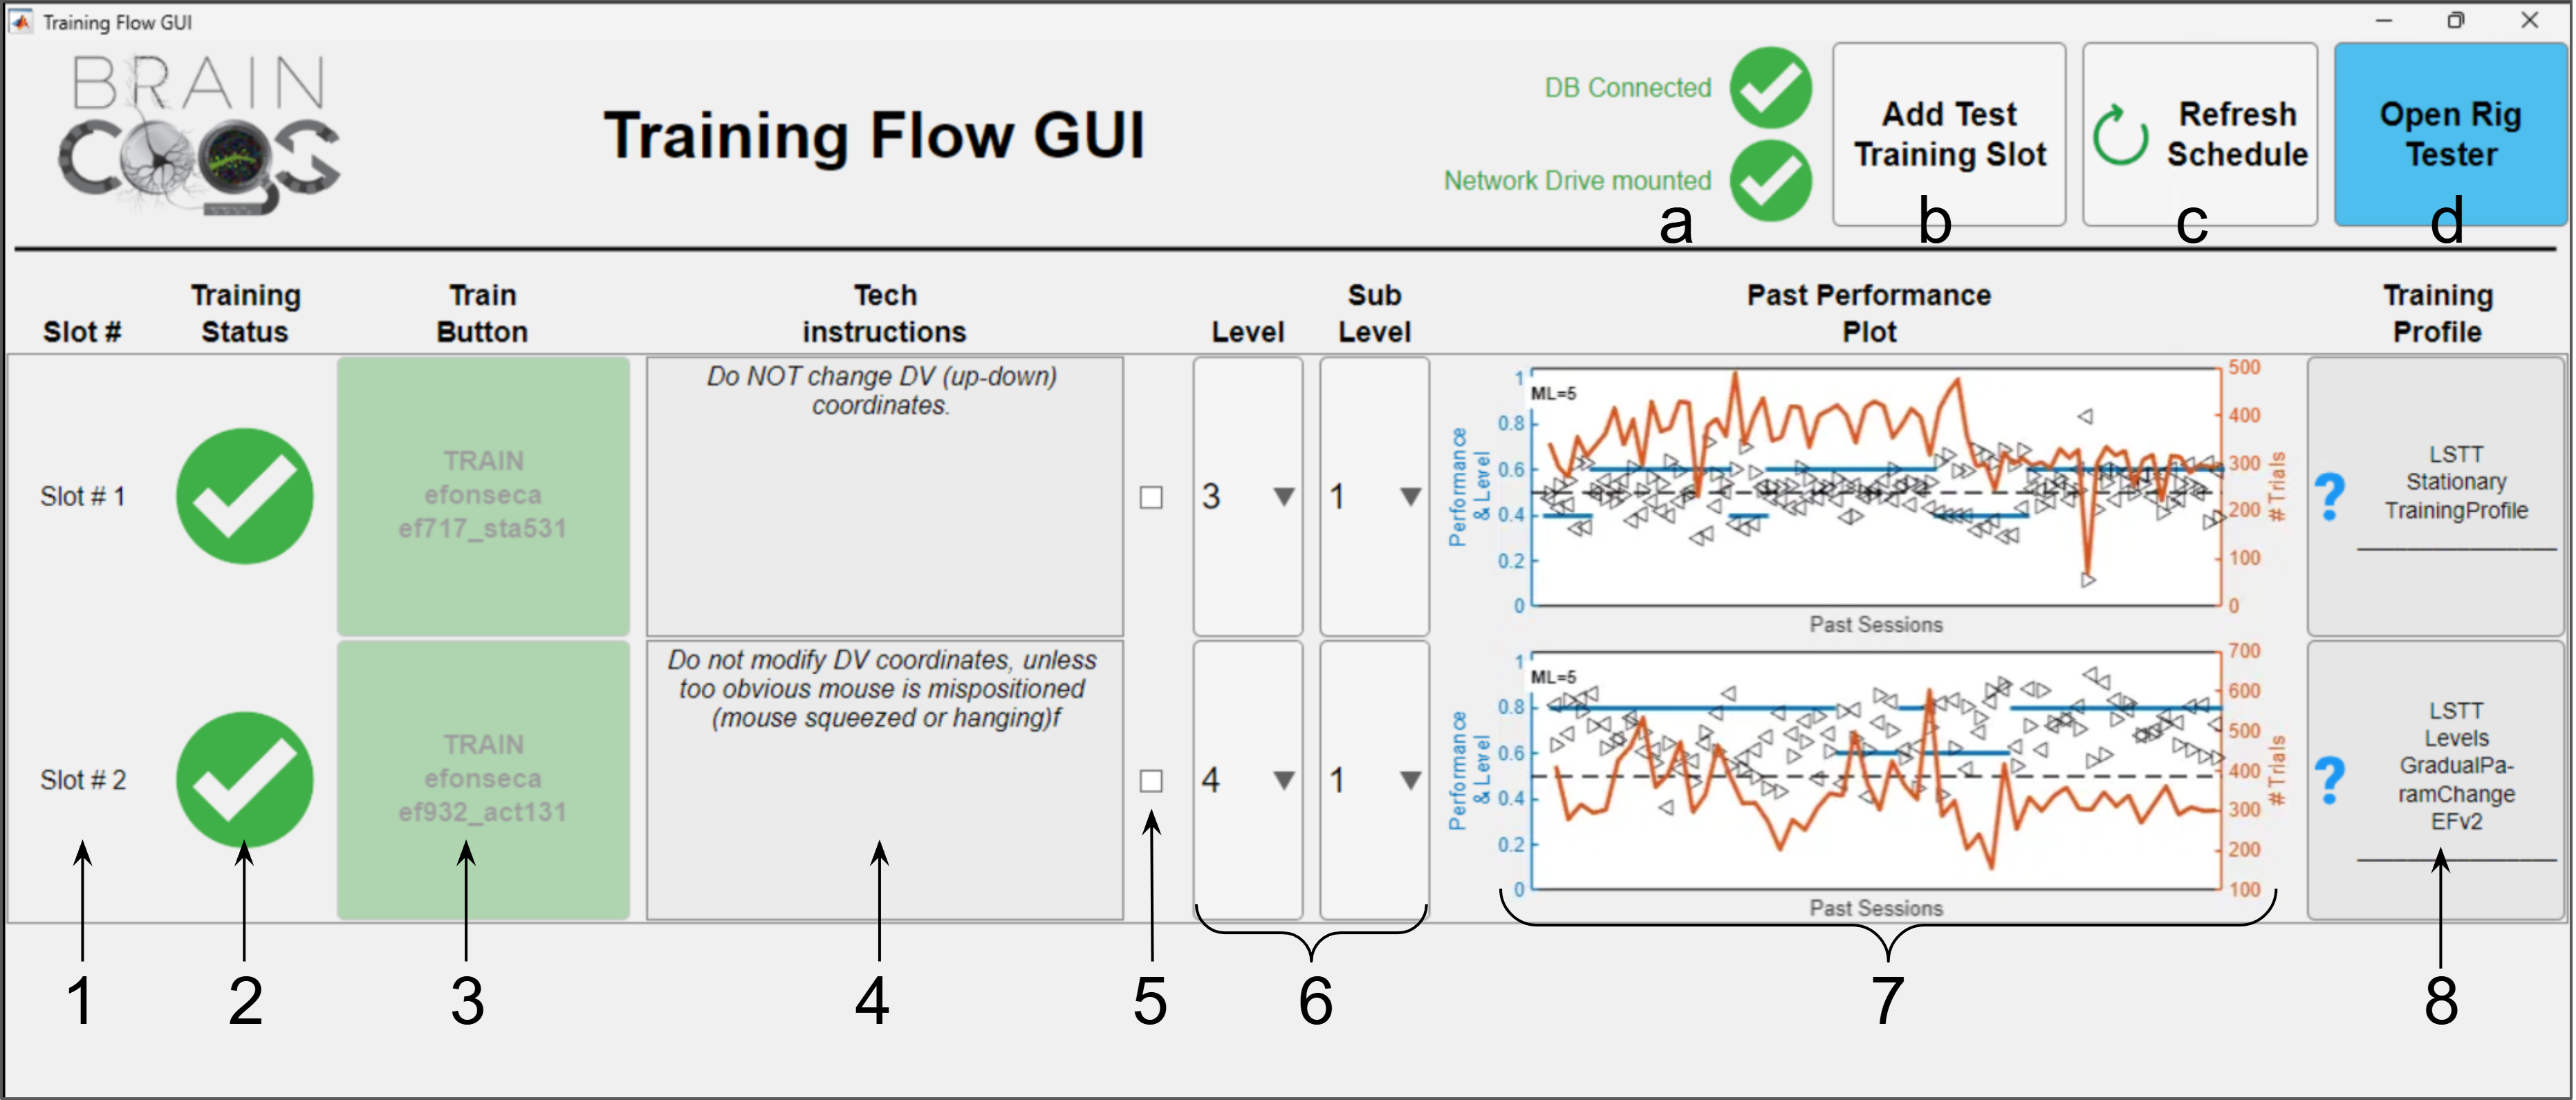
Once the Rig Tester GUI passes, the Training Flow GUI appears.
This GUI is the interface to:
Start subject training
Check the training status of subjects scheduled for the day
Verify the training profile for each subject
Add test subjects to train, to check experiment code
Below is a description of every part of the Training Flow GUI.
Slot # Labels: Informative label showing the training order for the day.
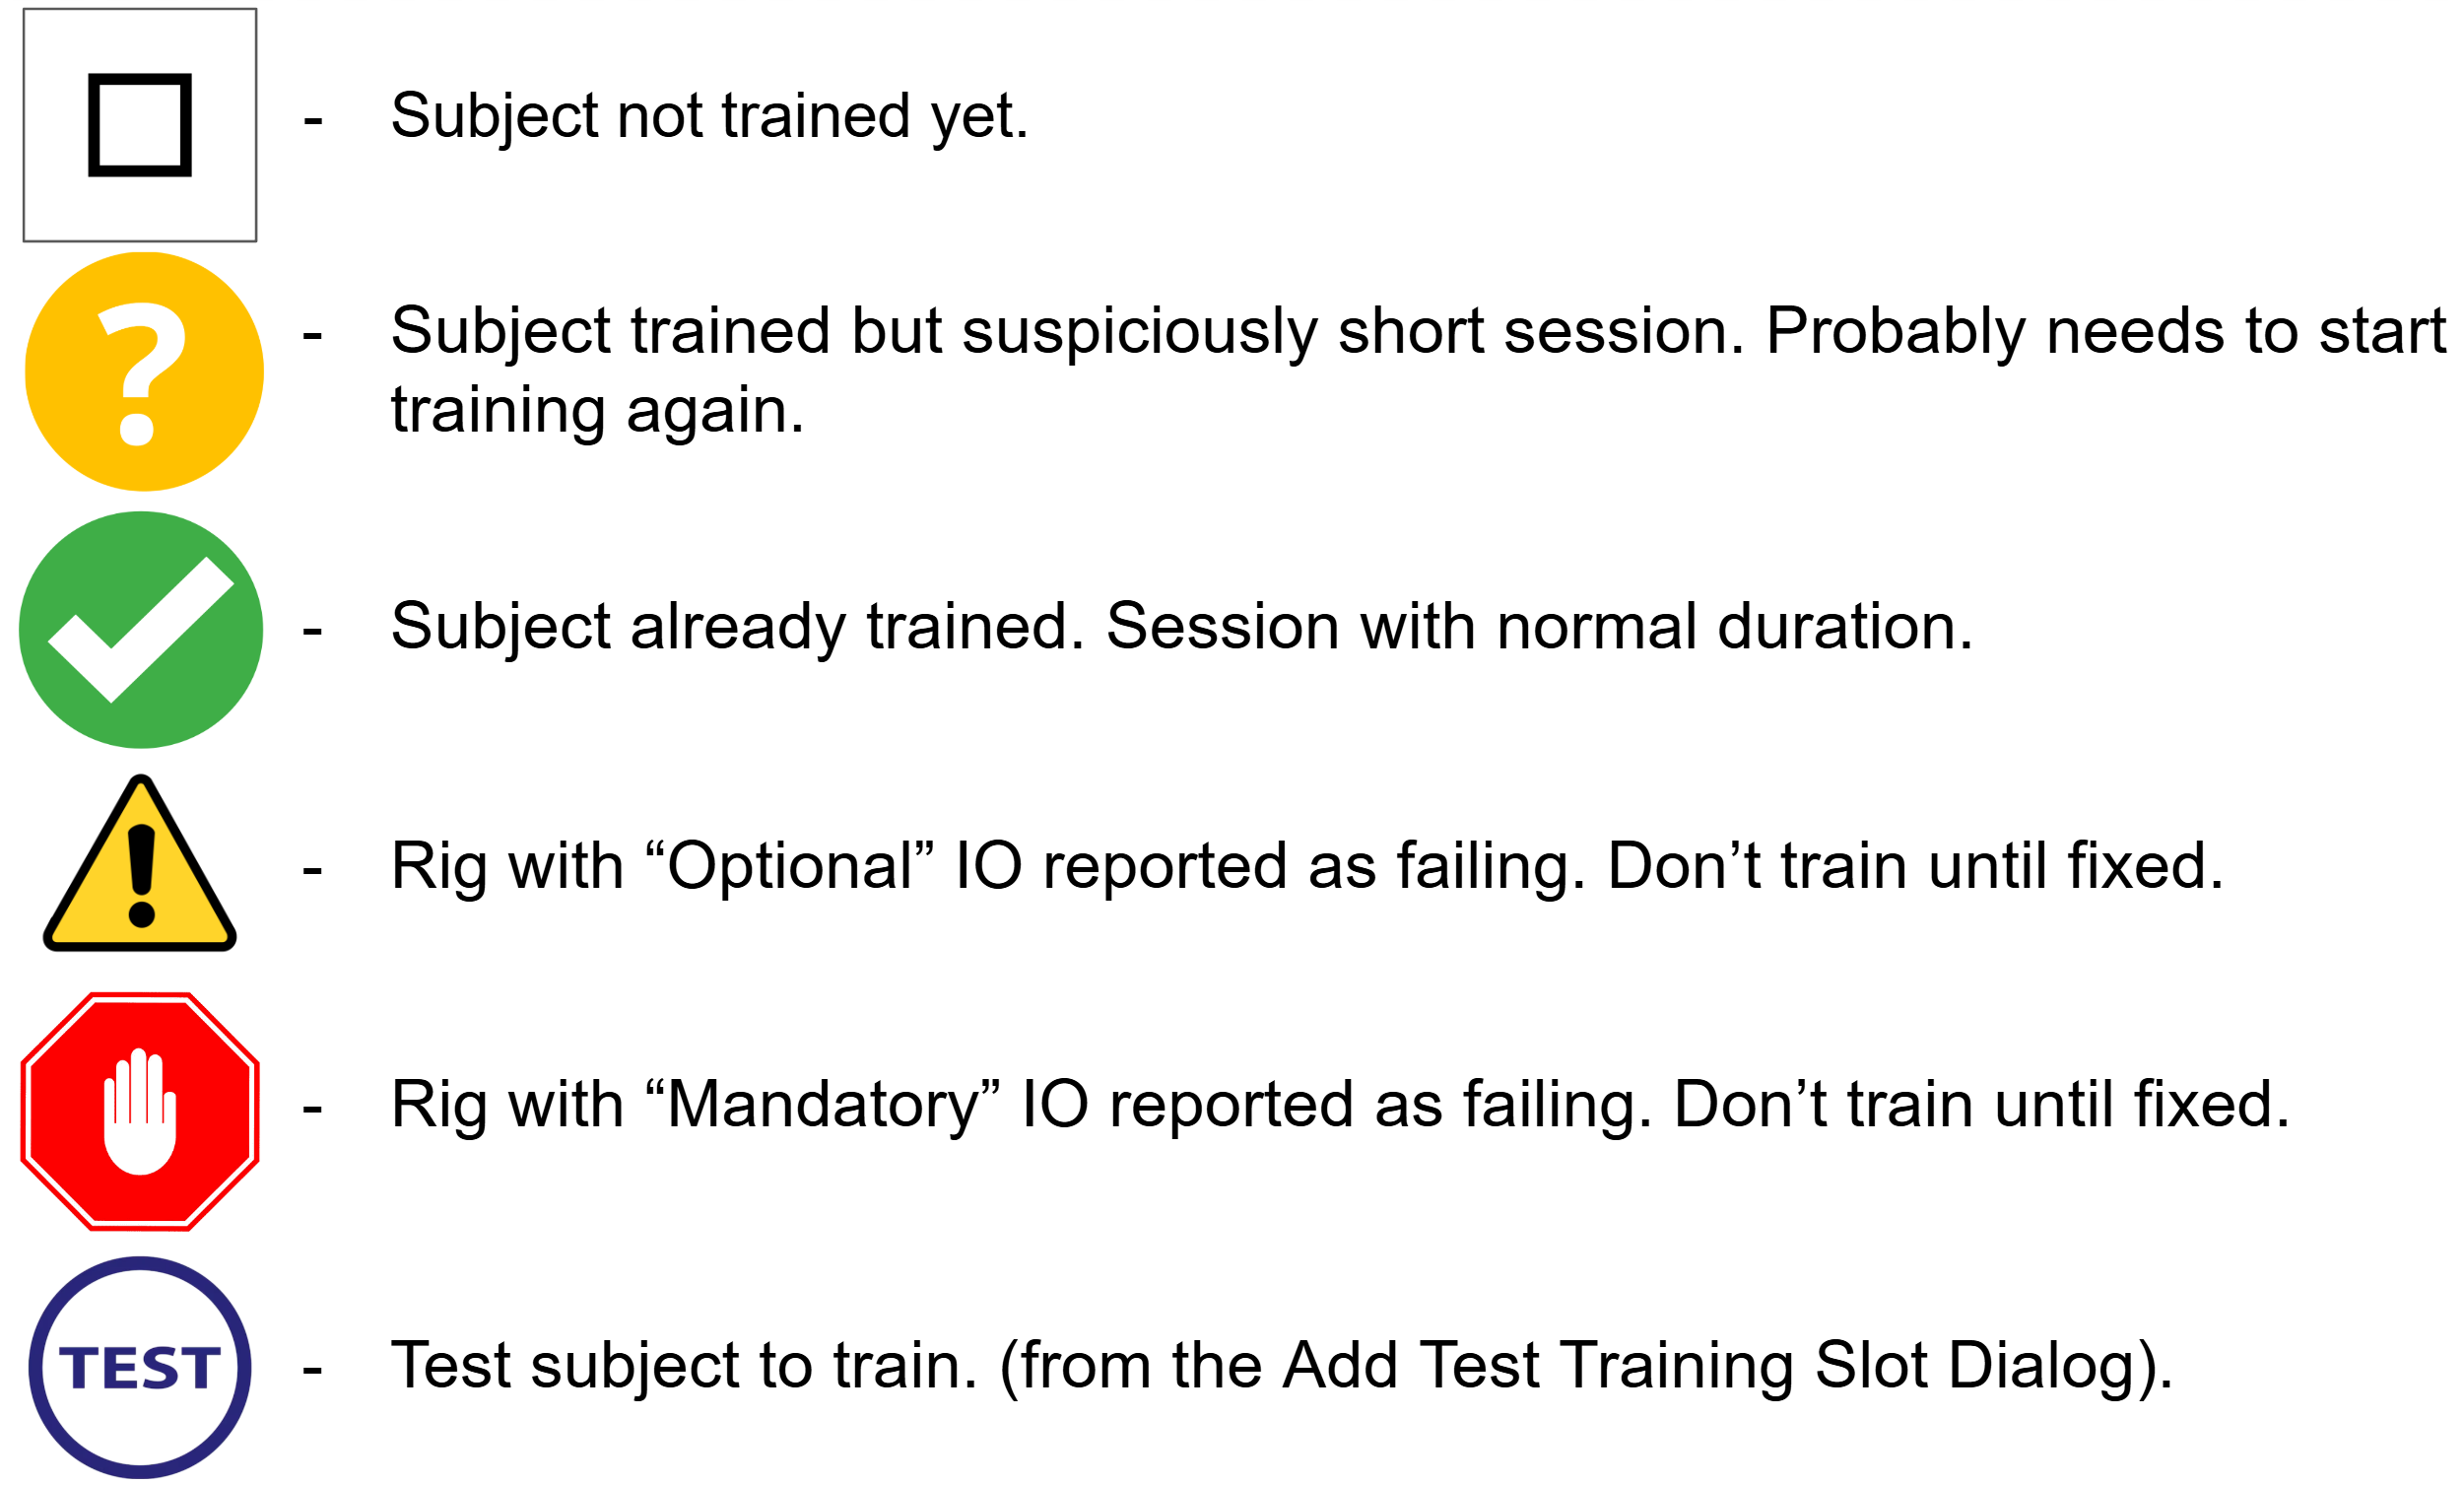
Training Status Icon: Icon showing the current status of the corresponding subject. See the image below for all possible icon statuses:
Train Button: Starts the selected subject's training process. The Training Setup GUI opens.
Tech instructions Area: General instructions provided by the researcher to complete before starting training.
Tech instructions Checkbox: The Train button stays disabled until the tech instructions checkbox is marked.
Level & Sublevel Override Selectors: "Force" training to start at a specific level (and sublevel, if the experiment uses them).
Past performance Plot: Plot showing the main training performance stats (# trials, session performance, and level) for the corresponding subject's last 50 sessions.
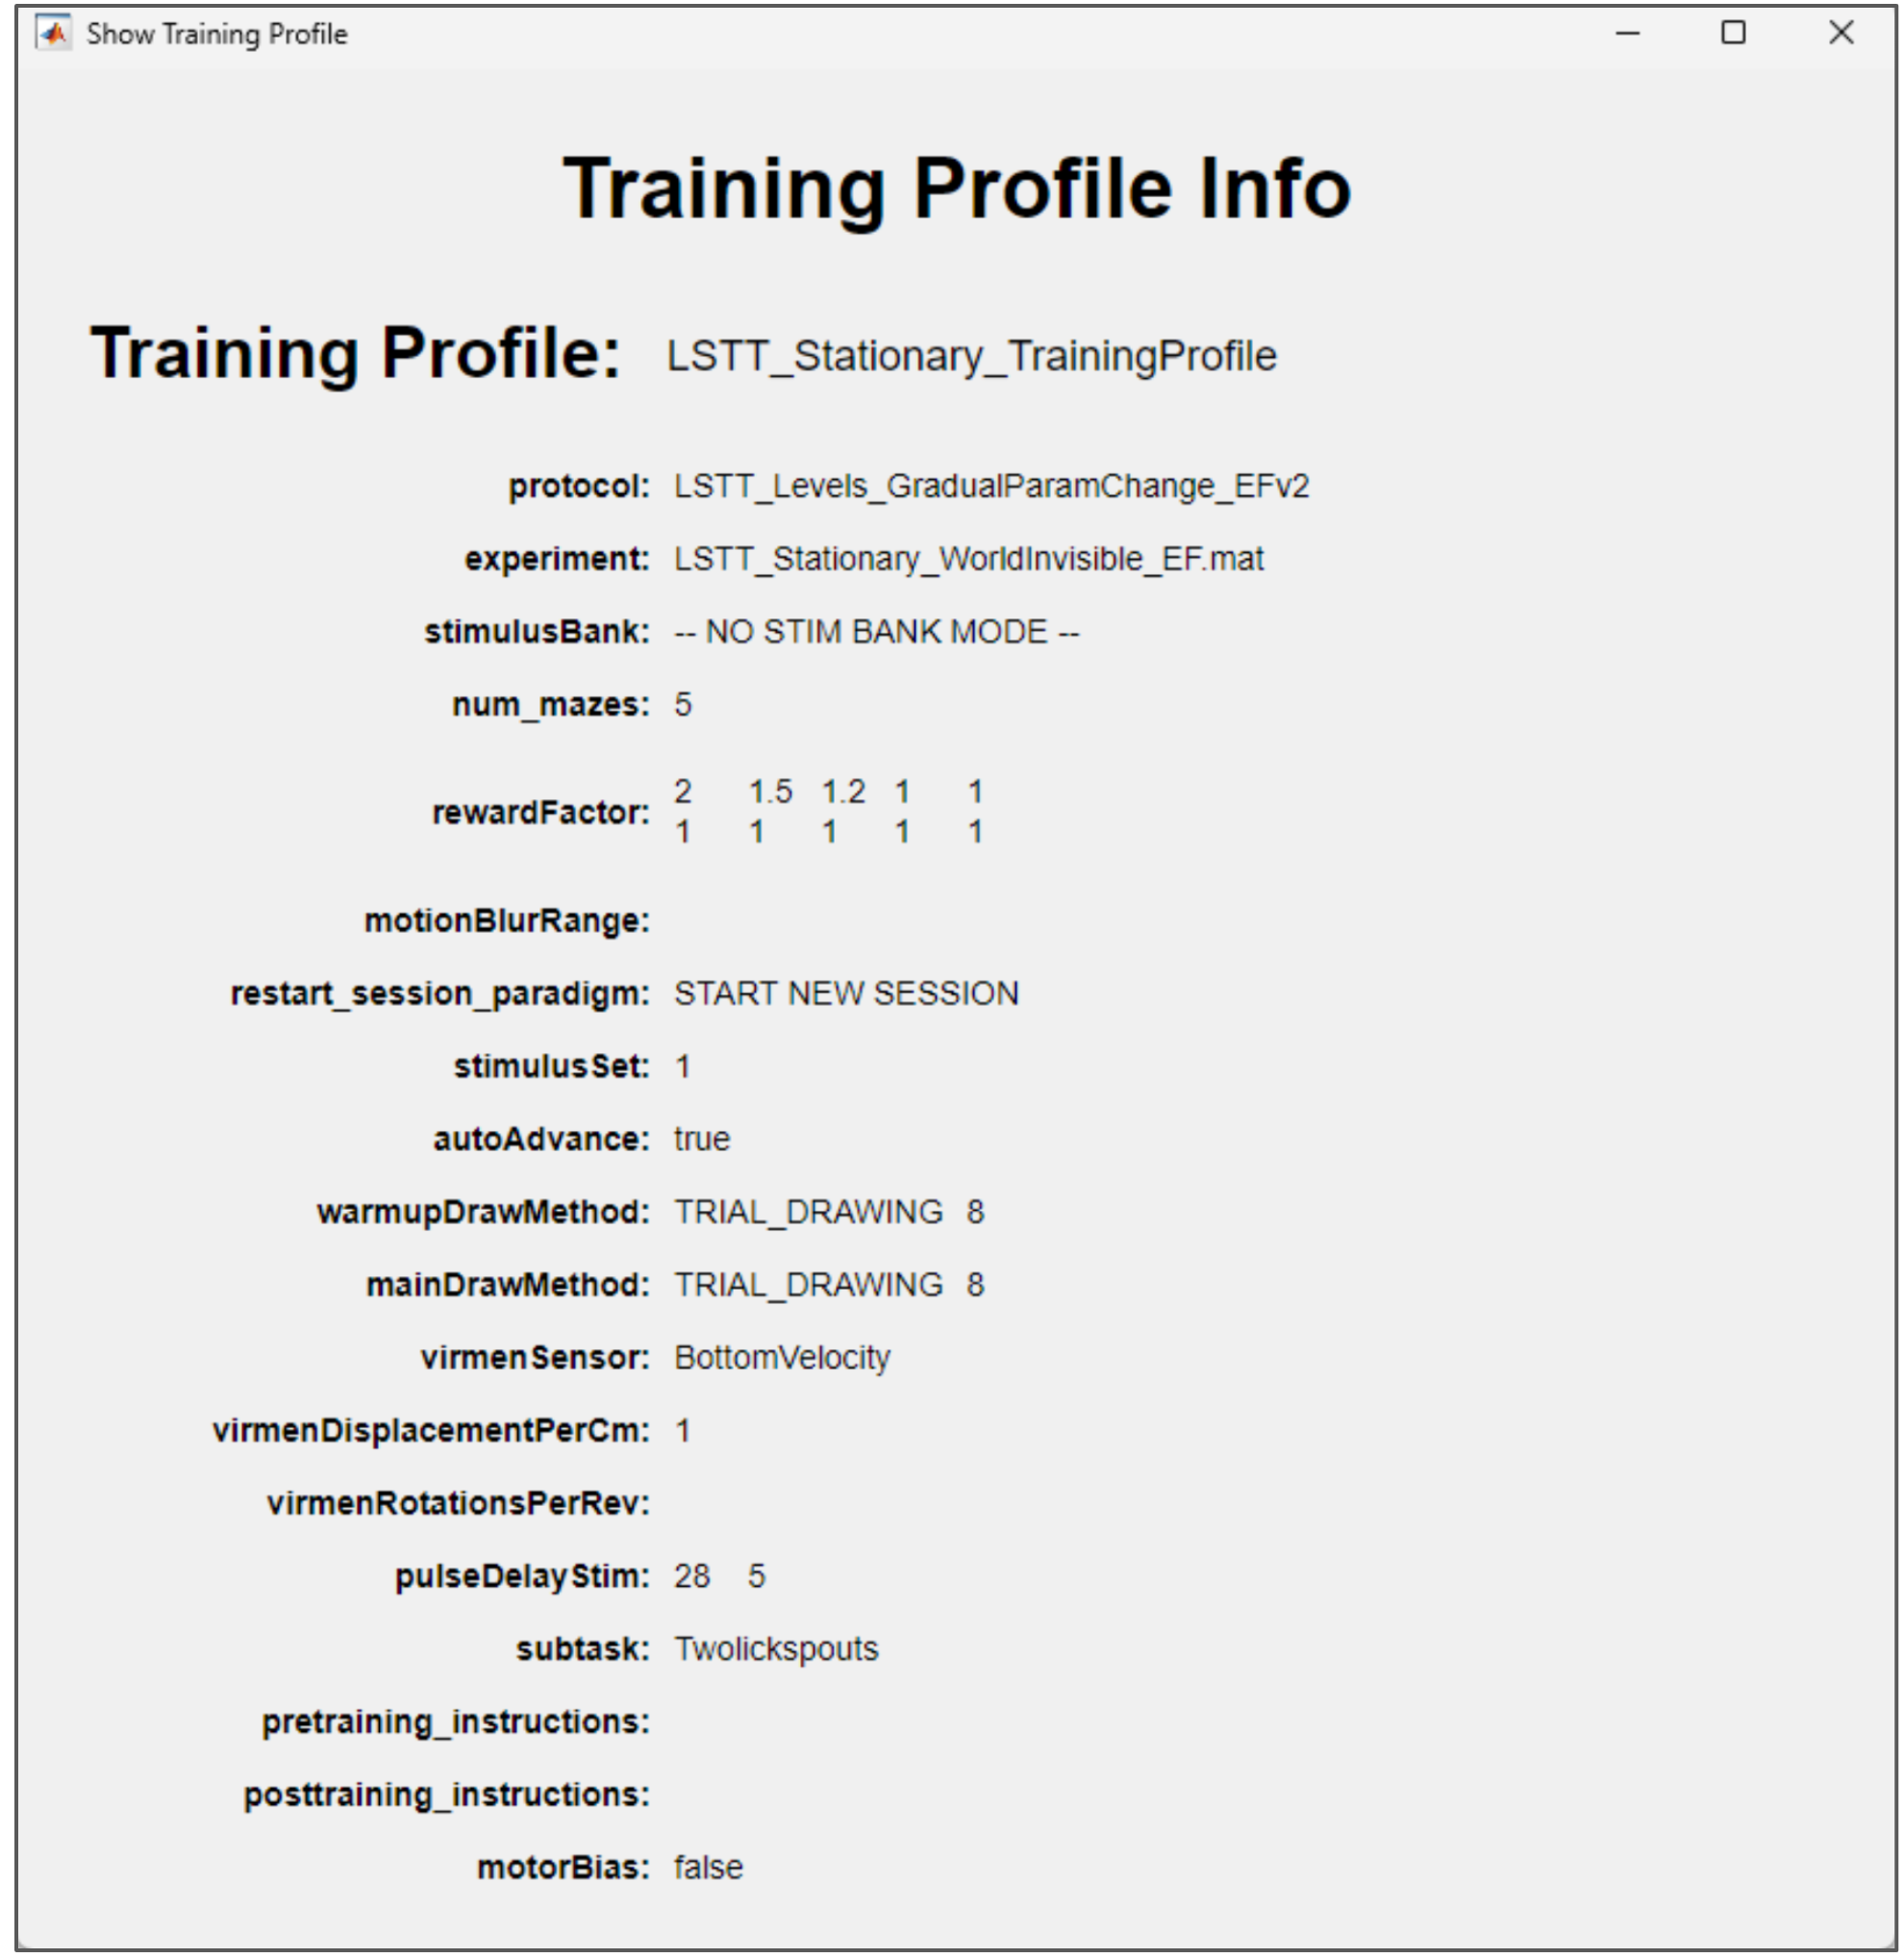
Check Training Profile Button: Opens a dialog (shown below) to verify all training profile variables for the experiment. See the Define Training Profile Web GUI section for more information.
a. Verify DB & Network Drive: Labels showing whether the Database and Network drive are working correctly. If the DB is not connected, ViRMEn Offline is used to continue training.
b. Add Test Training Slot Button: Click this to verify experiment code without creating a "real" session. The "Add test training" dialog appears; it is shown and described below.
c. Refresh Schedule Button: Refreshes the schedule in case changes were made to it during the day.
d. Open Rig Tester Button: If an IO needs to be rechecked, click this to open the Rig Tester GUI.
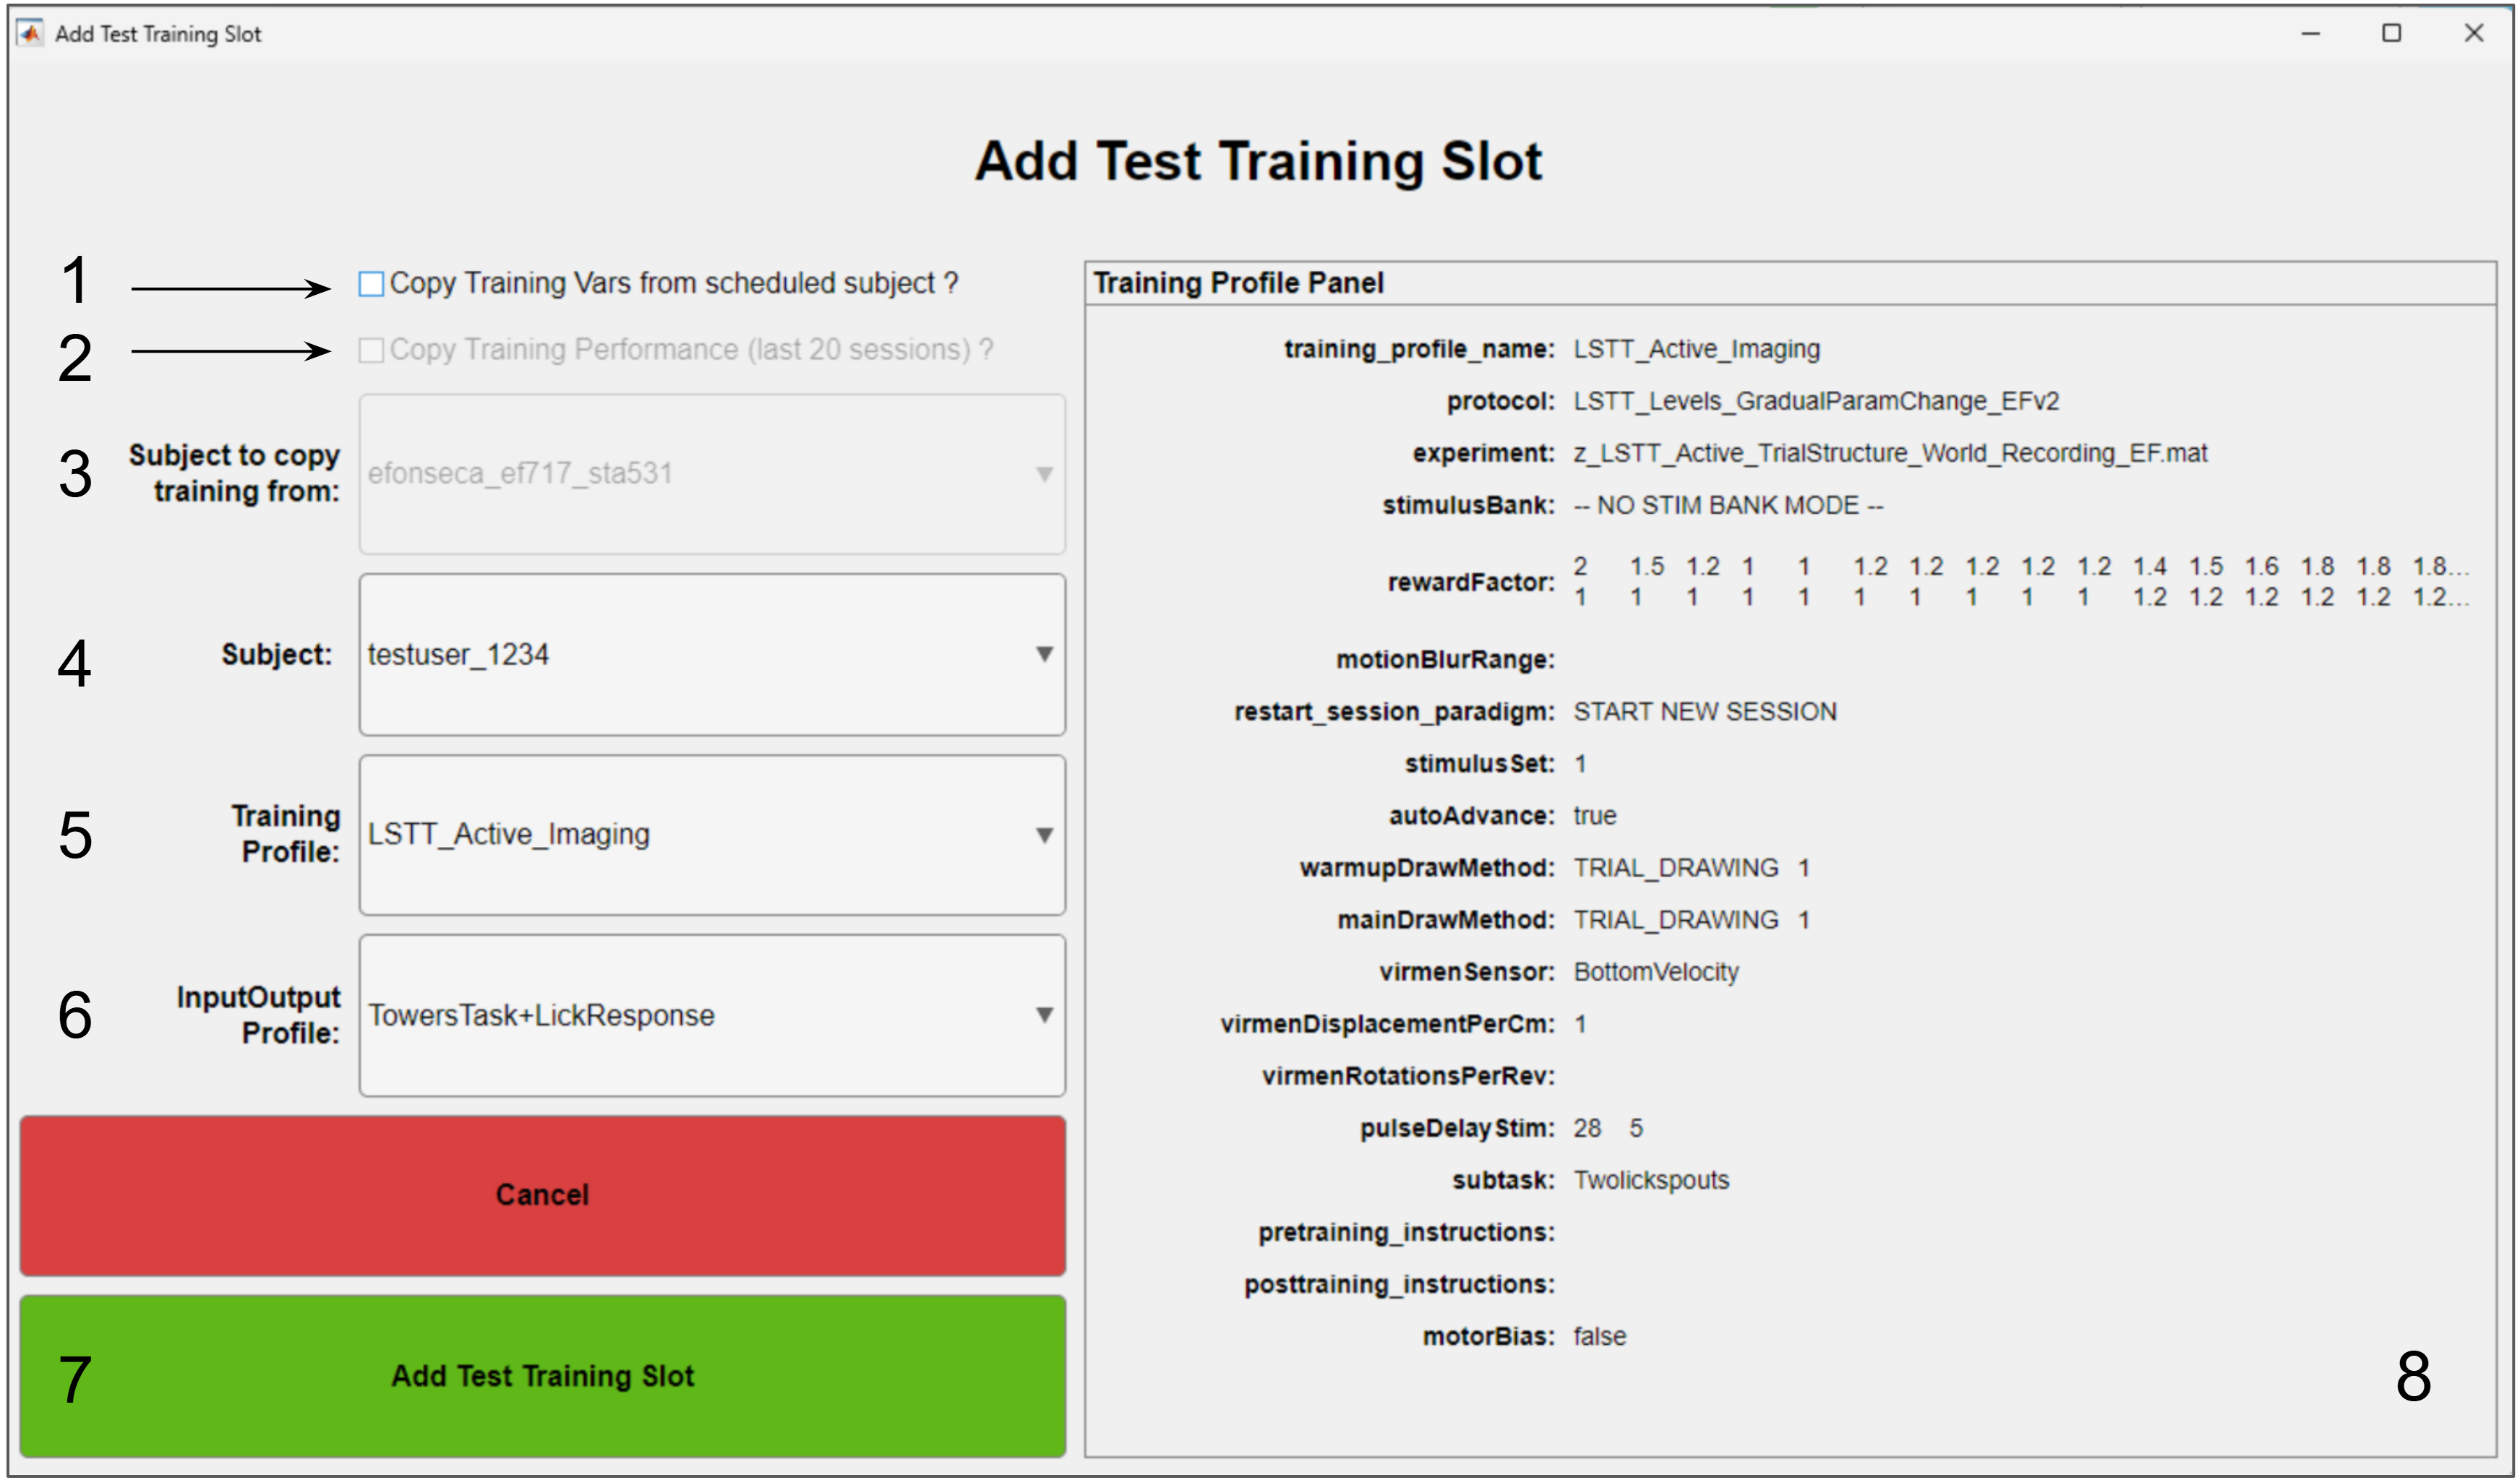
Below is a description of every part of the Add Test Training dialog.
Copy Training Vars from scheduled Checkbox: Check this to create a test subject with the same configuration as one of the subjects scheduled for the day.
Copy Training Performance Checkbox: Check this to copy the last 20 sessions of performance from the scheduled subject to the newly created test subject. Use this primarily to check that the maze advancement code and/or criteria work as expected. See the Protocol file and Maze advancement code sections for more information.
Subject Scheduled Selector: If option 1 is checked, select which subject you are copying the configuration from.
Subject Selector: If option 1 is unchecked, select which test subject will be used for the test training slot.
Training Profile Selector: If option 1 is unchecked, select which training profile will be used for the test training slot.
InputOutput Profile Selector: If option 1 is unchecked, select which InputOutput profile will be used for the test training slot. This normally has no effect on the test training, so leave it untouched if unsure.
Add Test Training Slot Button: Adds a new test subject slot to the Training Flow GUI.
Training Profile Panel: Panel to verify all training profile variables for the test training slot.
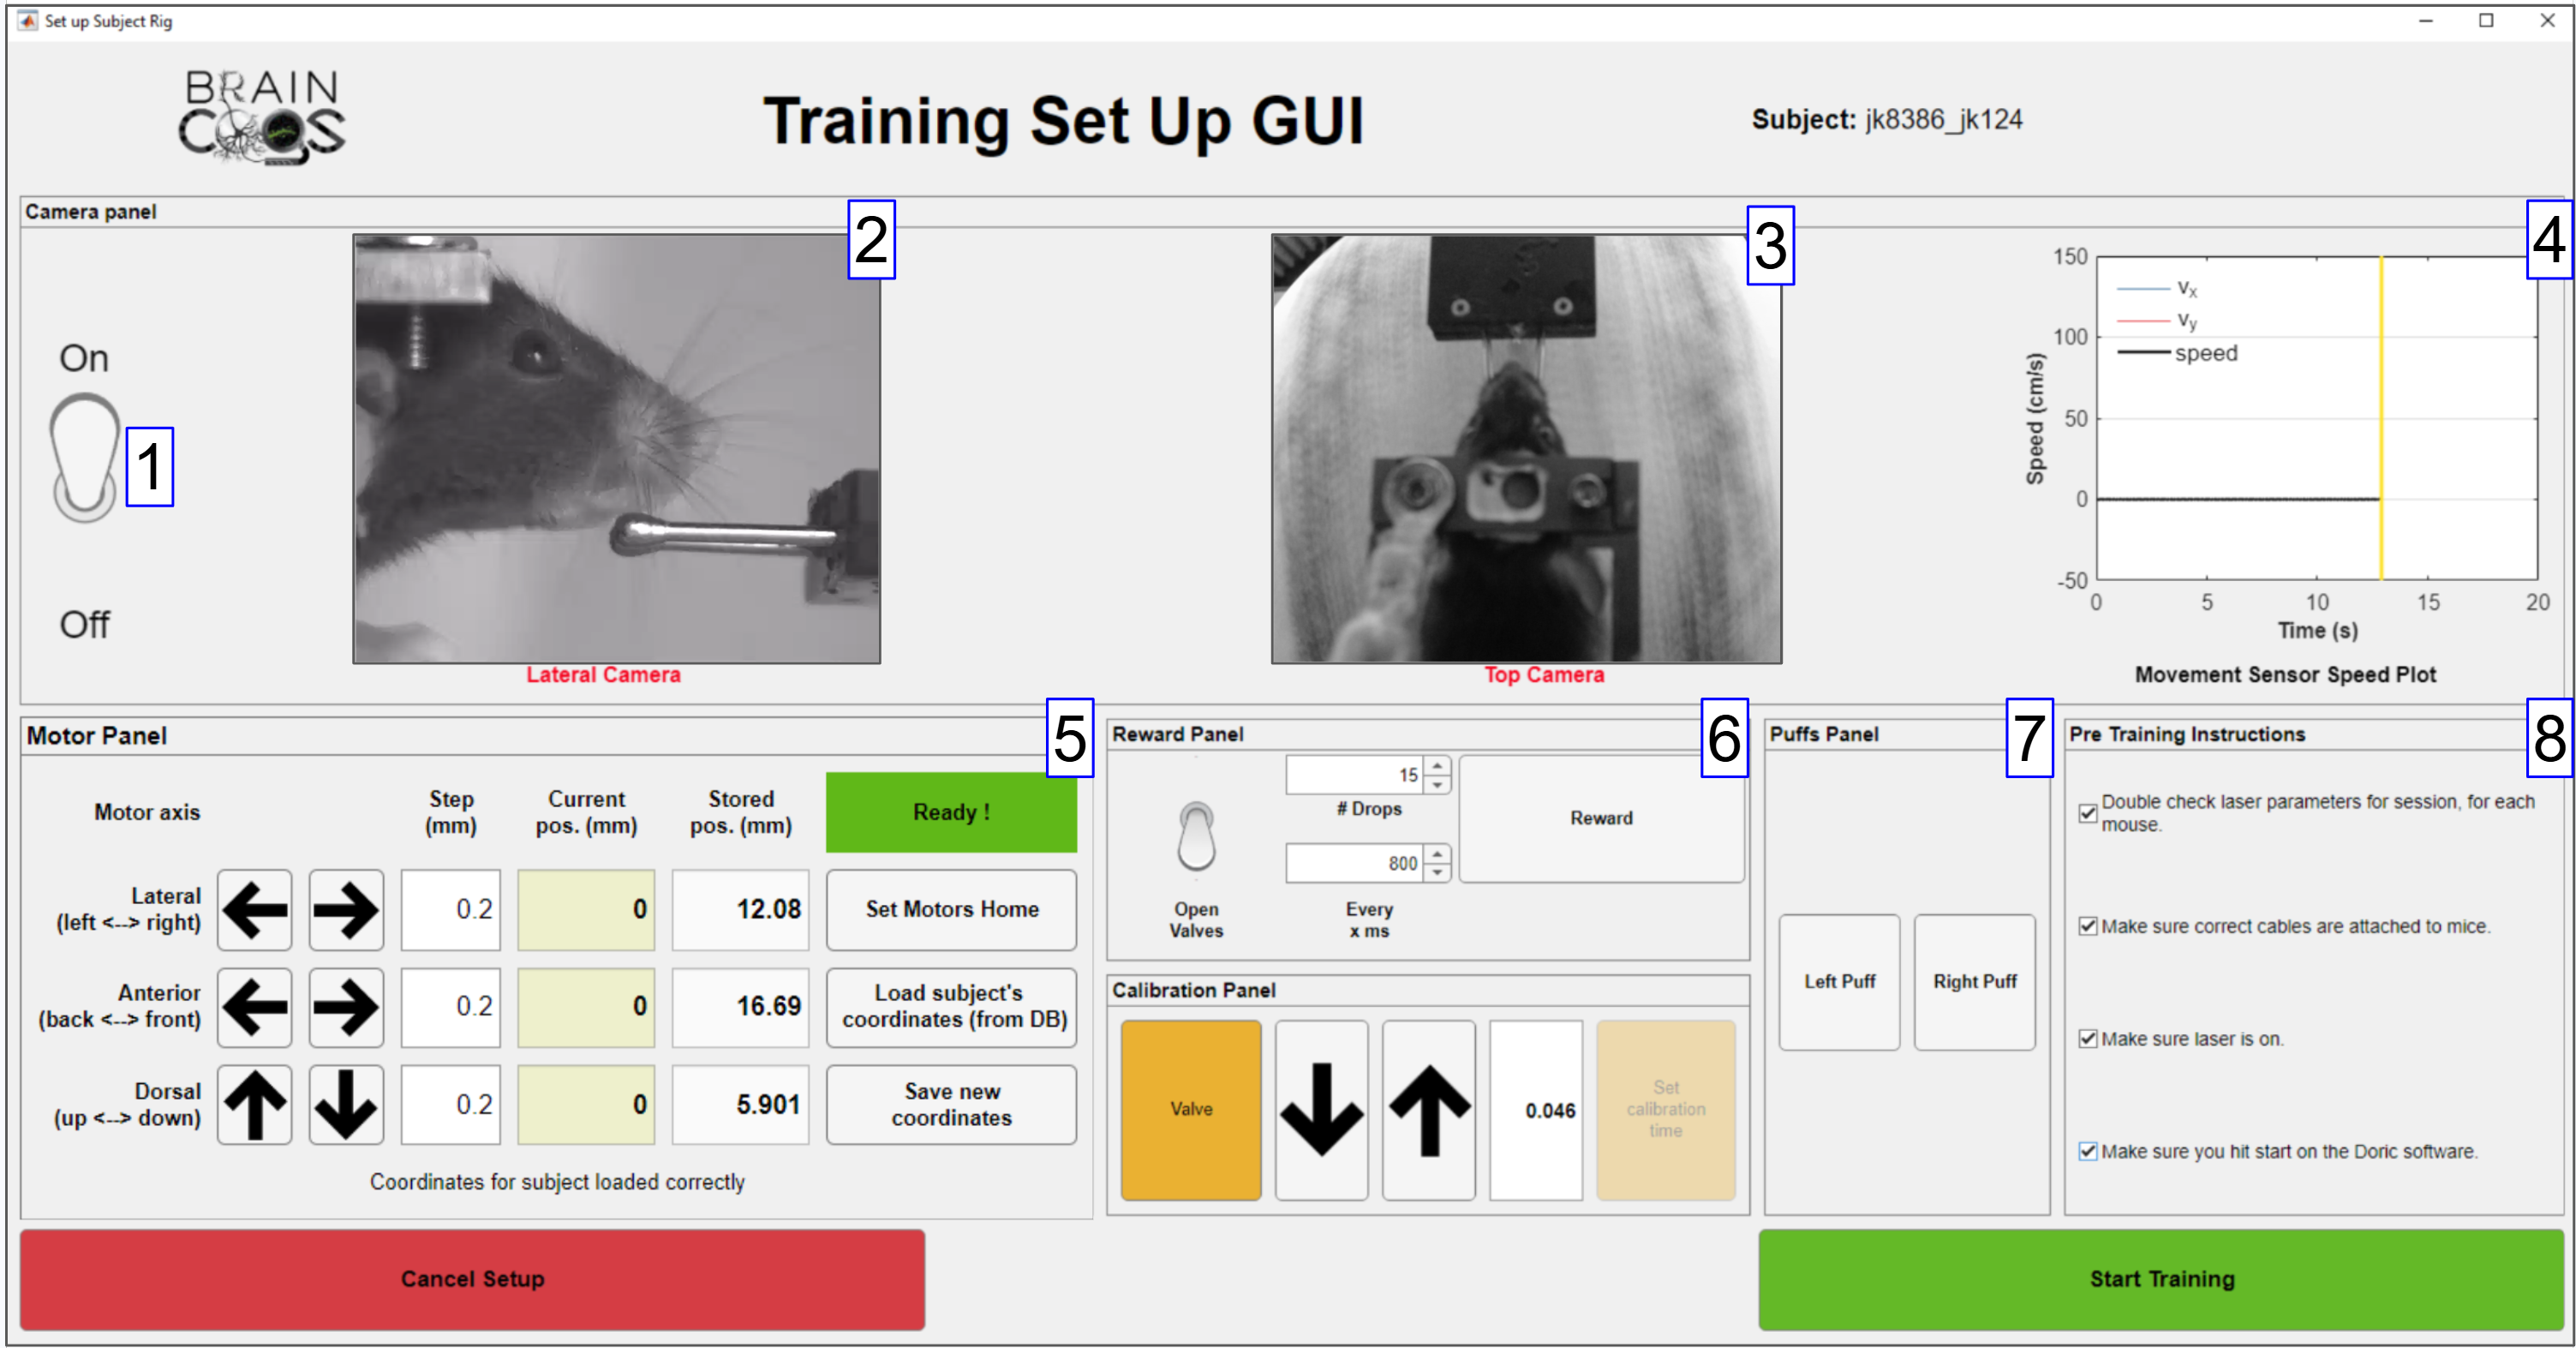
After you click the Train button on the Training Flow GUI, the Training Setup GUI appears. Here you can make final adjustments before the experiment starts.
Below is a description of every part of the Training Setup GUI.
Turn On/Off Cameras Switch: Turns on the cameras (if installed) to verify the subject's position.
Lateral Camera View: View to verify and correct the subject's anterior and dorsal positioning.
Top Camera View: View to verify and correct the subject's lateral and anterior positioning.
Movement Sensor Plot: Plot to verify that the Arduino movement sensor is working correctly.
Motor Panel: Panel to adjust motor position.
Arrow Buttons: Perform a single motor step in the chosen direction.
Step Edits: Adjust the motor step size for the corresponding axis.
Current Position Labels: Show the current position of the motors.
Stored Position Labels: Show the last position stored in the database for the current subject on this particular rig. For a new subject, the average position of the subjects on this rig is shown.
Set Motors Home Button: Set all motors to position 0 mm. Use this only when there is no subject in the rig!
Load Subject Coordinates Button: Coordinates are normally already loaded for the subject. Use this only when coordinates have changed substantially.
Save New Coordinates Button: Click this once the motor position has been adjusted. The new coordinates will be available for the next run.
Reward & Calibration Panel: Calibration with the same functionality as in the Rig Tester , plus buttons to deliver a small reward to the subject in the rig. This lets you verify that the subject can reach the reward lick spouts comfortably.
Puff Panel: (Only visible for rigs with air puffs.) Lets you verify that the subject and the air puff valves are positioned so the subject receives the air puff stimulation.
Pre Training Instructions Panel: (Only visible for subjects with pretraining instructions defined in the training profile; see the Training Profile Management section .) Final instructions for the technician to complete before starting training. The Start training subject button stays disabled until all of these are checked.
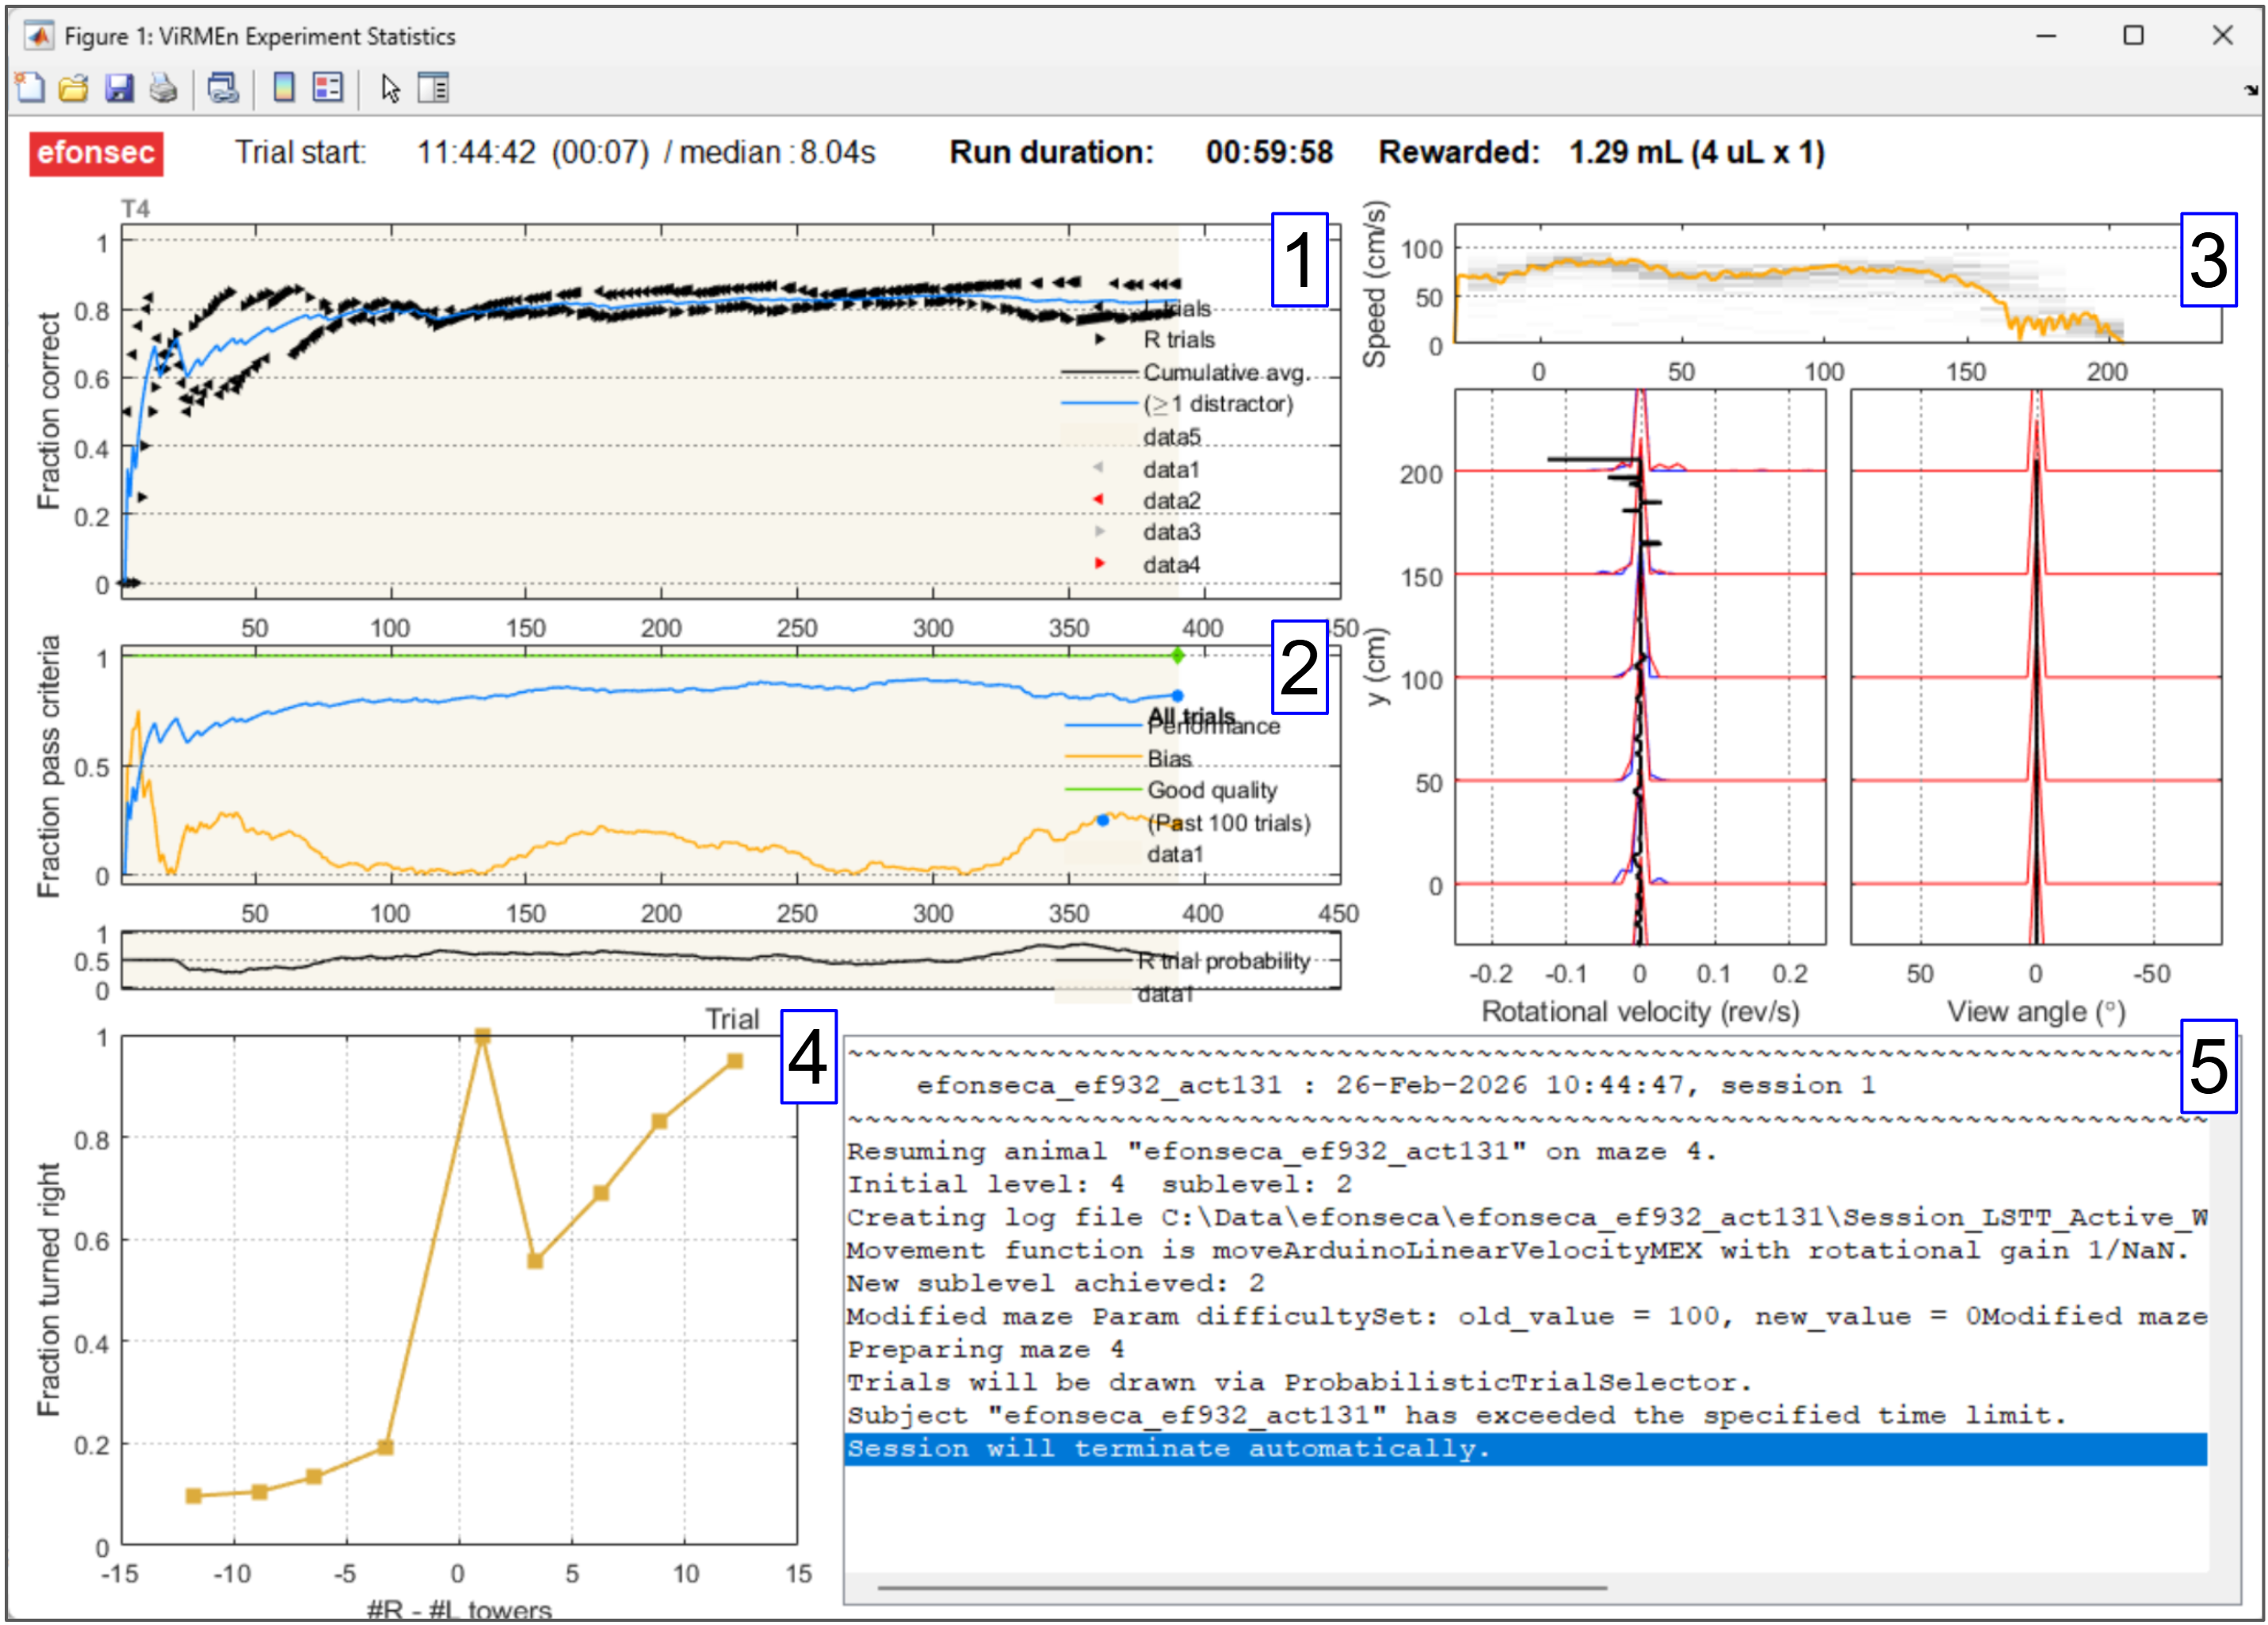
After you click the Start training subject button, the ViRMEn experiment starts and the ViRMEn Experiment Stats GUI appears. This GUI monitors the subject's current performance throughout the session.
Below is a description of every part of the ViRMEn Experiment Stats GUI.
Fraction Correct Plot: Overall and left/right performance across all blocks of the session.
Pass Criteria Plot: Performance and bias over the last 40 trials. These stats determine whether the subject is promoted to the next level.
Speed, Rotation & Angle Plots: Plots of the displacement variables from the last trial, used to verify that the movement sensor is working correctly and to monitor the subject's side bias.
Psychometric Plot: Percentage of right responses vs. right/left tower trials. For a well-trained subject, this plot should roughly approximate a sigmoid.
Message Text Area: Session milestones are written here, such as: new level achieved, forced reward delivery, level demotion, etc.
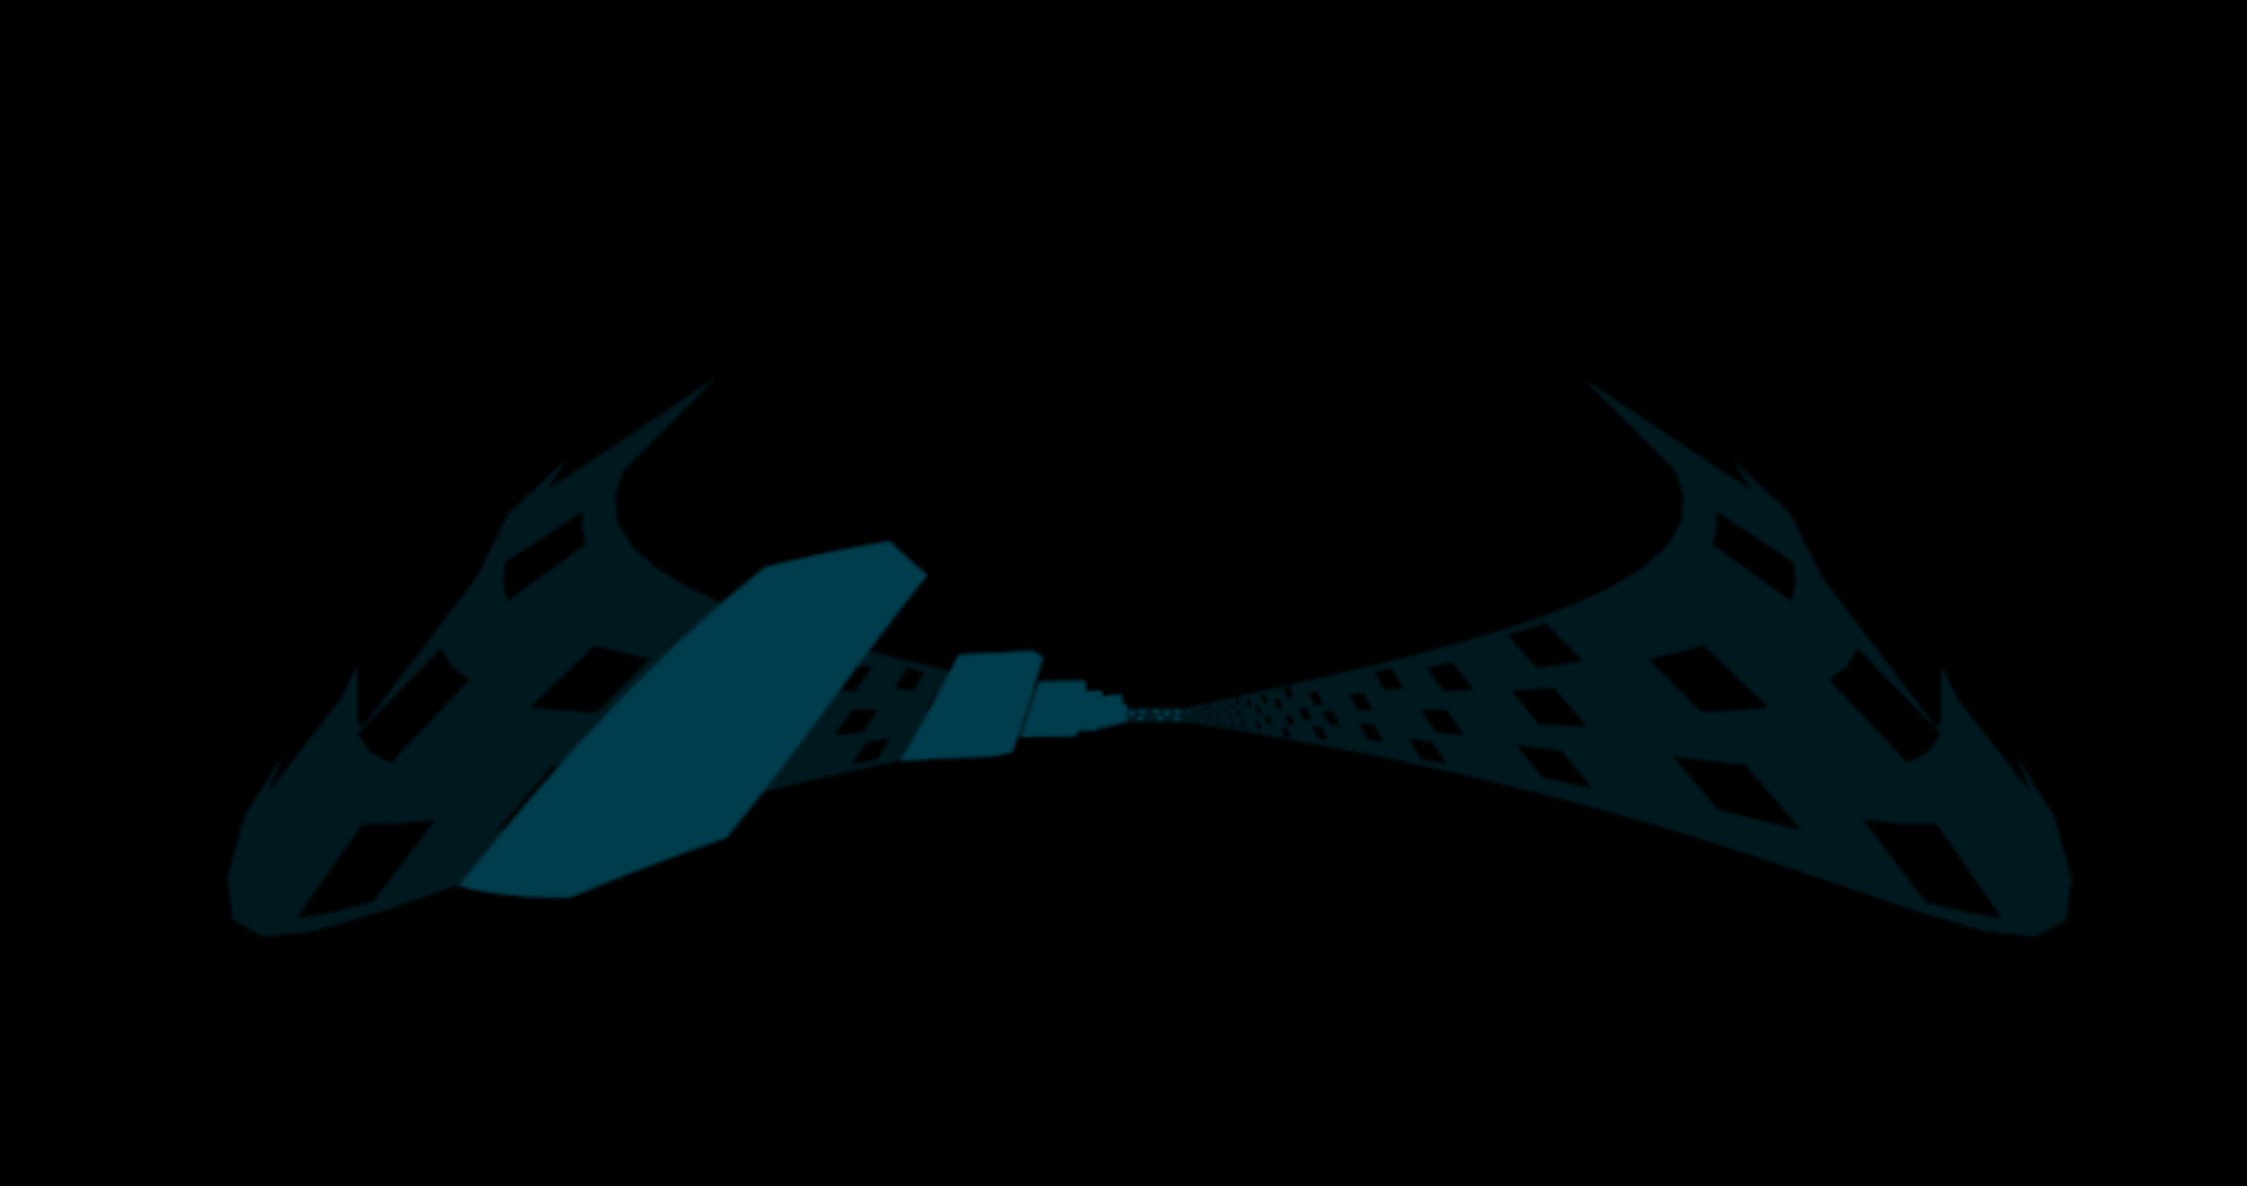
In addition to the Experiment Stats GUI, the virtual reality world is displayed on the rig projector. It may look something like the image below:
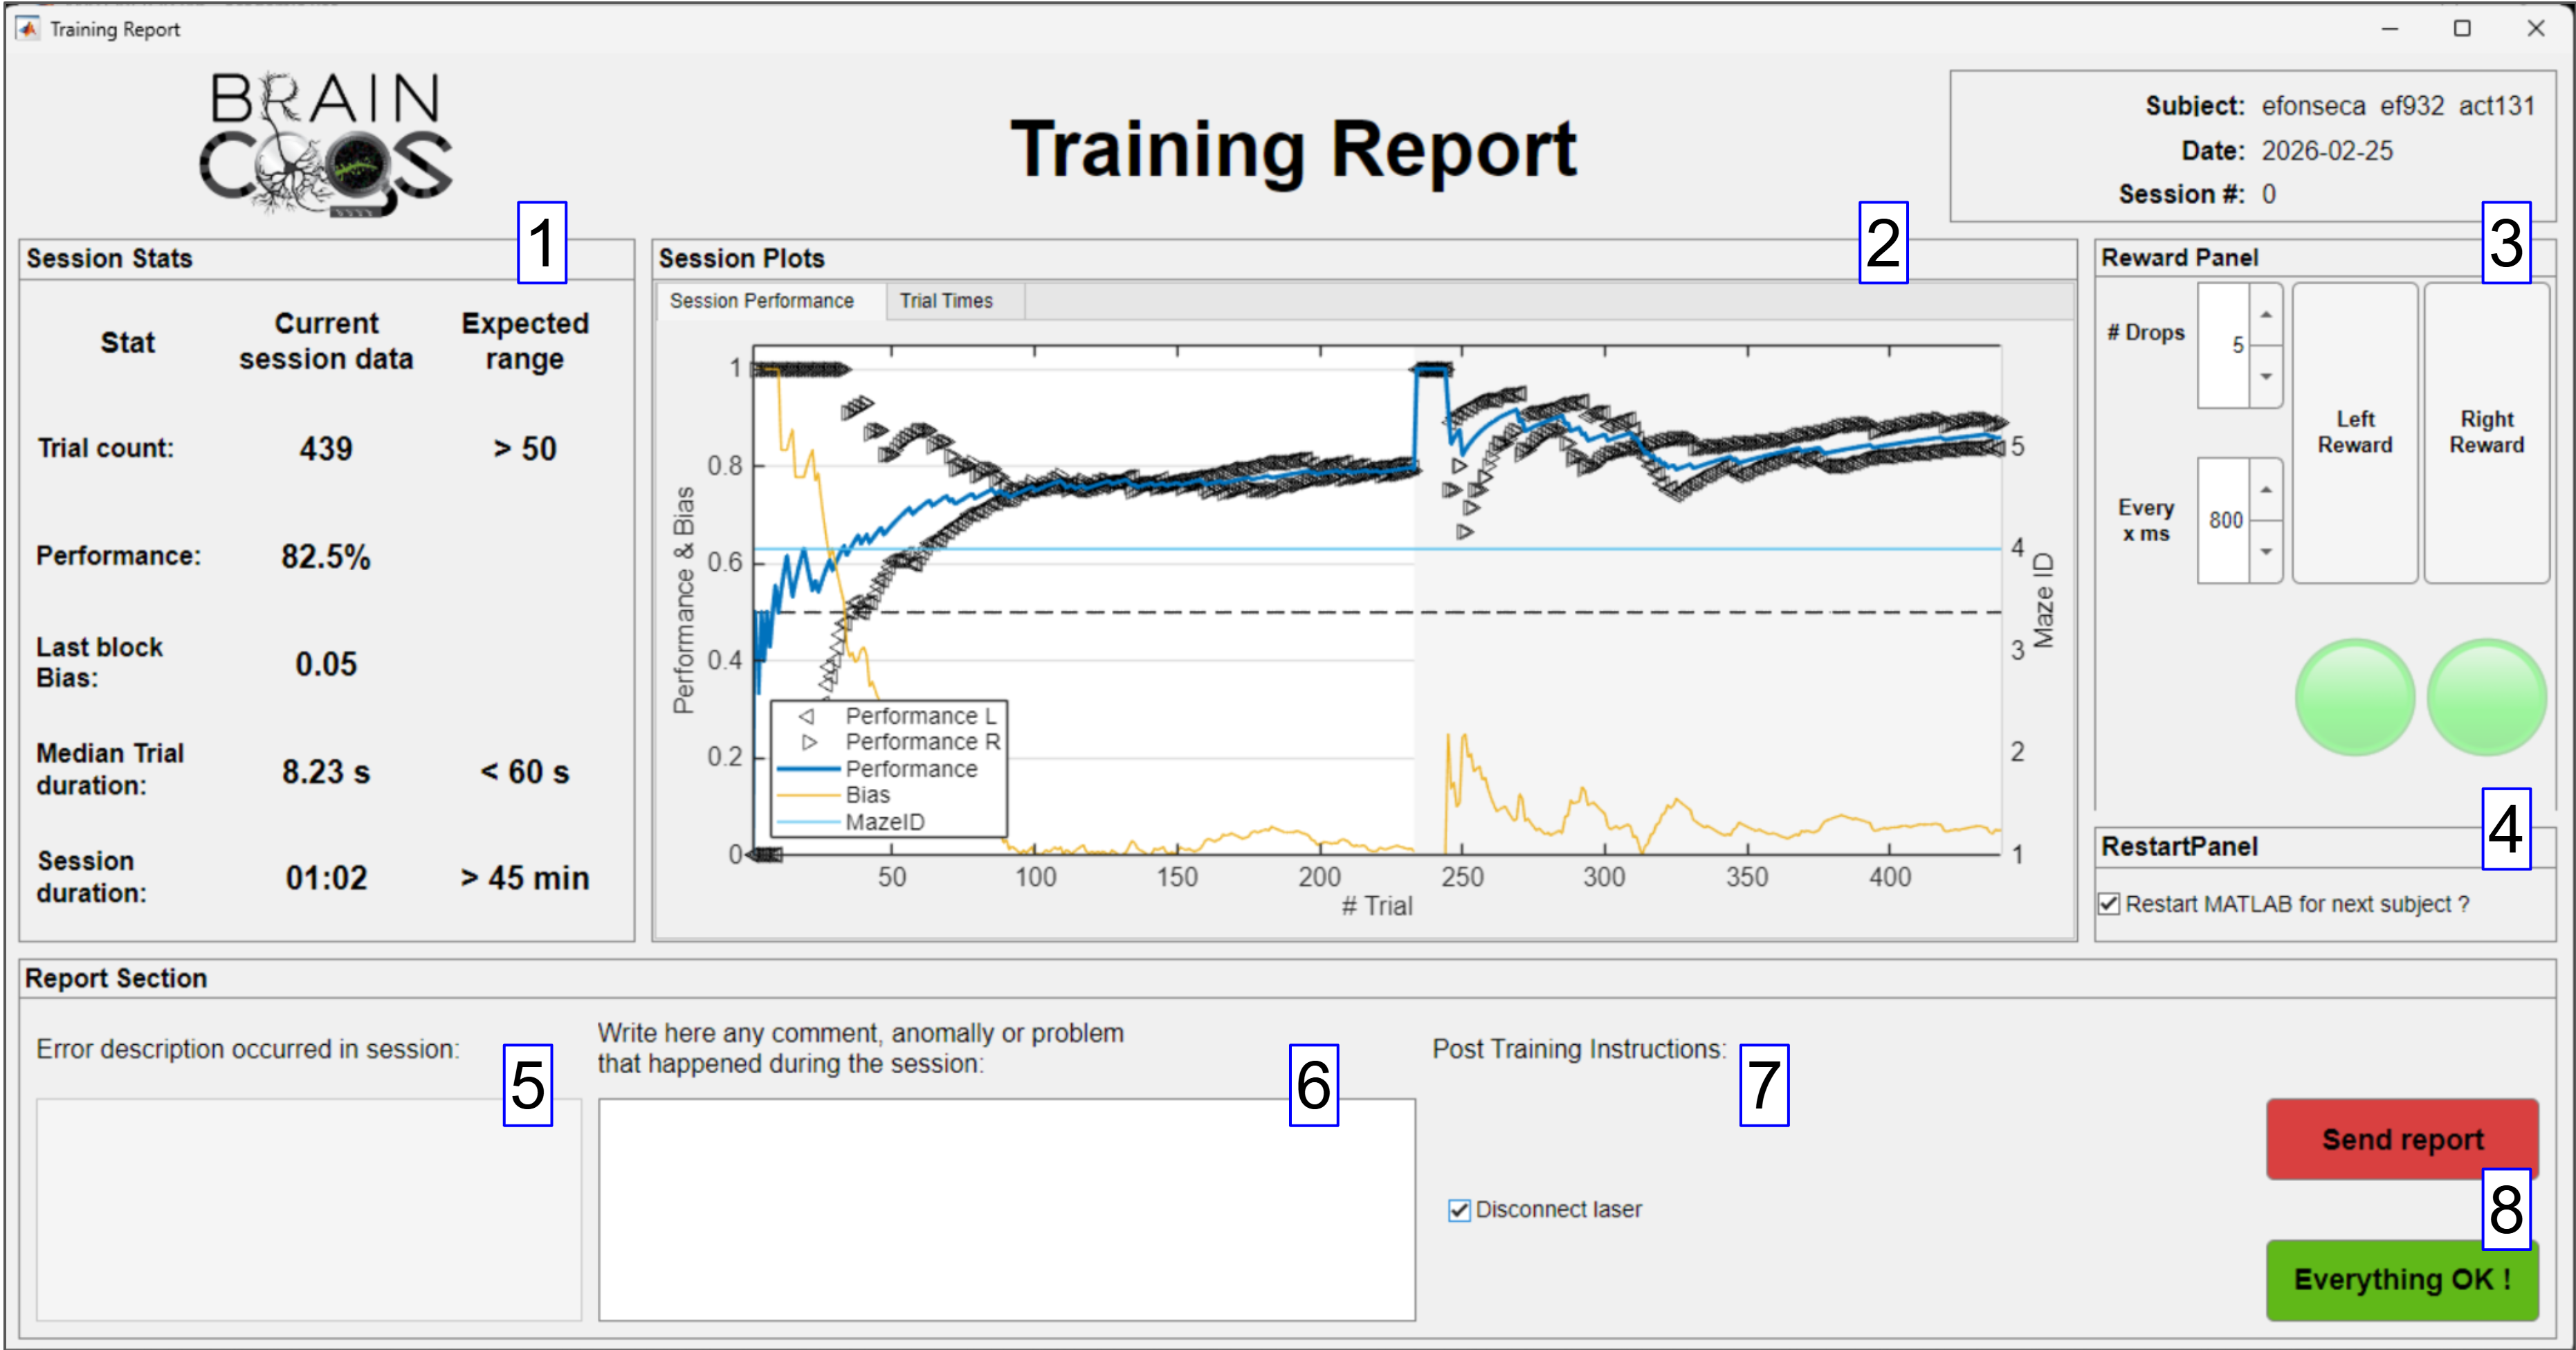
Once the subject's session is over, the Post Training GUI appears. This GUI monitors overall performance and verifies that no code error occurred during the experiment.
Below is a description of every part of the Post Training GUI.
Session Stats Panel: The most common performance stats for the session. If session data is shown in red, an error or something abnormal most likely occurred during the session.
Session Plots: Overall and left/right performance across all blocks of the session.
Reward Panel: Same functionality as the Reward Panel in the Training Setup GUI.
Restart Panel: By default, MATLAB restarts after a subject is trained. You can prevent this by unchecking the checkbox in this panel.
Error Description Area: If an error occurred during training, this window shows it as MATLAB reports it.
Error Comment Area: Window to add extra comments if a report is sent.
Post Training Instructions Checkboxes: (Only visible for subjects with posttraining instructions defined in the training profile; see the Training Profile Management section .) Final instructions for the technician to complete after training the subject. The Everything OK button stays disabled until all of these are checked.
Send Report and Everything OK Buttons: If an error occurred, the technician can send a report by clicking the corresponding button. This sends a Slack message to the #rig_training_error_notification channel.
If the rig where training happens has a motor positioning system (ask the Lab Manager about it), you need to set up the initial coordinates for each subject trained on that rig.
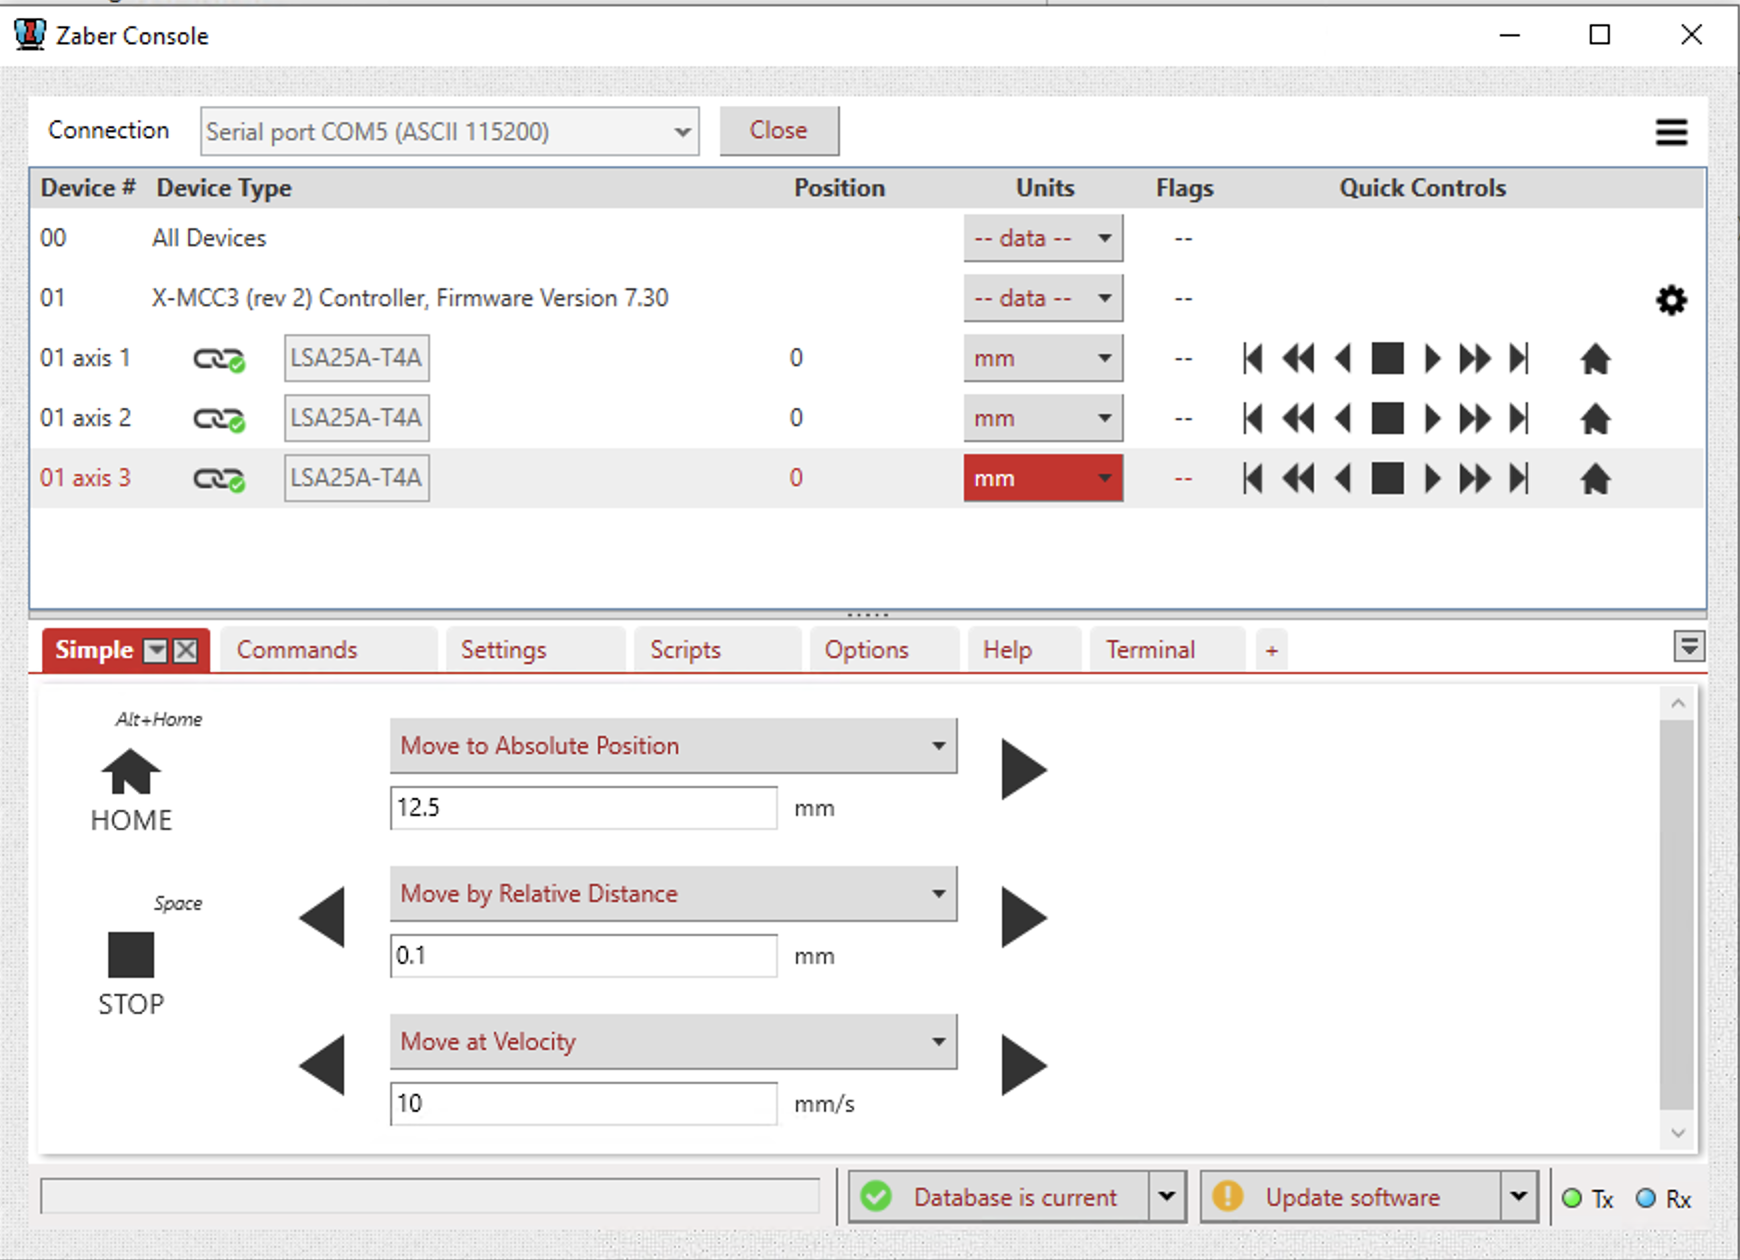
Adjust the subject's positioning for the first time on the rig using the motor GUI (installed on the rig computer).
In MATLAB, enter the following (replace the code in brackets with the corresponding info for the subject):
new_record = structnew_record.subject_fullname =['efonseca_ef481_actpg004']; # Subject fullnamenew_record.ml_position =[17.5] # ml position in mm(motor axis#1 position in GUI)new_record.ap_position =[10] # ap position in mm(motor axis#2 position in GUI)new_record.dv_position =[15.3] # dv position in mm(motor axis#3 position in GUI)insert(subject.LickometerMotorPosition, new_record)
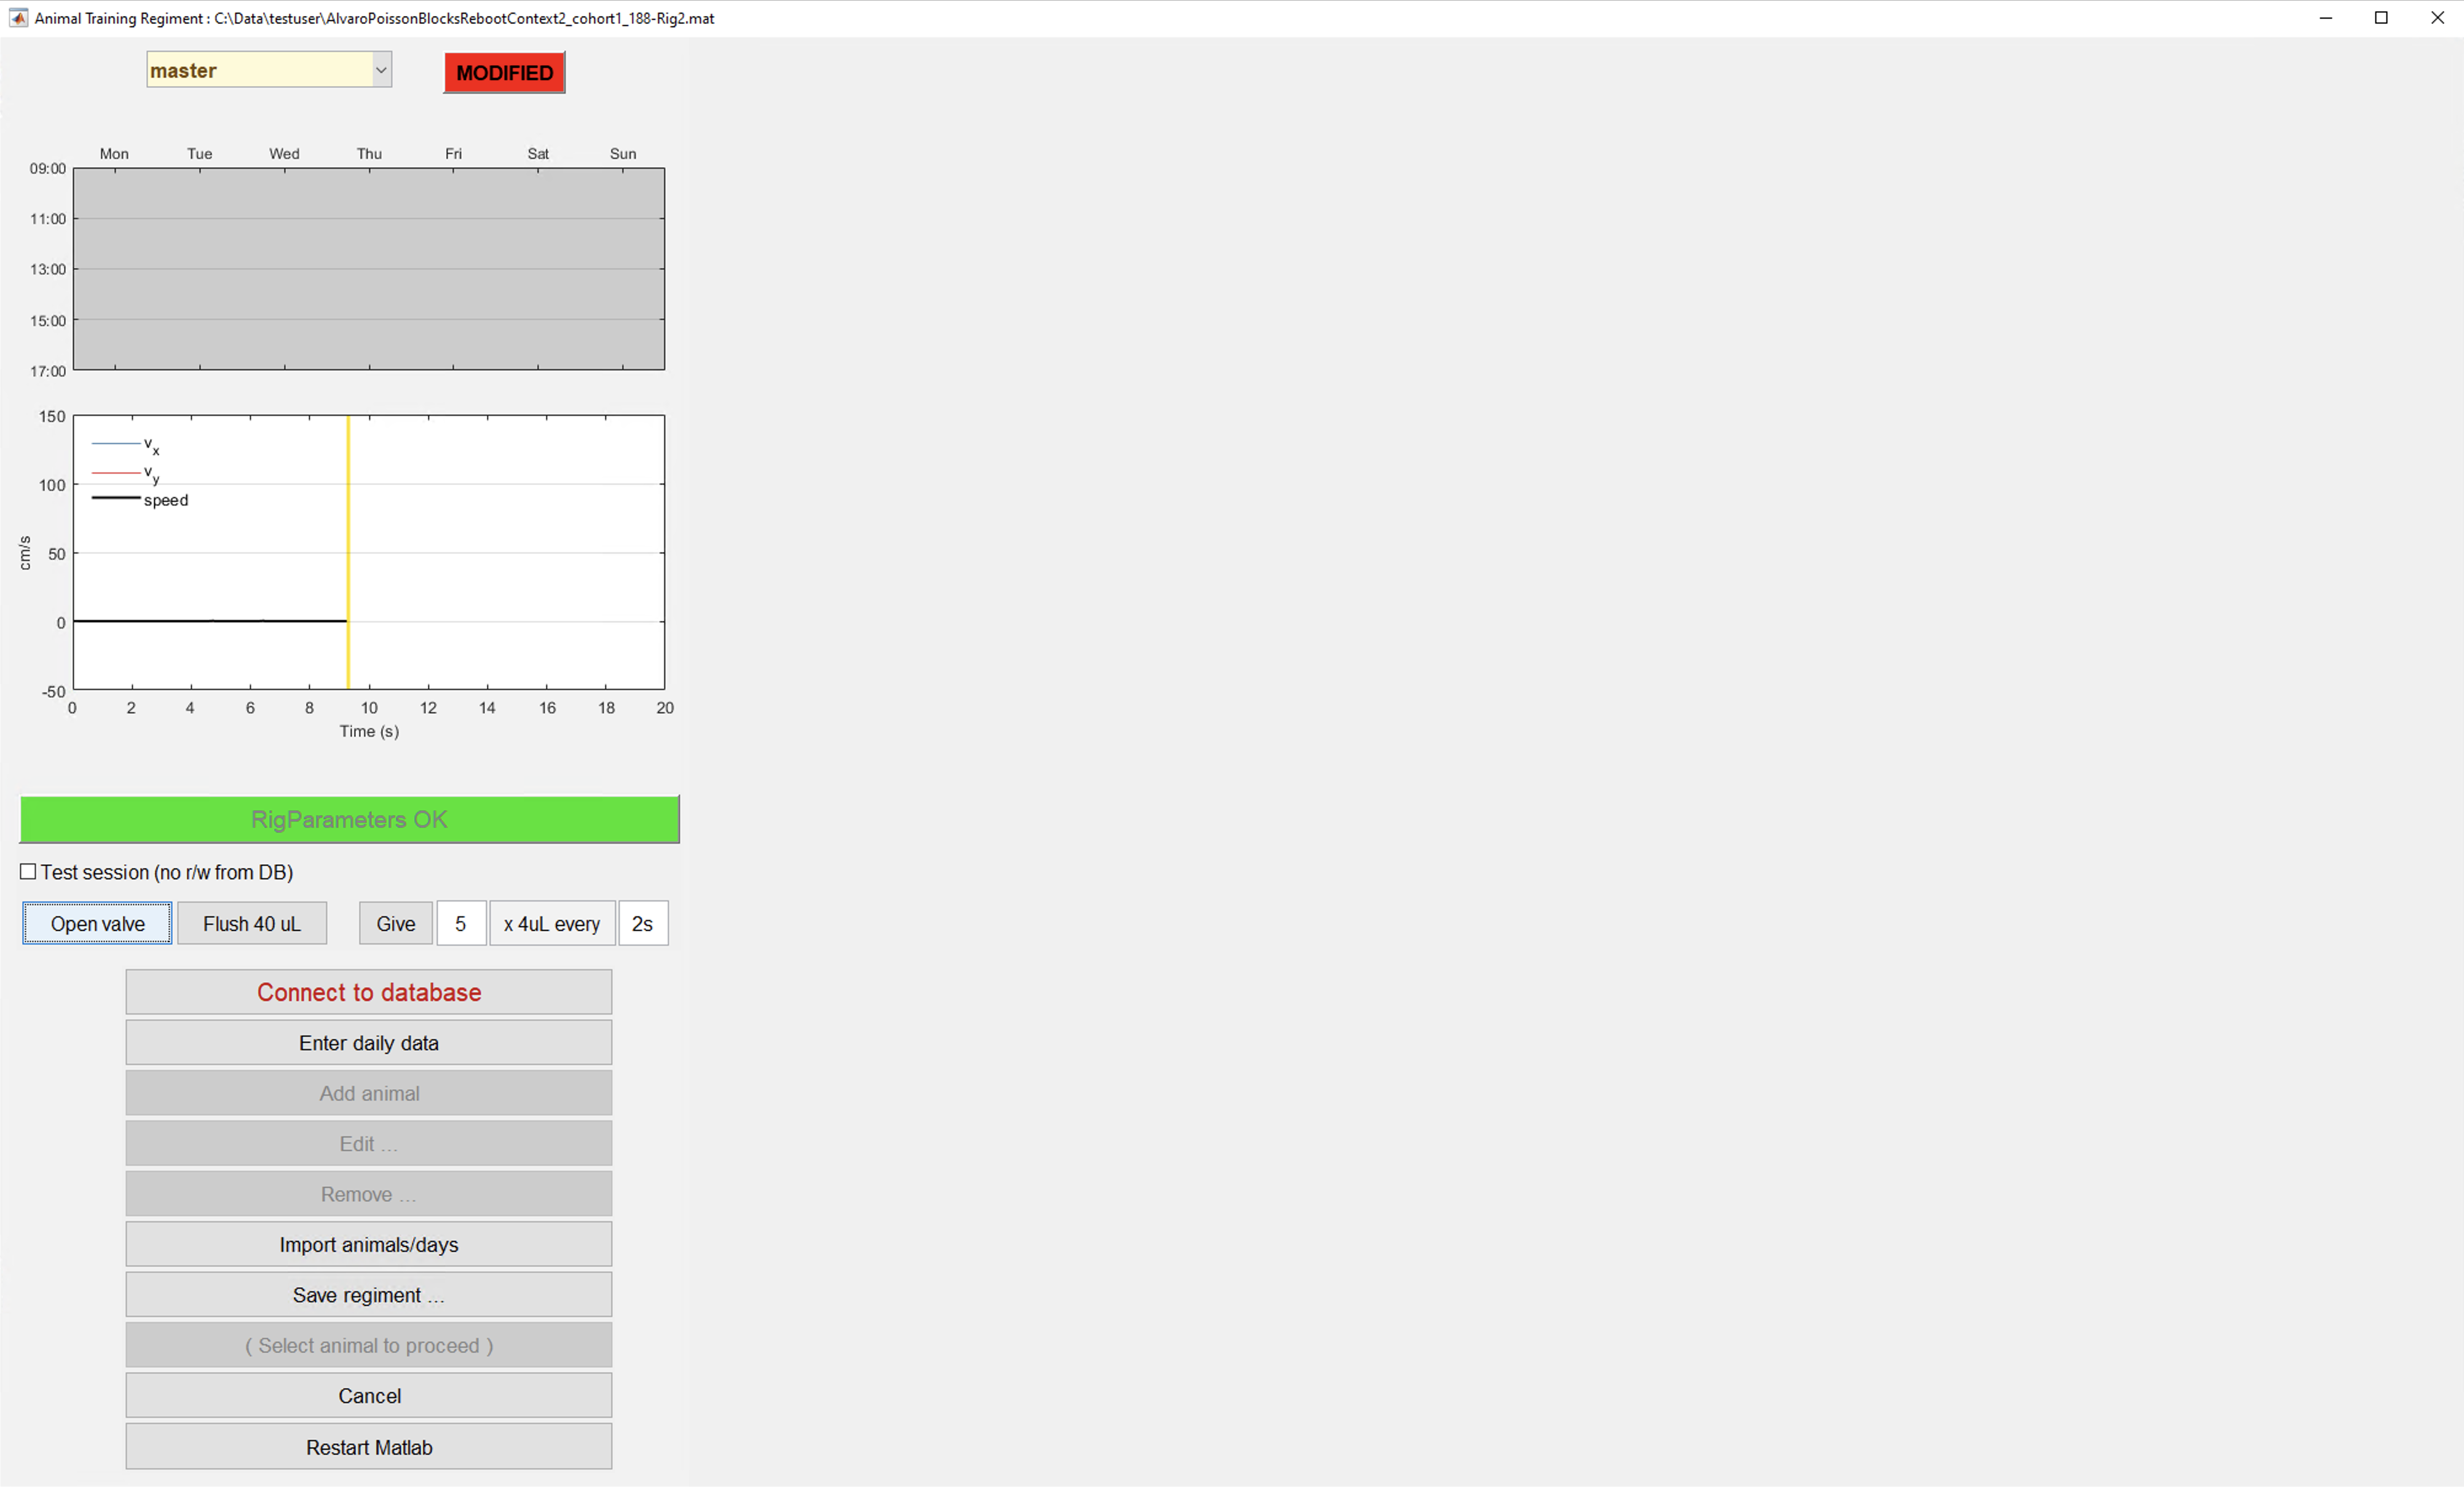
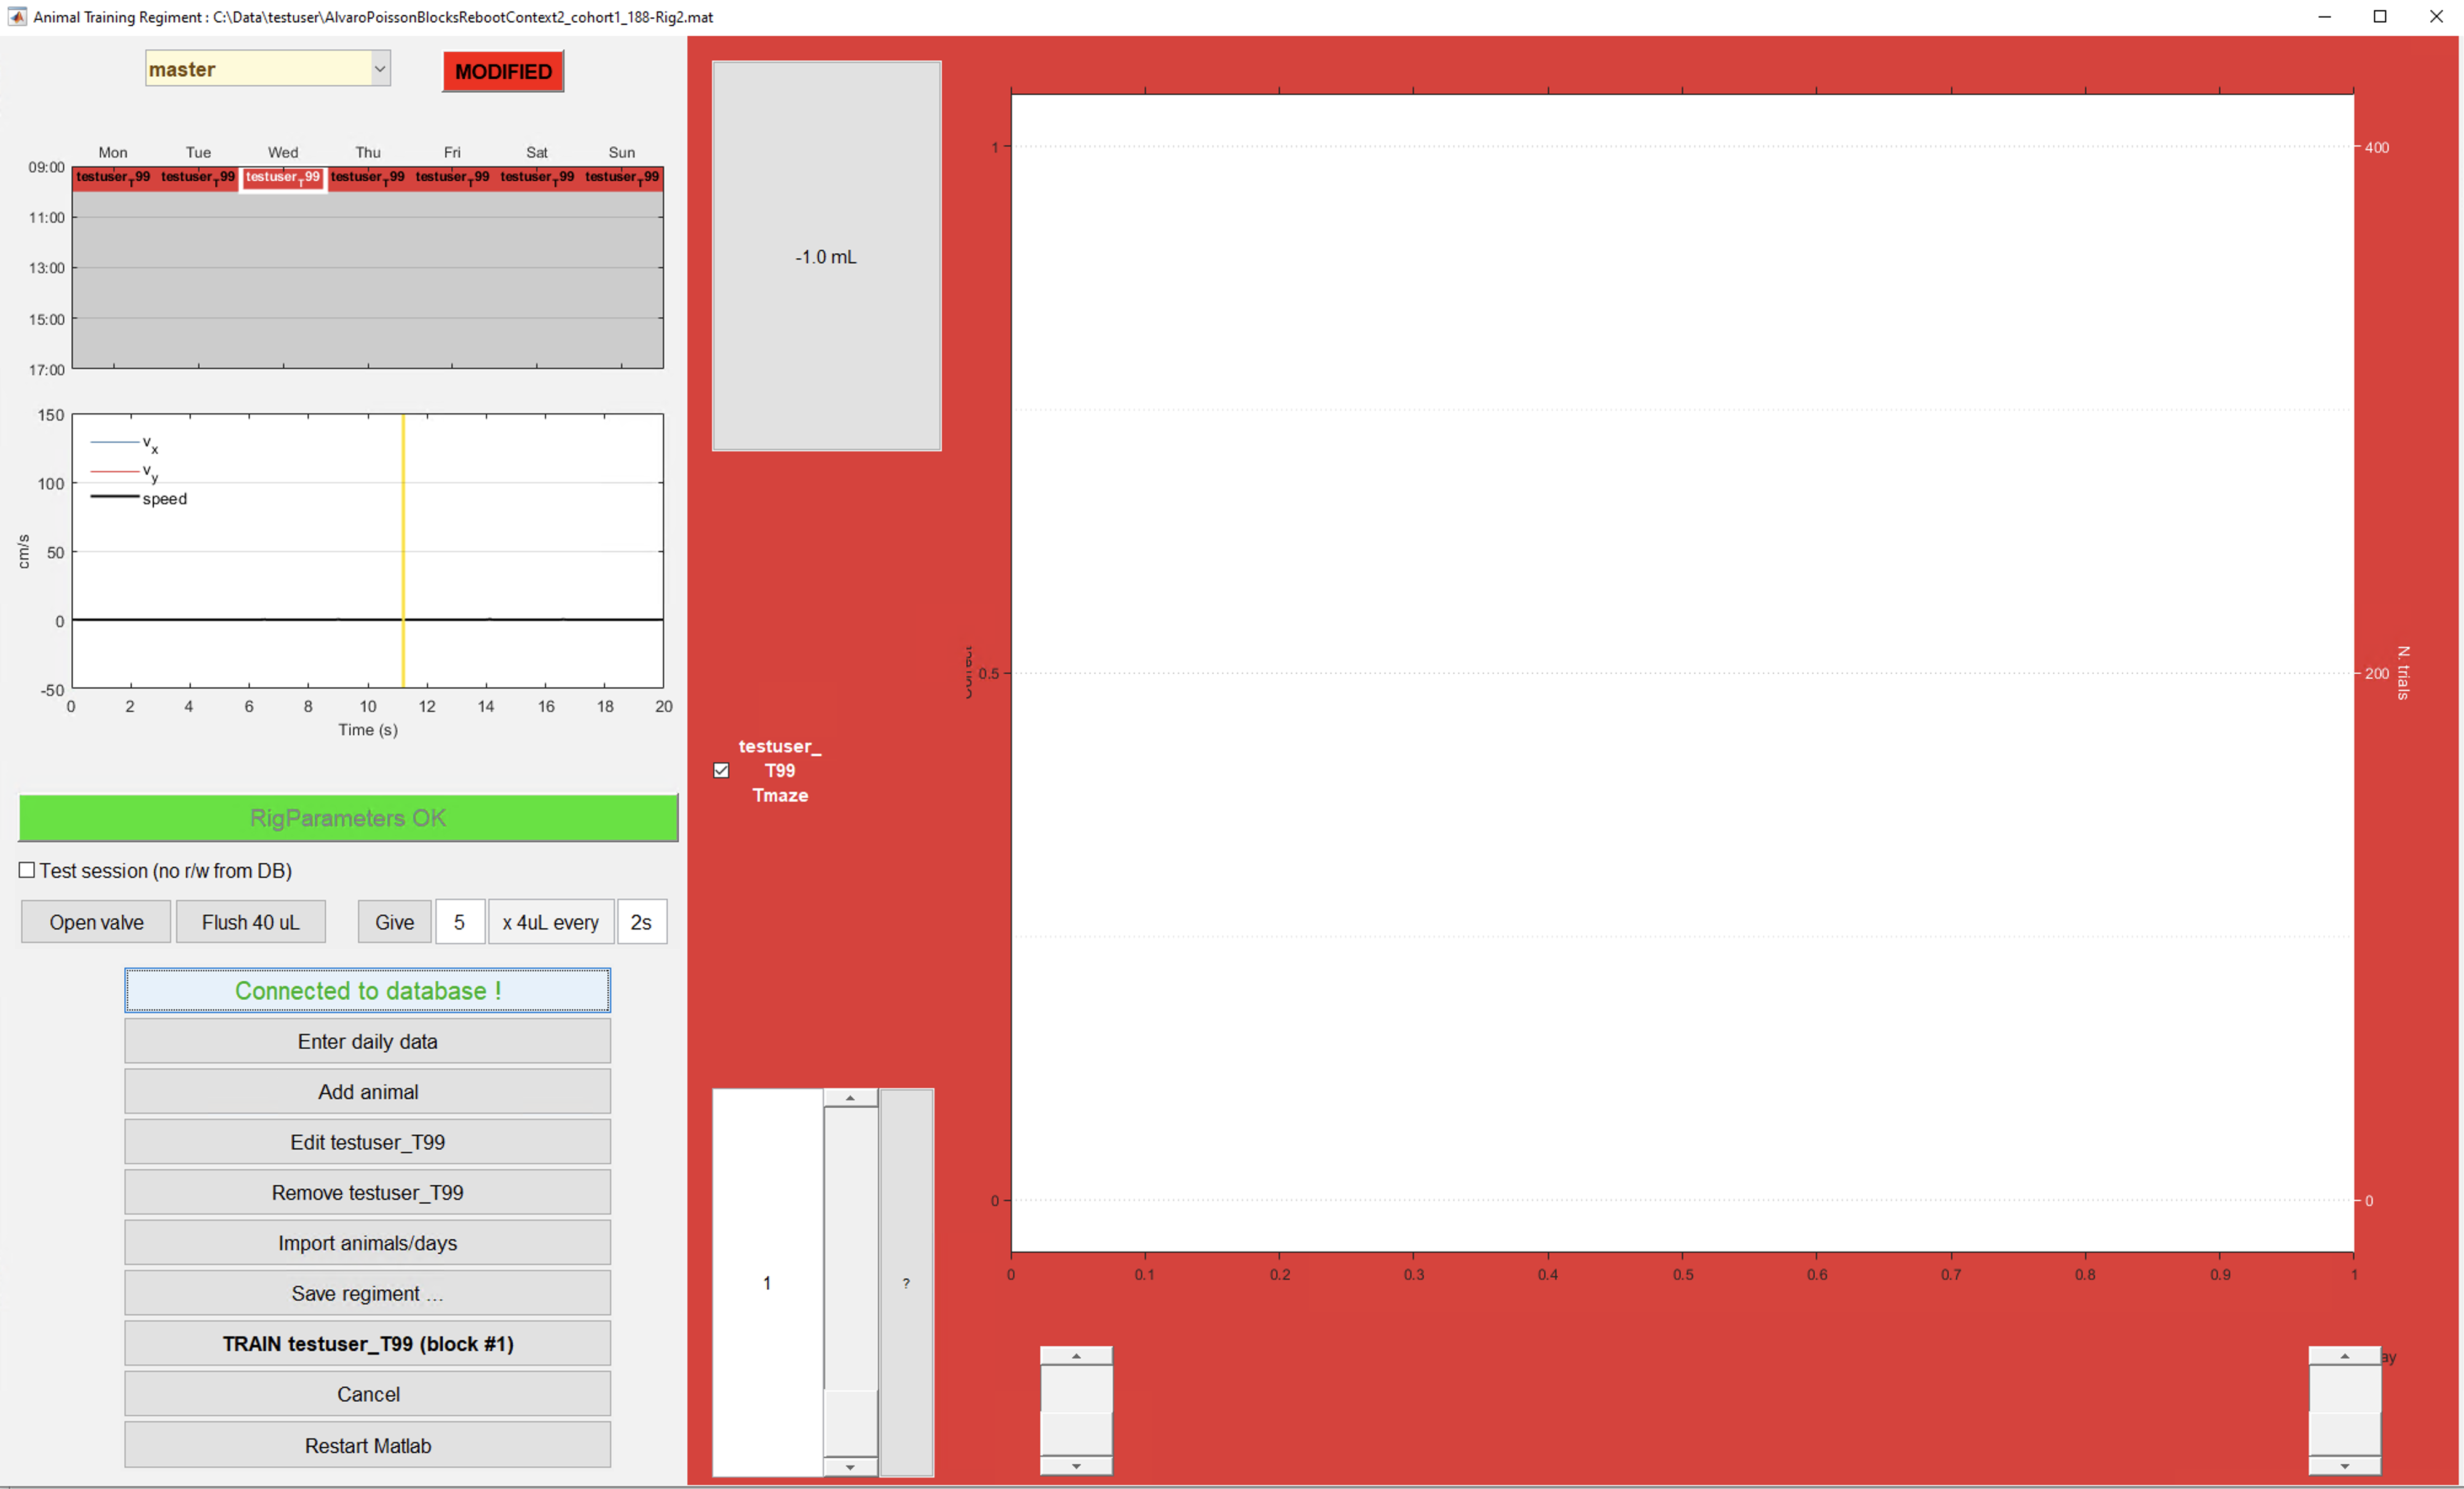
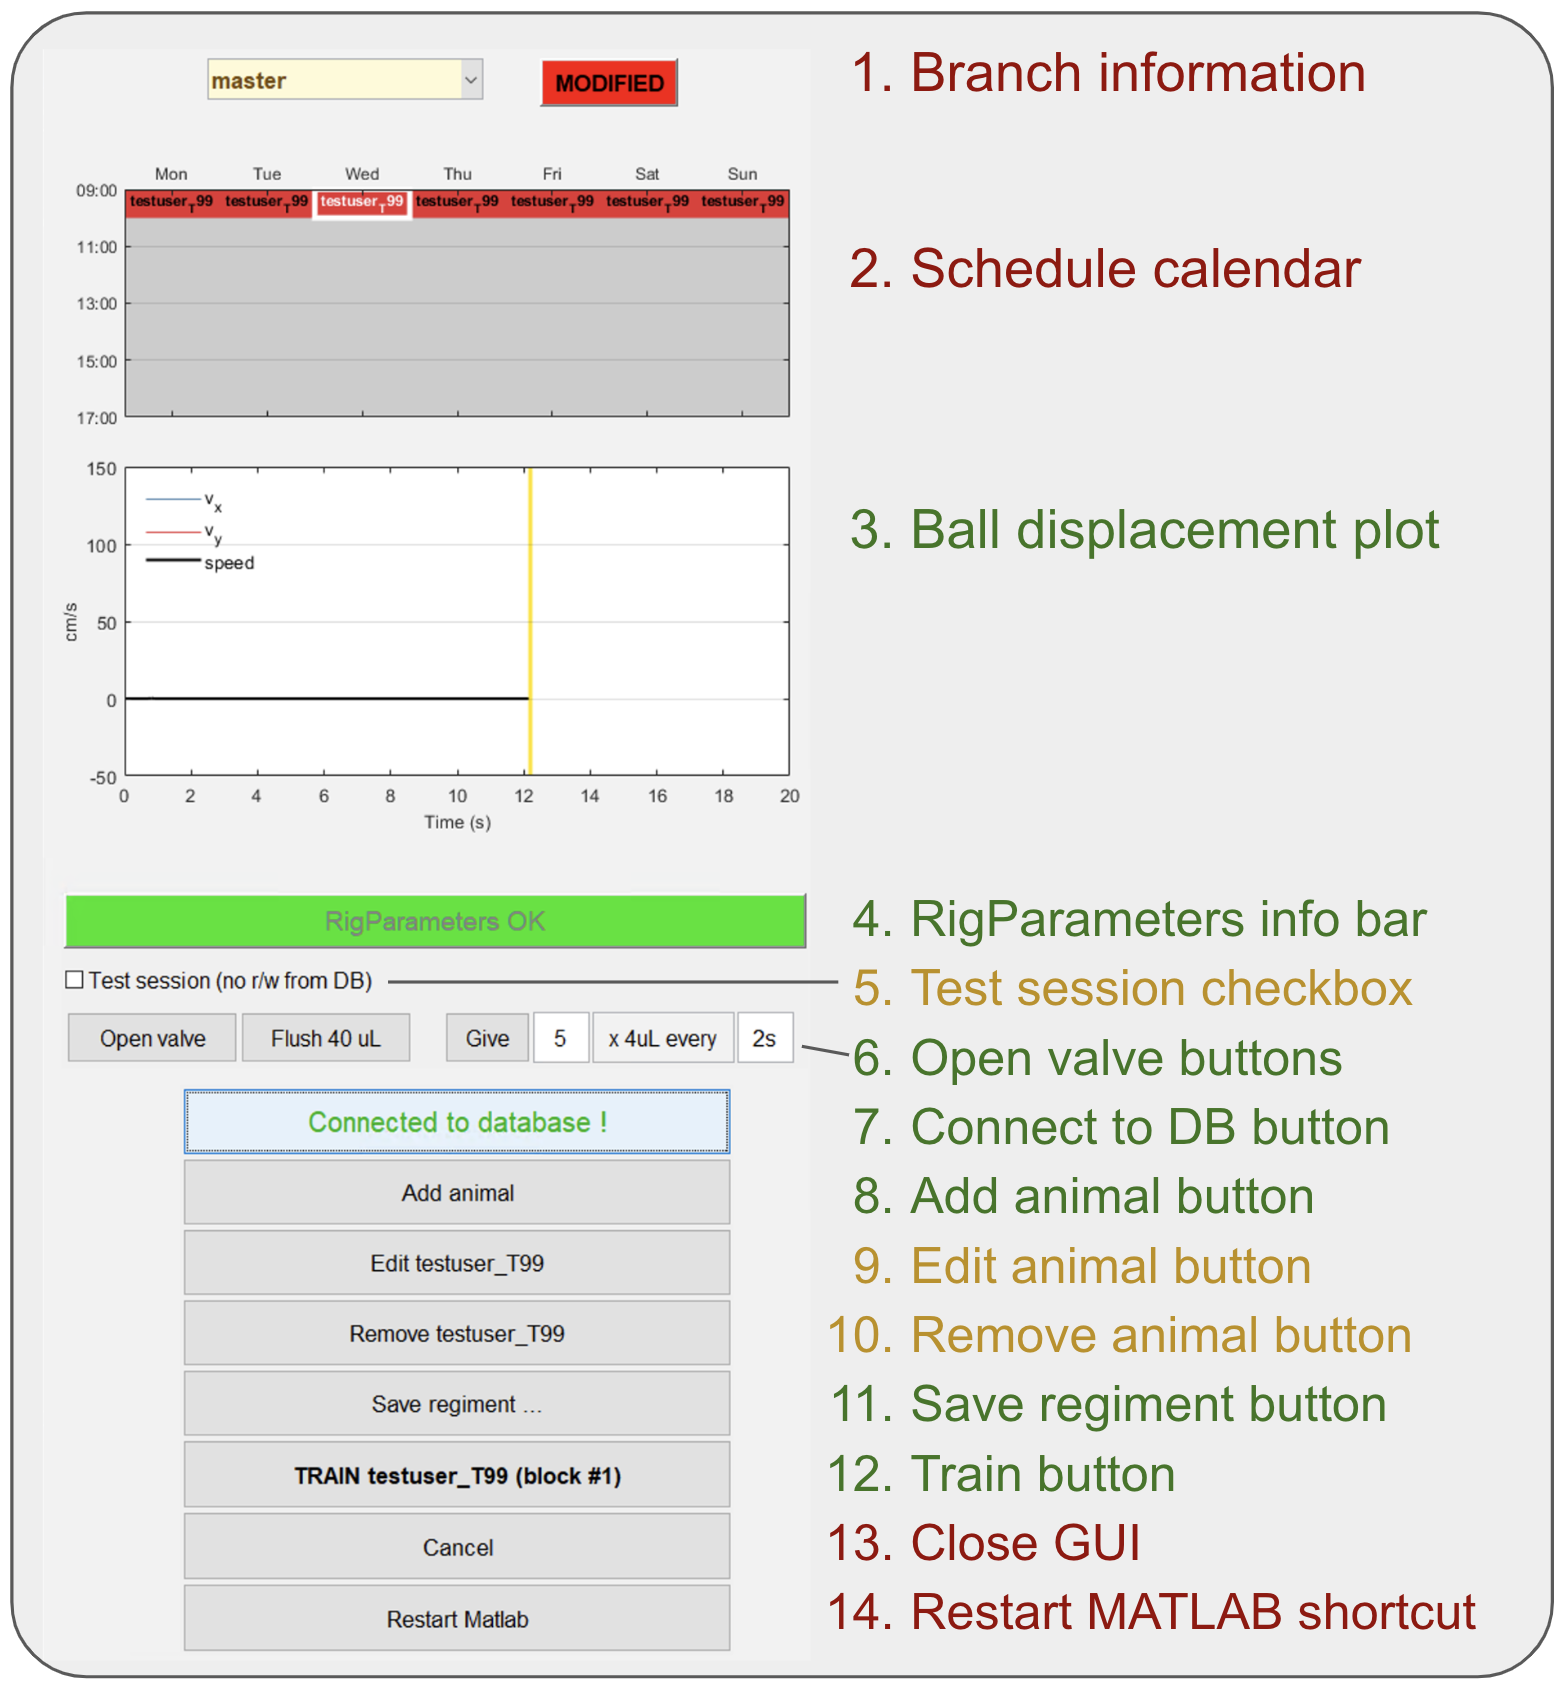
This section describes all the elements of the training GUI.
On the main screen, the elements are grouped into three categories (red = rarely used or not used at all; yellow = used in specific situations; green = widely used).
Branch information section: For git users, shows which branch is currently checked out and whether the current code has uncommitted changes. Most of the time it should read "master" and "synced". If not, see the pulling/pushing code section.
Schedule calendar: Day of the week and time when subjects should be trained. This information is not crucial for training at the moment.
Ball displacement plot: Figure showing real-time X and Y velocity for the subject in the rig. Use this plot to detect ball movement sensor issues.
RigParameters info bar: This bar turns red whenever simulation mode is active or the hasDAQ parameter is set to false. If that is the case, both parameters must be reset for training to start. If simulation mode is intended, ignore this bar.
Test session checkbox: Check this box if the next session's goal is to test code, or if the behavior will not be analyzed. The session will not be stored in our DB.
Open valve buttons: Use these buttons to give a small reward to the subject in the rig and/or to test valve function.
Connect to DB button: Use this button to connect to the DB; it should be the first thing you do when the training GUI opens. See the Set up training section.
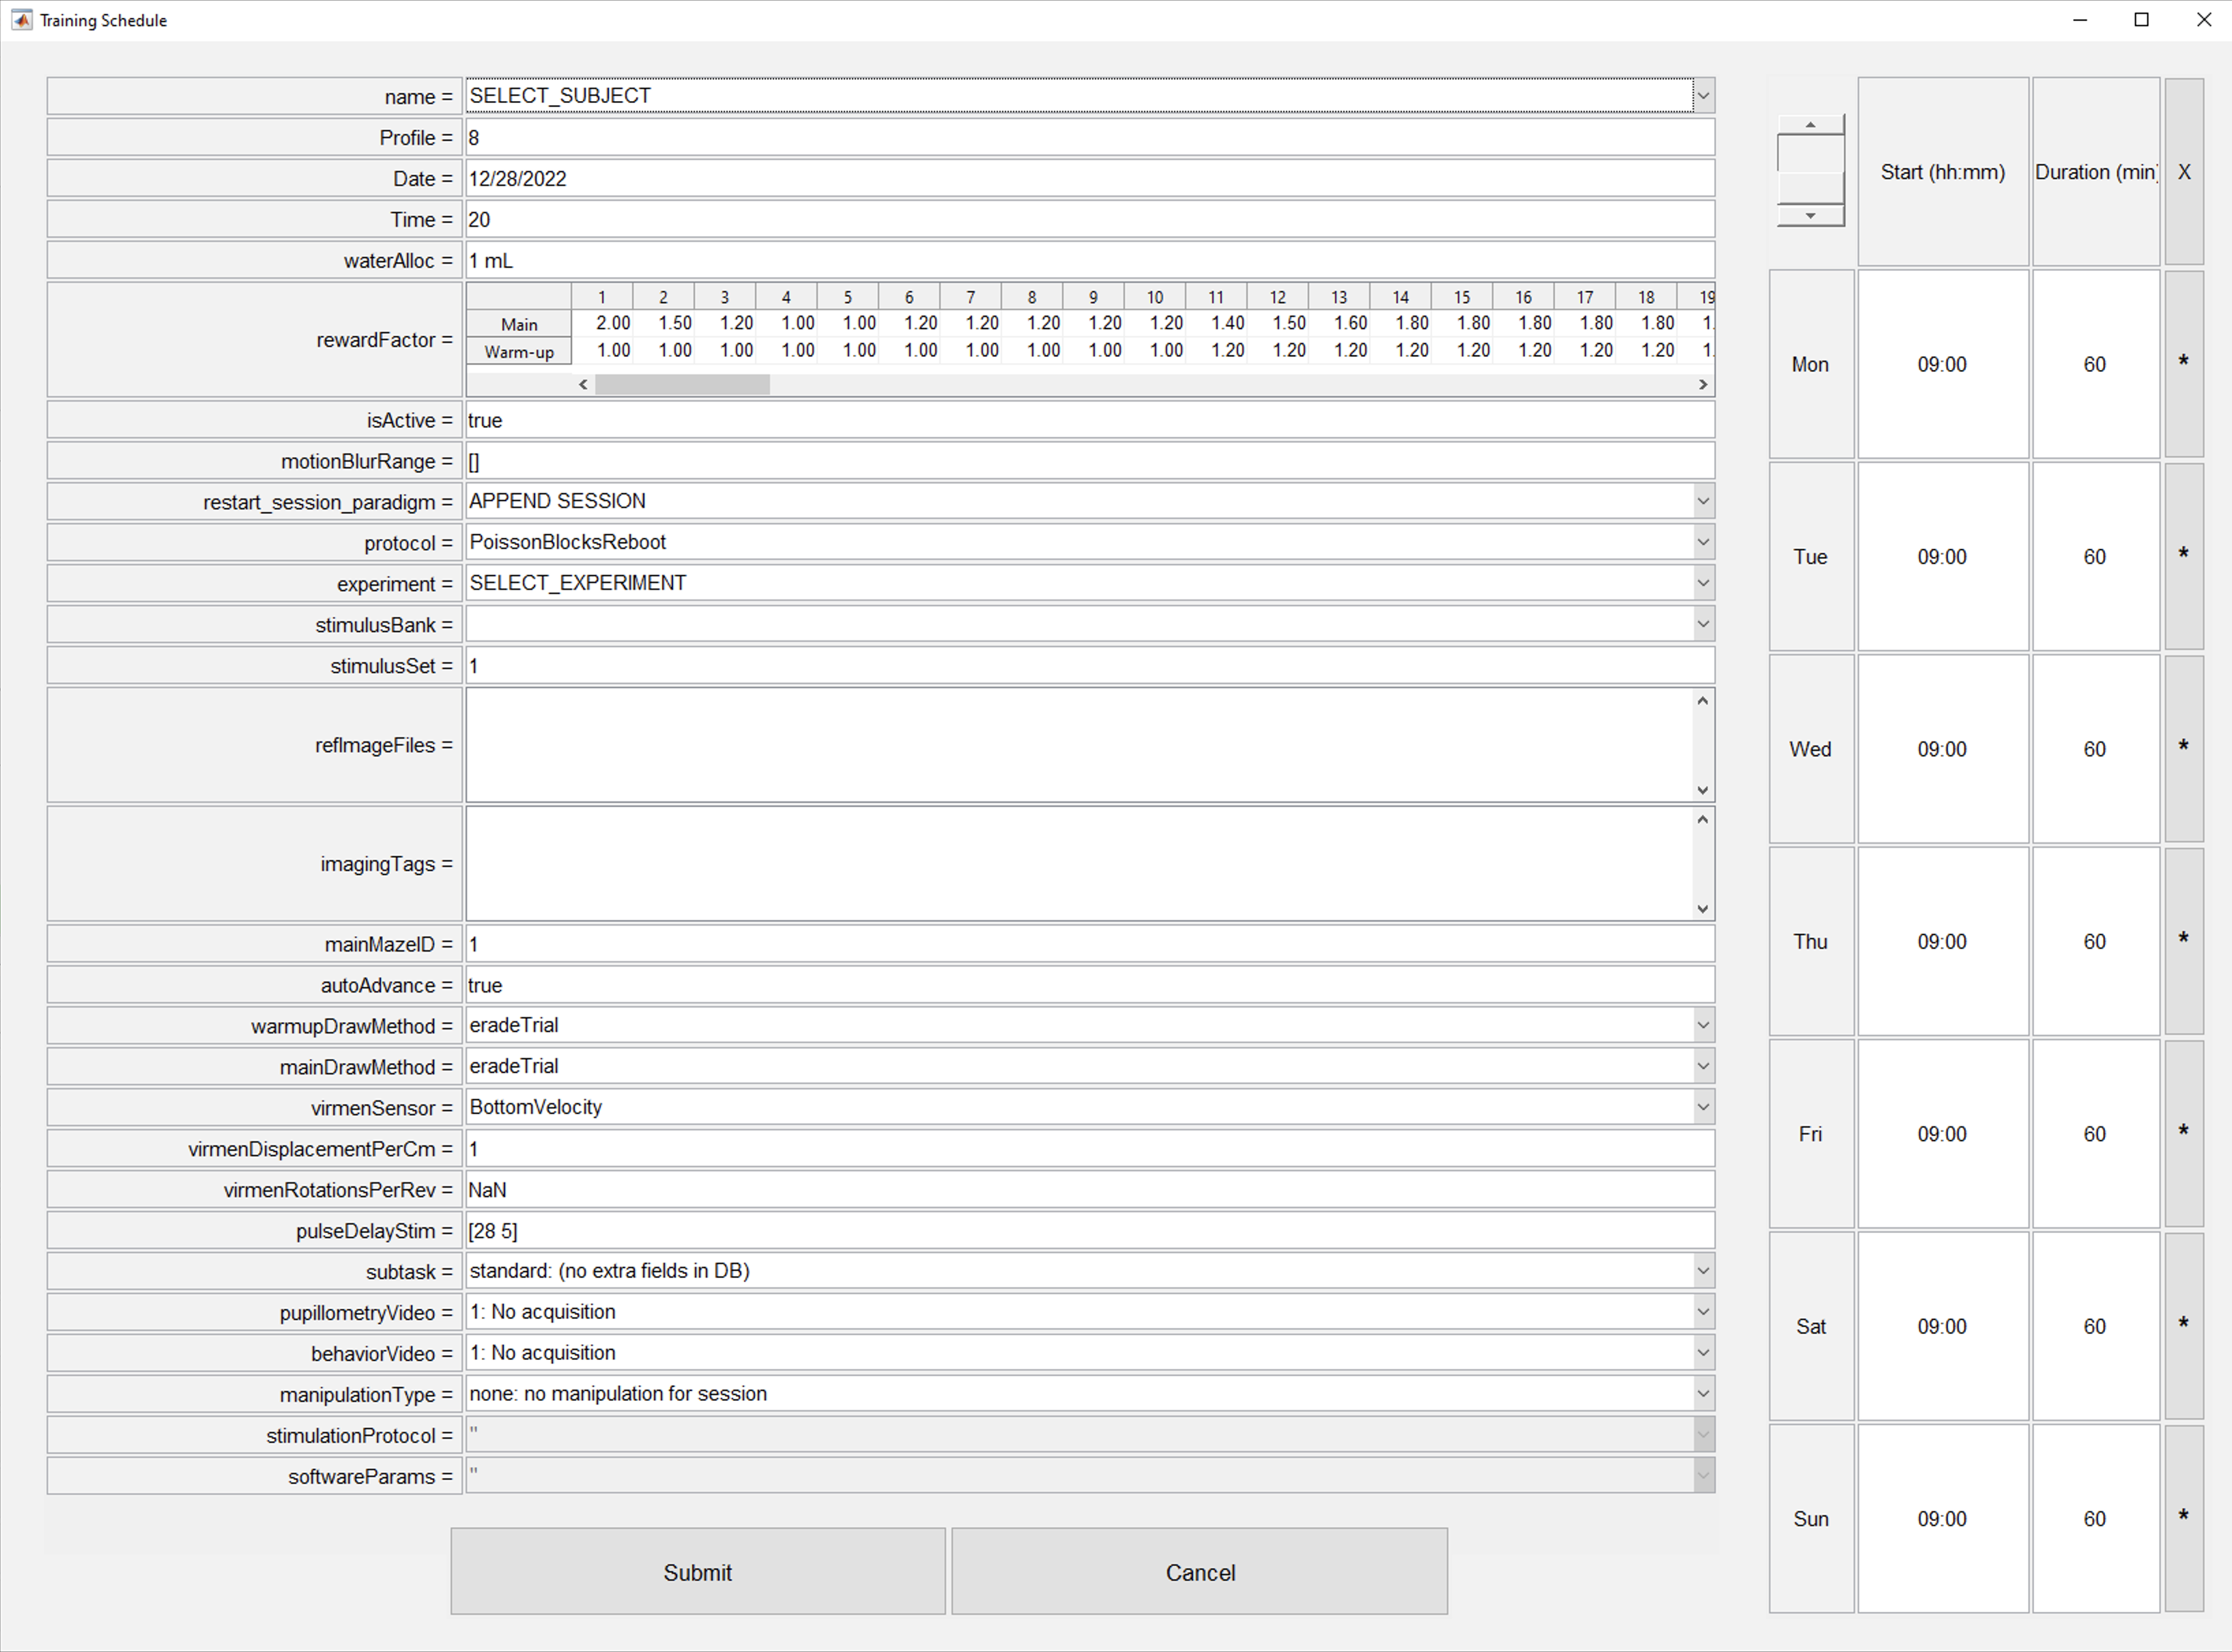
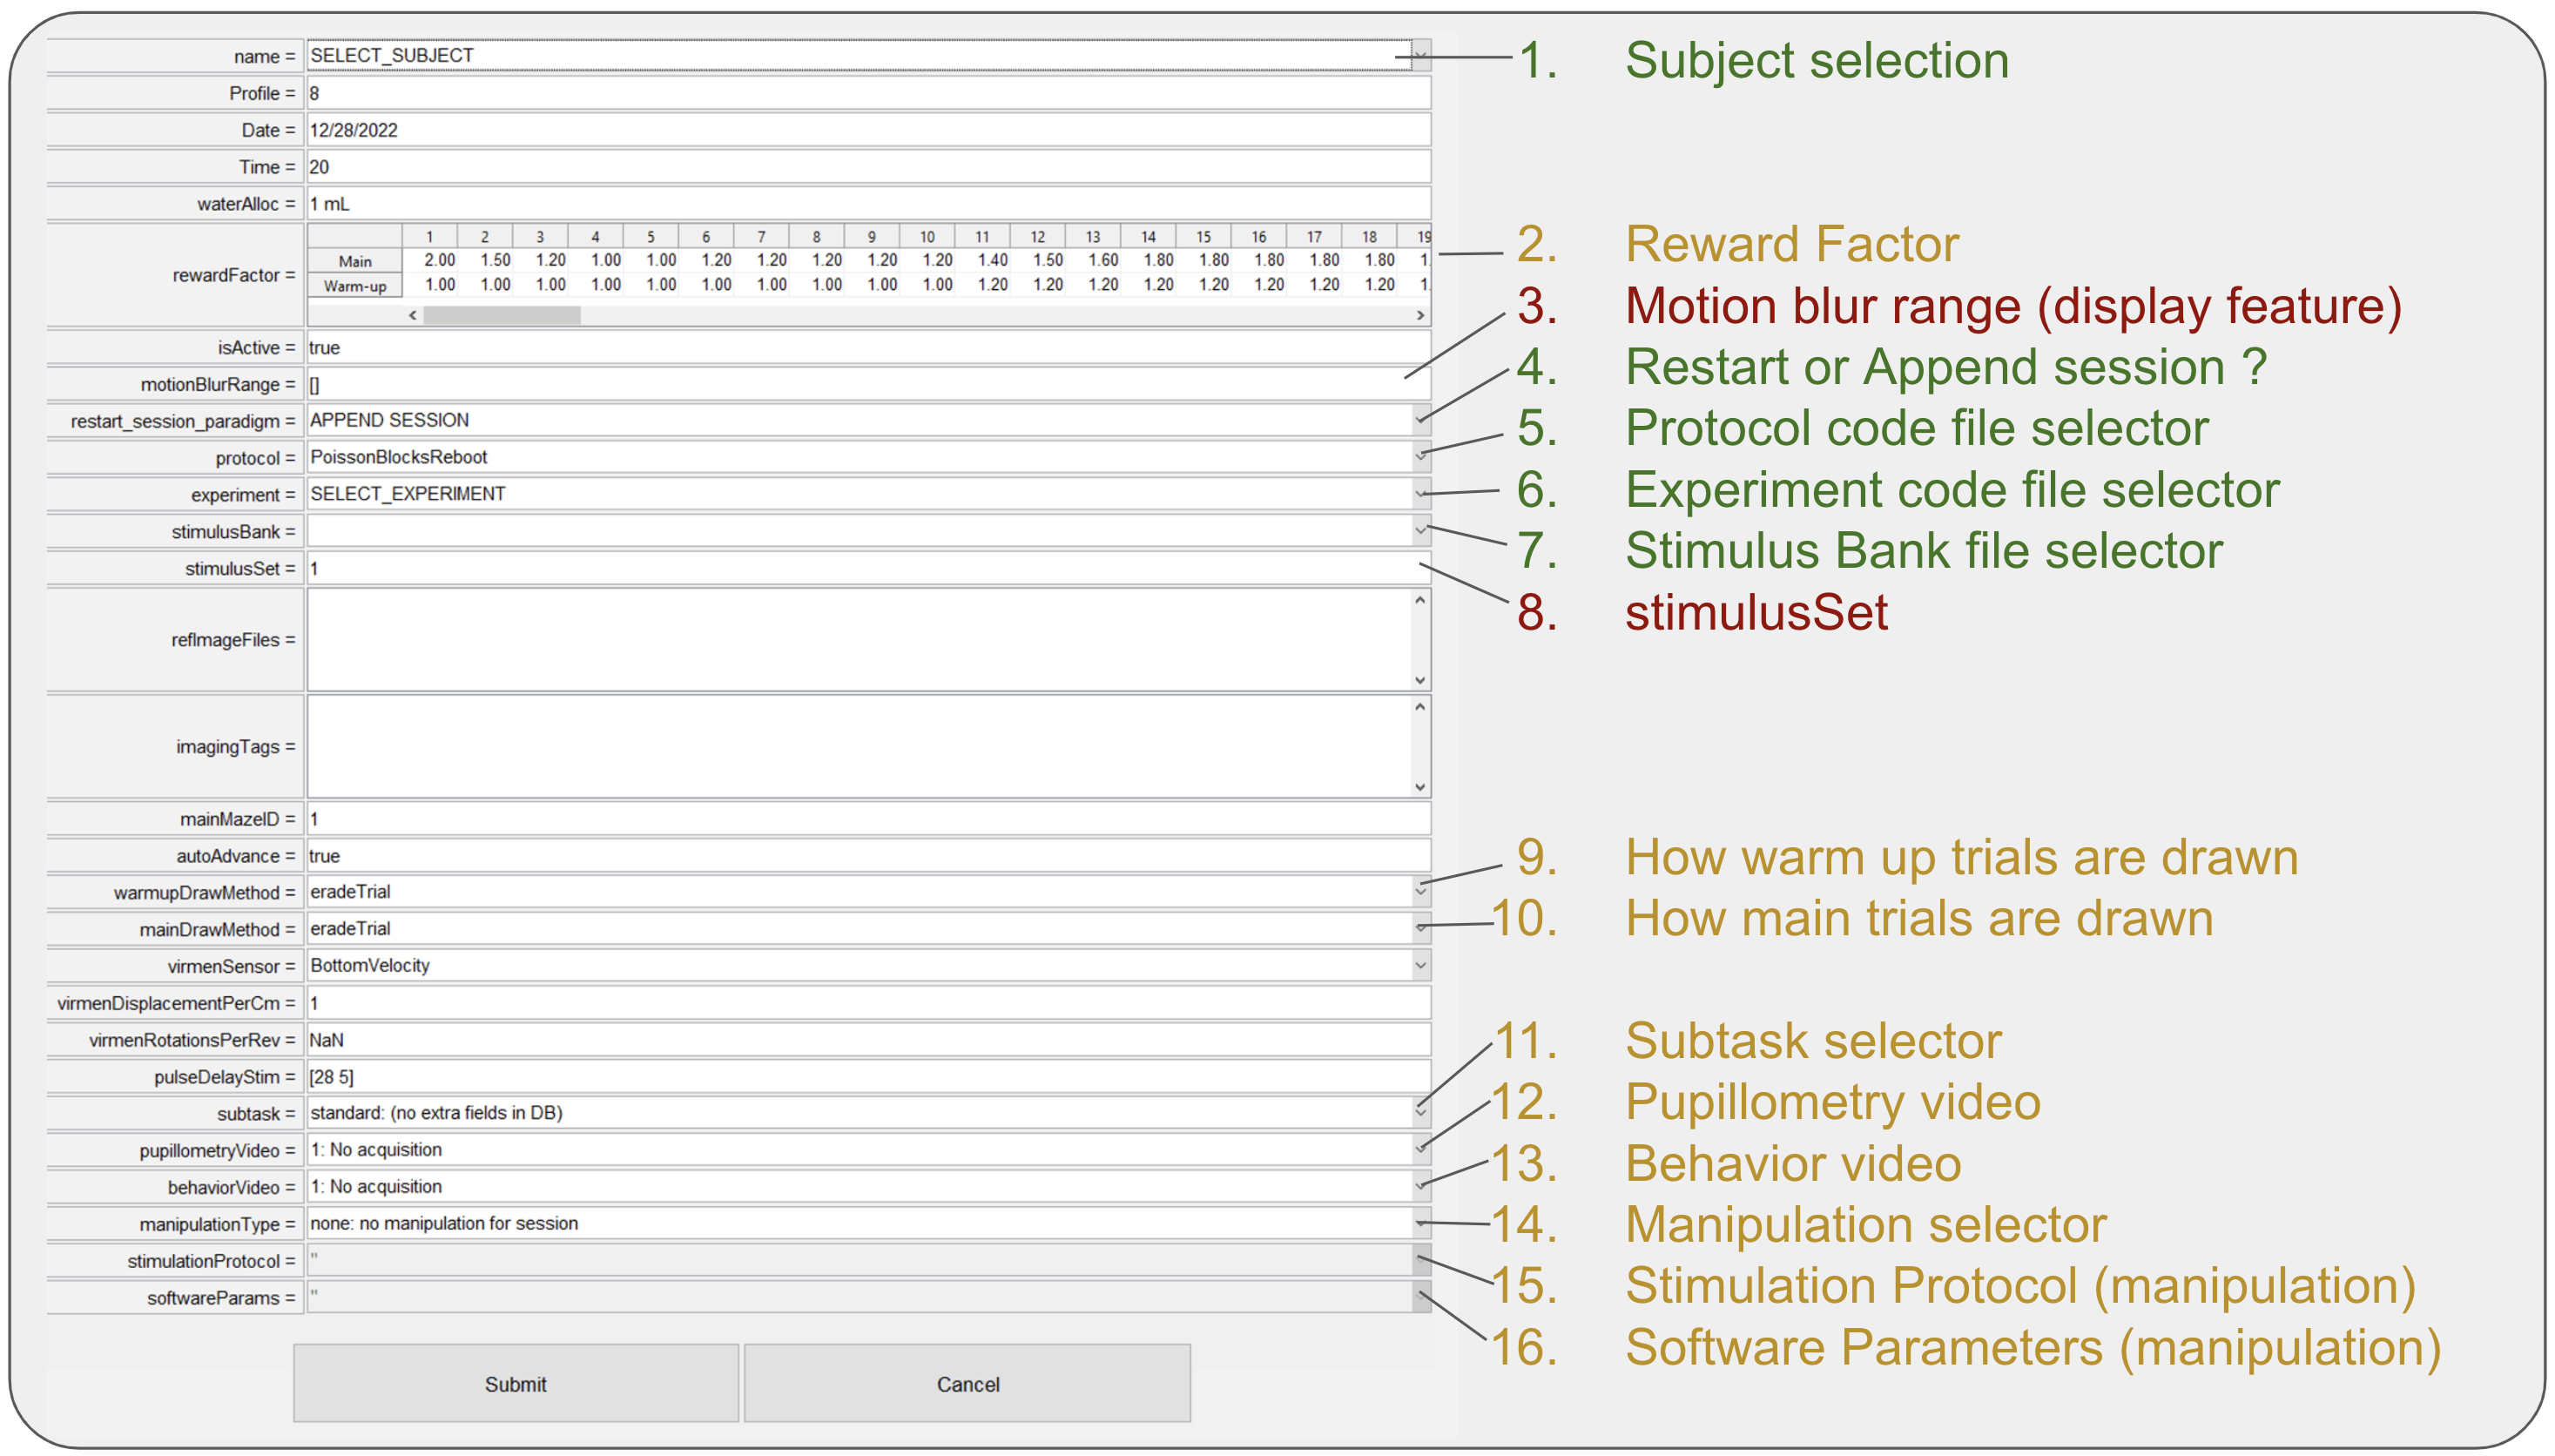
In the Add animal dialog, the elements are grouped into three categories (red = rarely used or not used at all; yellow = used in specific situations; green = widely used). Elements that are not described are not used.
Subject selection: Dropdown list of all subjects in BRAINCoGS available for training.
Reward Factor: Multiplier applied to the reward for each of the warm-up and main mazes. The reward is normally 4 ul for each correct trial on the Towers Task (e.g. if RewardFactor = 1.25 -> Reward = 4*1.25 = 5 ul).
Motion blur range: Parameter that sets up the cue elongation effect opposite to the subject's direction of motion in virtual reality. A 2x1 vector where the first element is the distance (in cm) from the subject to the tower cue at which elongation starts, and the second element is the distance (in cm) at which the elongation effect stops. Leave empty for no motion blur effect. Common values: [28 5], [].
Restart or append session: Action to perform when a session is restarted.
If APPEND SESSION is selected, each time the session is restarted the "new" session is counted as new blocks of the same session.
If START NEW SESSION is selected, each time the session is restarted a new session is created (recommended when physiology recordings are performed, to make the syncing process easier).
Stimulus Set edit: If the stimulus bank has more than one set, you can set it here. Only change this if you understand the stimulus bank file deeply and know what you are doing.
How warm up trials are drawn: Strategy for selecting left or right trials based on previous bias and performance. The default value is eradeTrial, described here.
How main trials are drawn: Strategy for selecting left or right trials based on previous bias and performance. The default value is eradeTrial, described here.
Subtask selector: If the session is from a specific subtask, you can select it here. See the subtask pipeline section for more information.
Pupillometry video: If a pupillometry video will be captured, select the video parameters here.
Behavior video: If a behavior video will be captured, select the video parameters here.
Manipulation selector: If the session is from a specific manipulation, you can select it here. See the manipulation pipeline section for more information.
Stimulation protocol: If the session is from a specific manipulation, select the stimulation protocol in this dropdown. See the manipulation pipeline section for more information.
Software parameters: If the session is from a specific manipulation, select the software parameters in this dropdown. See the manipulation pipeline section for more information.
Find all lines in the experiment code that interact with hardware (every line starting with nidaq.. and the updateDAQSyncSignals function — the hardware code lines).
Add the line if RigParameters.hasDAQ before the hardware code lines and close the if after them.
Open failed: Port: COM7 is not available. Available ports: COM1.Use INSTRFIND to determine if other instrument objects are connected to the requested device.
Serial communications have not been properly initiated.
Device Error: Unanticipated host error
These are the most common errors during training. Check whether the Arduino COM port is found in Device Manager, and restart MATLAB and/or the system to solve this.
[nidaqPulseRightReward:commit] Requested operation could not be performed, because the specified digital lines are either reserved or the device is not present in NI-DAQmx. It is possible that these lines are reserved by another task or the device is being reset. If you are using these lines with another task, wait for the task to complete. If you want to force the other task to relinquish the device, reset the device. If you are resetting the device, wait for the reset to finish. Device: Dev1 Task Name: RightReward Status Code:-200587
Review the RigParameters.m file and check that there is no overlap between the input/output channel variables (rewardChannel, laserChannel, rightPuffChannel, leftPuffChannel, rightRewardChannel, leftRewardChannel, newIterationChannel, newTrialChannel, etc.).