Pupillometry Pipeline Guide
- This guide walks researchers through registering, monitoring and reviewing pupillometry data.
Set up the pupillometry pipeline on a rig computer
- Ask your lab manager for help setting up a camera on the rig.
- If needed, add these parameters to RigParameters.m:
matlab
%% Pupilometry video parameters
video_parent_path               =   'E:/VideoData'
video_ext                       =   '.mj2'
video_acquisition_rate          =   30
video_gain                      =   8
preview = true- The RigParameters.m parameter that controls video acquisition for the next session is video_record. If it is set to true, the pupillometry session will be registered.
matlab
video_record = true- In the experiment file, add the following lines to the
initializationCodeFunfunction (just after thevr = initializeGradedExperiment(vr);line):
matlab
% Start video acquisition
if RigParameters.hasDAQ && isprop(RigParameters, 'video_record') && RigParameters.video_record
    vr = startVideoAcquisition(vr);
end- In the experiment file, add the following lines to the
runtimeCodeFunfunction (just after thecatch err displayException(err);line):
matlab
% Stop video acquisition
if RigParameters.hasDAQ && isprop(RigParameters, 'video_record') && RigParameters.video_record
    vr = stopVideoAcquisition(vr);
end- In the experiment file, add the following lines at the very start of the
terminationCodeFunfunction:
matlab
% Stop video acquisition
if RigParameters.hasDAQ && isprop(RigParameters, 'video_record') && RigParameters.video_record
    vr = stopVideoAcquisition(vr);
end
Pupillometry DB and data organization
Raw data (video files) is stored in:
\\cup.pni.princeton.edu\braininit\Data\Raw\video_pupillometry\(userid)\(subjectfullname)\(session_date)_g(session_number)\(video_file)Processed data (HDF5 files) is stored in:
\\cup.pni.princeton.edu\braininit\Data\Processed\video_pupillometry\(userid)\(subjectfullname)\(session_date)_g(session_number)\(h5_file)Video models are stored in:
\\cup.pni.princeton.edu\braininit\Data\Raw\video_models\(video_model_directory)See DB organization (pupillometry) for a description of each pupillometry table.
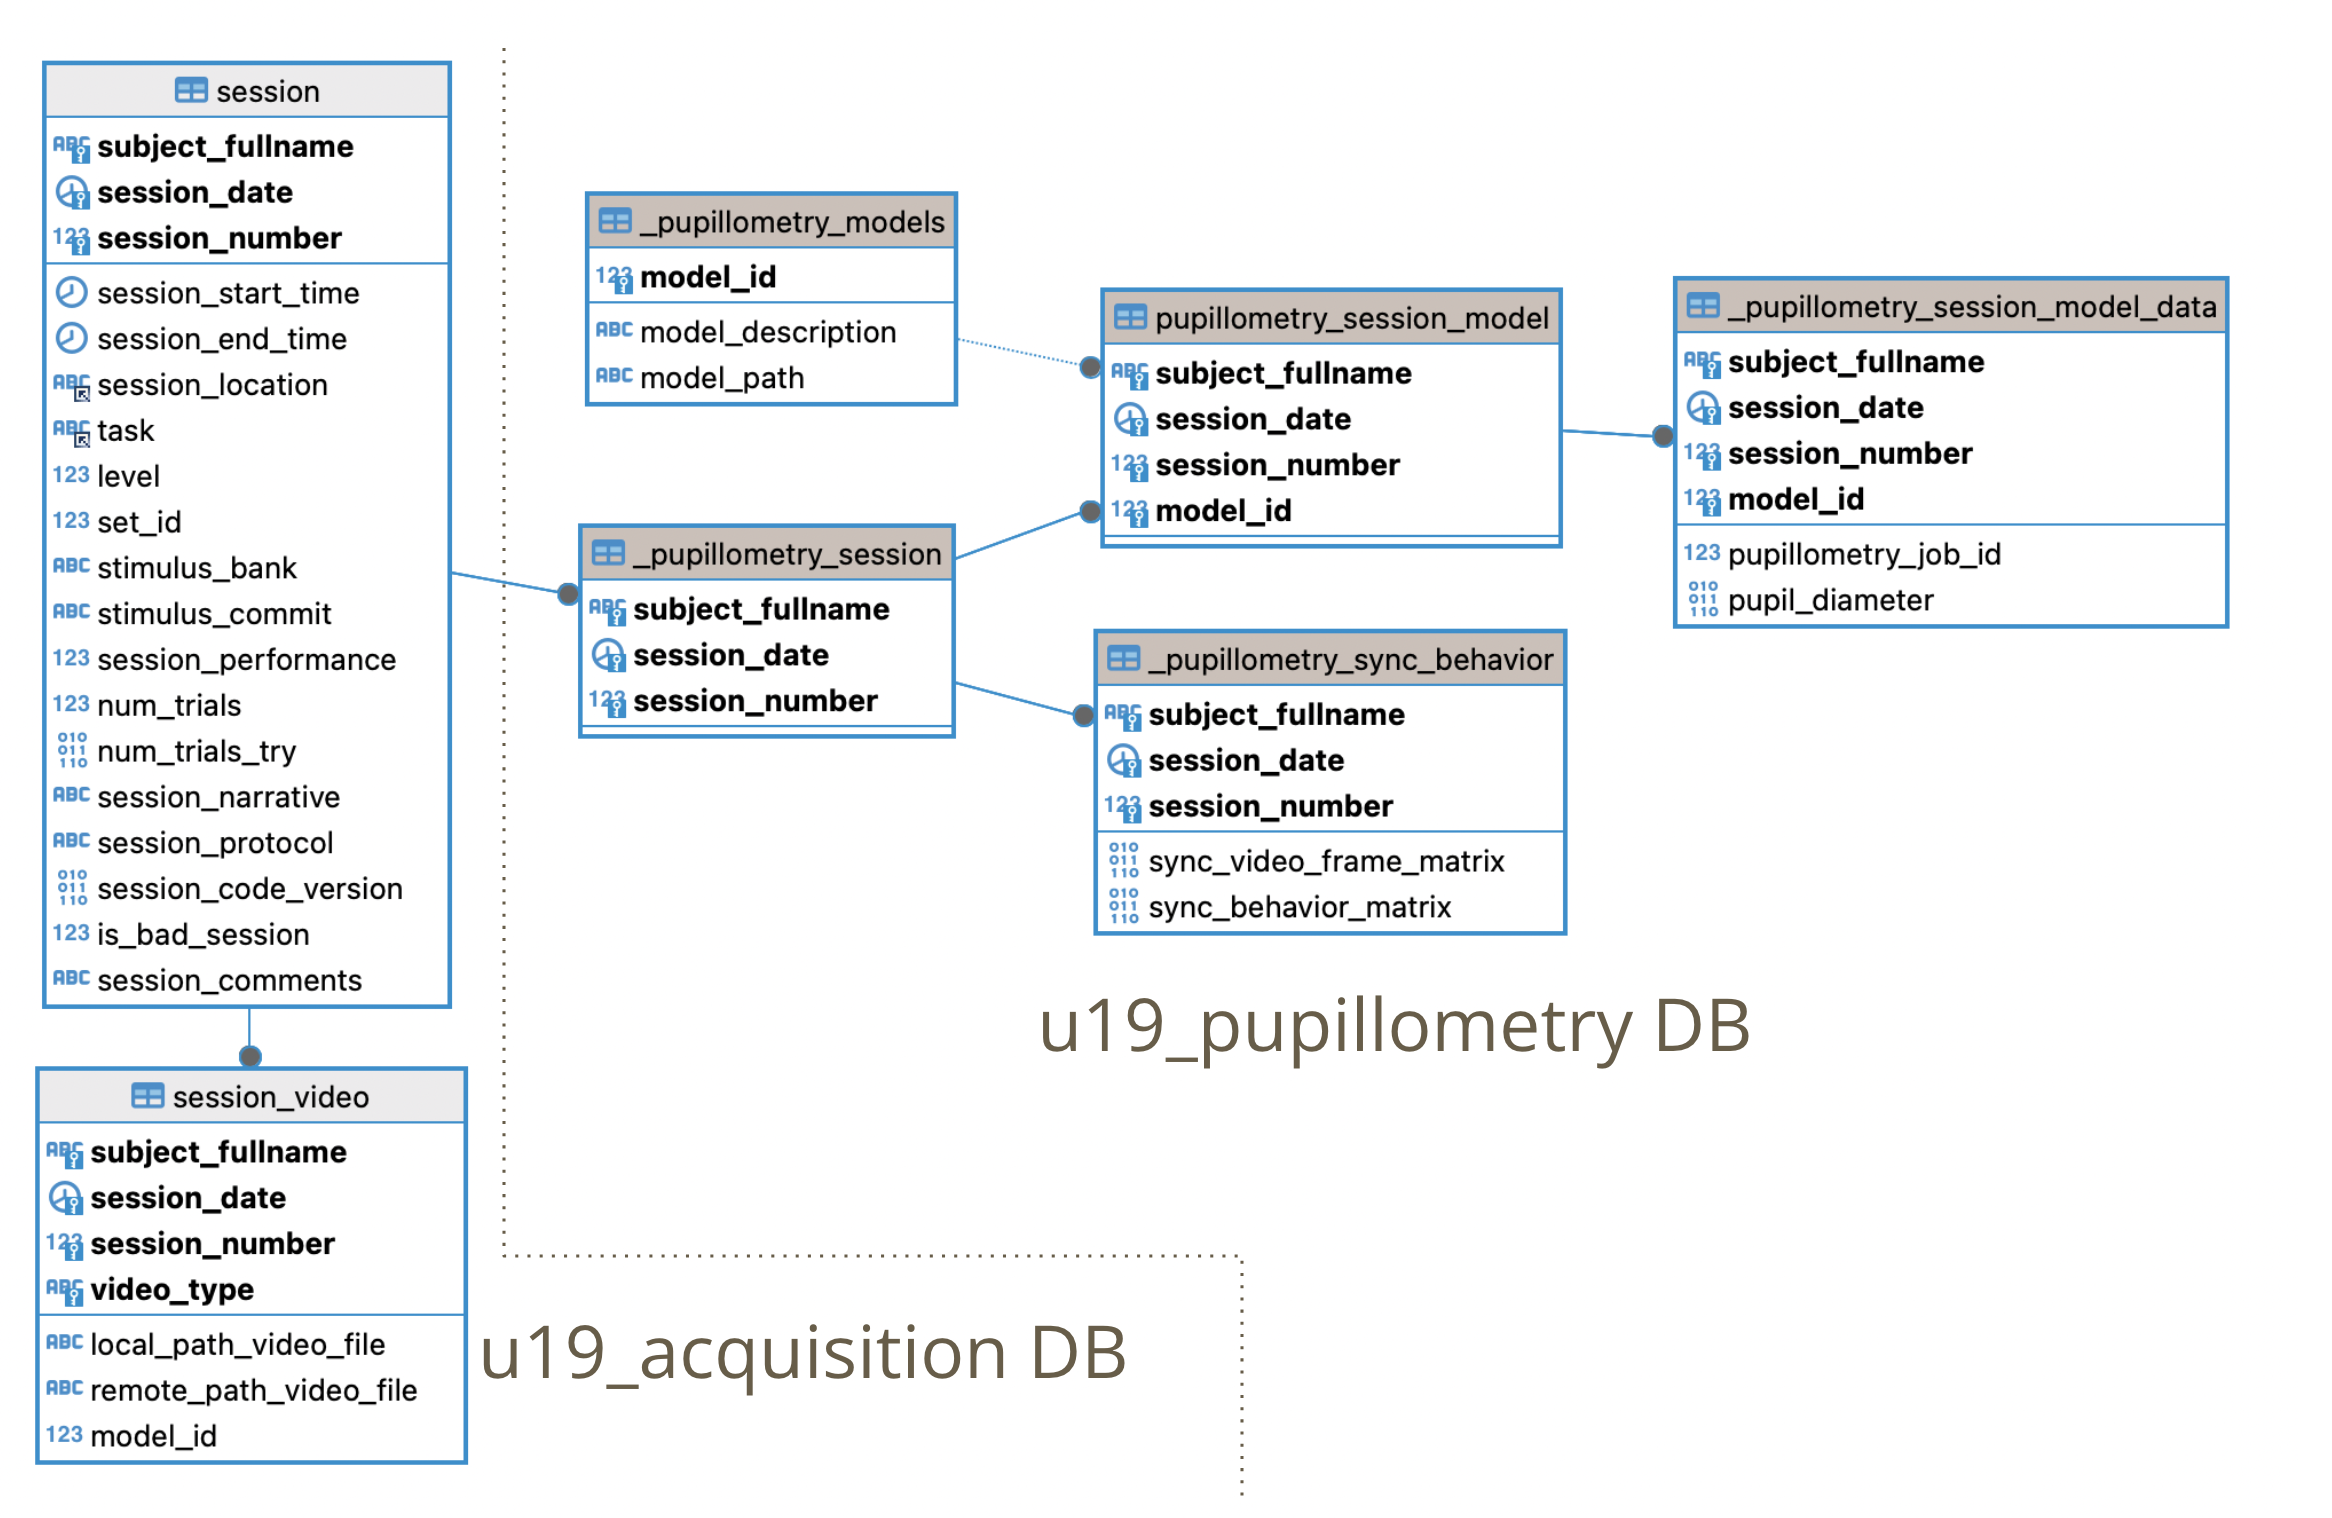
Pupillometry pipeline steps
When
pupillometry_video -> 2. In RigParametersis selected in the training GUI, a newsession_videorecord is registered in the DB when the session is ingested (code here).The
cmd_copy_video_filesscheduled task reads thesession_videorecords and copies the new videos to:\\cup.pni.princeton.edu\braininit\Data\Raw\video_pupillometry\(userid)\(subjectfullname)\(session_date)_g(session_number)\(video_file). (script run by the video backup scheduled task)During the nightly cron job, if the video is found on cup:
- Populate the
pupillometry_sessiontable. - Run the behavior sync code for the video (code here).
- Register the default model to process the video in
pupillometry_session_modelandpupillometry_session_model_data.
- Queue and check the job on
spockvm2:
- Similar to the ephys/imaging automation pipeline, the pupillometry pipeline has a main (simpler) class to process all pupillometry jobs, called
PupillometryProcessingHandler. This class is here. - Execute the pupillometry_queue_jobs script. This script calls the
PupillometryProcessingHandler.check_pupillometry_sessions_queuefunction. It queues a processing job for every session with a registered model. - Execute the pupillometry_check_jobs script. This script calls the
PupillometryProcessingHandler.check_processed_pupillometry_sessionsfunction. When a processing job has finished, it retrieves the final result (pupil_diameter) and stores it in thepupillometry_session_model_datatable.
Monitor pupillometry processing sessions
A few MATLAB functions let you check on pupillometry jobs:
Get processed data from a session:
matlab
key = struct('subject_fullname', 'efonseca_ef317_act116', 'session_date', '2024-02-21')
pupillometry_data = fetch(pupillometry.PupillometrySessionModelData * pupillometry.PupillometrySyncBehavior & key, '*')
pupillometry_data =

  struct with fields:

           subject_fullname: 'efonseca_ef317_act116'
               session_date: '2024-02-21'
             session_number: 0
                   model_id: 2
        pupillometry_job_id: 2984
             pupil_diameter: [108177×1 double]
    sync_video_frame_matrix: [108177×4 single]
sync_behavior_matrix: [150227×5 single]pupil_diameter: Pupil diameter for each video frame.
sync_video_frame_matrix: Time & block/trial/iteration for each video frame.
sync_behavior_matrix: Time & video frame for each block/trial/iteration.
- Restart processing for a failed job: Processing sometimes fails because of external factors (the processing system was down, the model was not selected properly, etc.). As a first attempt to fix it, use the restart function:
matlab
psmd = pupillometry.PupillometrySessionModelData()
key = struct('subject_fullname', 'efonseca_ef317_act116', 'session_date', '2024-02-21')
psmd.restart_pupillometry_failed_job(key)
If processing fails again, contact the software developer and check the #automation_pipeline_errors Slack channel for details about the error.
- Check the status for all sessions:
matlab
psmd = pupillometry.PupillometrySessionModelData()
all_sessions_table = psmd.check_status_pupillometry_jobs()- Check the status for a specific session (or sessions):
matlab
psmd = pupillometry.PupillometrySessionModelData()
key = struct('subject_fullname', 'efonseca_ef317_act116', 'session_date', '2024-02-21')
session_status = psmd.check_status_pupillometry_jobs(key)- Get all successfully processed sessions:
matlab
psmd = pupillometry.PupillometrySessionModelData()
pupillometry_finished_sessions = psmd.get_finished_jobs_pupillometry()
Add a new video model to the pipeline
See the DeepLabCut documentation for a step-by-step guide.
Ask BRAIN CoGS staff who have created video models before for tips and tricks:
- Joshua Julian (jjulian@princeton.edu)
- Juan Lopez (juanlopez@princeton.edu)
After the video model has been created, copy the model's main directory to this location:
\\cup.pni.princeton.edu\braininit\Data\Raw\video_models\(video_model_directory)Add the model to the DB (u19_pupillometry.PupillometryModels table):
- MATLAB code:
matlab
new_model_key = struct()
new_model_key.model_description = 'New model to insert'
new_model_key.model_path = 'video_models/new_model_directory_name'
insert(pupillometry.PupillometryModels,new_model_key)- Always prefix
model_pathwithvideo_models/(i.e.video_models/<model_directory_name>).
- Get the
model_idof the model you want to use for your sessions:
matlab
>> pupillometry.PupillometryModels

ans =
Object pupillometry.PupillometryModels
 :: Table to store reference for each model ::
    MODEL_ID      model_description                        model_path
    ________    _____________________    ______________________________________________

       1        {'Pupillometry_2022'}    {'video_models/Pupillometry2-Ryan-2022-04-07'}
       2        {'Pupillometry_2023'}    {'video_models/twolickspouts-esme-2023-06-22'}
fetch(pupillometry.PupillometryModels,'*')

- Insert the sessions to be processed with the new model into
u19_pupillometry.PupillometrySessionModel:
matlab
key = struct('subject_fullname', 'efonseca_ef317_act116', 'session_date', '2024-02-21')
key.model_id = 2
insert(pupillometry.PupillometrySessionModel, key, 'IGNORE');- The sessions will be processed with the new model overnight.
Note
All pupillometry sessions are processed with a default model (model_id = 2, Pupillometry_2023). In the future, we plan to add a way to select the model per subject and/or rig instead of always using the default model.